The Ghost Blogging Platform was a Kickstarter project initiated by John O'Nolan (former lead of WordPress UI team) in April, 2013. In October, the platform was released under MIT license to GitHub. The main reason for building the new platform was to offer a cleaner and easier way to create online content for bloggers and online publishers.
There are hosting providers that offer out-of-the-box installations of the Ghost Blog Platform. These providers handle everything from database creation to server adjustment, and all you have to do is concentrate on writing content. Installing your own blog platform can be harder but it gives you more flexibility and maybe more satisfaction as well.
Installation
I am using Ubuntu 14.04 LTS for installing the platform. Since Ghost was written using node.js, there's a trick to completing the installation on Ubuntu because you need to install the nodejs-legacy package. The package name on Ubuntu was changed to avoid naming conflicts with the node (Amateur Packet Radio Node Program) package. Note that the term 'legacy' in this case does not mean that this is an old code or old package.
The platform needs npm, the Node Package Manager to be installed and sqlite3 or MySQL for storing the blog data. I'm going with the default setup, using sqlite3 as a database.
Here are the commands you need to run for the installation to complete:
sudo apt-get install nodejs-legacy
sudo apt-get install npm
sudo apt-get install sqlite3
Download the zipped release of Ghost, from GitHub, Ghost's release page.
# unzip the Ghost release to a new folder,
# where you want to run the blog from

unzip Ghost-0.5.8.zip -d ~/ghost_blog

# navigate to the installation folder
cd ~/ghost_blog
npm install --production
The npm will install a lot of node.js packages into the local folder. This can take some time, so just wait till it finishes. In case there are errors during the package installation, npm will let you know where the installation log file is, and you can figure out the cause of the error from there. In most of the cases, there are additional deb packages missing.
Blog Setup
The blog can be started after the installation is done. Run the command below in the installation folder:
# after the installation of npm modules
# start the platform using
npm start

#the console should display something like this:
> ghost@0.5.8 start /home/greg/Development/_freelancer/ghost/ghost_blog
> node index

    Migrations: Up to date at version 003
    Ghost is running in development...
    Listening on 127.0.0.1:2368
    Url configured as: http://localhost:2368
    Ctrl+C to shut down
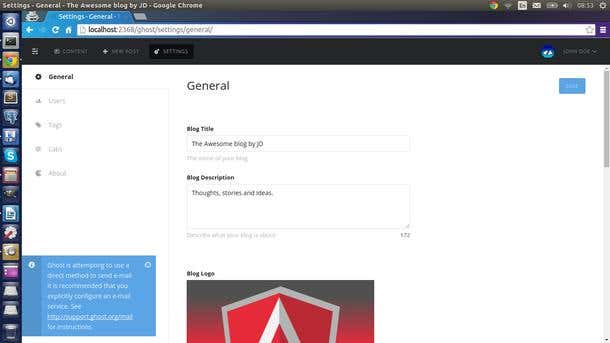
You can navigate to http://localhost:2368/ghost to setup the blog details, such as the blog title, user email address, password, and background image. After your first login, you arrive at the Settings page:

After I set the Blog Description, Logo and Image, the front-page looks like:

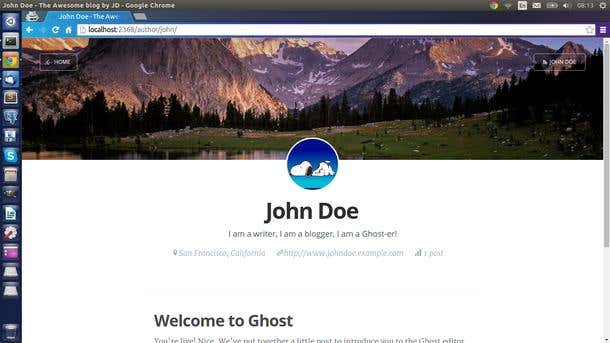
The User Profile page can be nicely customized and has a really pleasant look:

User Roles
The platform has four user roles defined:
1. Owner - The owner is the absolute super user. The account that you create when you setup the blog for the first time is designated as the Owner account by default. On a blog, there can be only one owner, and other users can be added to the system using this account.
2. Administrator - is like the owner, but its role can be changed or downgraded, and it can also be deleted. Administrators are created by the Owner. Administrators can add users with Editor or Author role.
3. Editor - has access to all the content on the blog, it can invite only Authors to the blog but no other Editors or Administrators.
4. Author - has access to the content and that’s it, they cannot invite other users, cannot change any setting on the blog.
Markdown
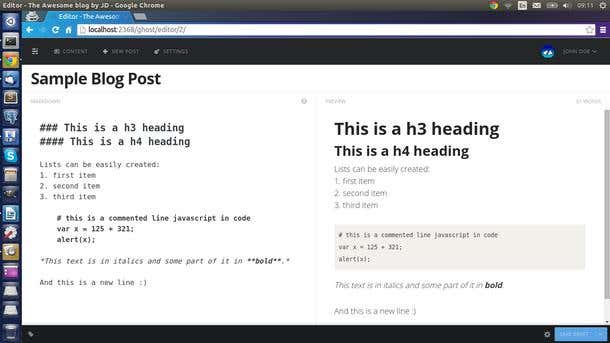
Ghost uses Markdown for content creation and editing. It can take some time to get used to it, but nowadays there are many online publishers who accept content in Markdown format, so investing a little time to learn how to use it will prove useful in the long run. The platform has a very good editor that gives you a view of the output in real time.

You can find additional information about the platform on http://www.ghostforbeginners.com/ and http://www.allaboutghost.com/. The platform supports theme customization. Visit http://www.allghostthemes.com/ to see all the free (and paid) themes that can be downloaded and installed through the Settings page.