Just like anything else that you do in your life, drawing is a skill. You can become better at it with practice.
Whether it's to create a beautiful landscape scene, or to draw your own rose tattoo learning how to draw a rose is a basic drawing technique. So, in order to get you started, we've put together a guide on how to easily draw and color a rose design in 7 steps, courtesy of Veridekonge.
SEE ALSO: Pair your stunning rose design with a beautiful butterfly drawing
Let's get into the tutorial...
Outline The Stem

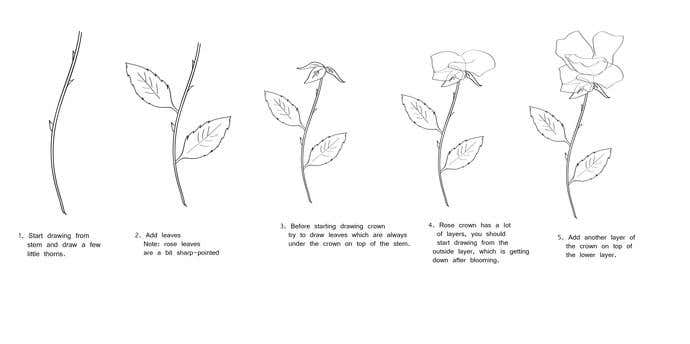
When you start this project you want to begin with the stem. Think of it as starting where all plants begin, and this is at the base. The first step begins with you drawing lines for the stem and the thorns. Not every flower has thorns, but roses definitely do. Once you draw your parallel lines for the stem you can add on leaves. Generally, you want to draw two leaves, one on each side of the stem. They will be facing up toward the top of the paper, and will have sharp pointed tips. You also want to draw some details toward the inside of the leave to mimic the veins. These little bits of details are what is really going to draw your picture together at the very end. Lastly, you want to draw tiny leaves at the very top of your stem. When you look at a rose, the bud sits on a few leaves of greenery. At the top of the stem, draw three leaves, one facing you, one to the back and one to the front. You can add in some more details in these three leaves to show the veins as well.
Drawing Your Rose

Once you have all of the greenery done you are going to start on petals of the rose. First start with the crown, which is made up of many layers. You want to draw the flat base petals first, and this will be directly on top of your leaves. This is the outside layer of the flower that you see after it blooms. Once you have solid petals on the bottom you add another layer of petals on top of it. This is known as the crown layer because the shape is the same as a crown sitting on top of your head. Next you will add the third layer which is smaller than the crown, and it will fit inside. Once you draw this smaller bud on the inside of the crown you will have to draw a spiral on the top. Initially you are going to make a drop shape, and then you draw the spiral on the inside. Once that is finished, you add a tall petal to the very back of the bud. This final petal gives the rose a lot of definition and depth.
Coloring The Rose

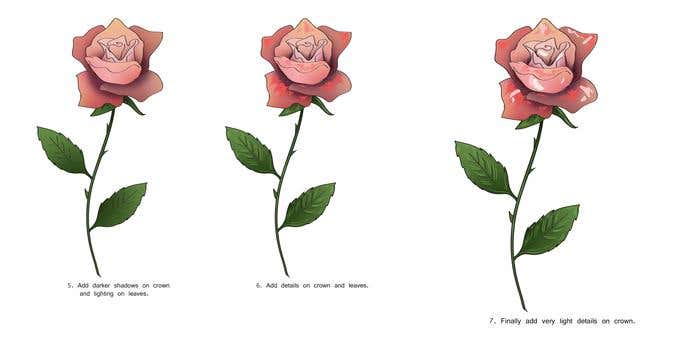
When you start with the stem, leaves, and thorns you want to make them all the same color. If you wanted to, you could make the bottom of the stem darker than the Then you will move onto decorating the petals of the rose. Start with all of the outside petals and color them a darker color than you will color the inside of the rose. Make sure that whatever color you pick you choose shades that are all within the same family. So, start with the dark color on the outer petals, and then move to a lighter color for the inner petals. The darker shades that you use on the outside will mimic shadows that would occur naturally on the flower. After you have picked all of your colors, and filled in the large portions, it is time for you to add in details. You will make little etching strokes on the inside of the stem, leaves, and the flower petals. You want to highlight the areas of the rose that the light would hit naturally. These tiny etch makers will give your flower definition and make it appear more realistic. Finally, you want to add highlights to your rose. Imagine that you are holding a spotlight aimed to this rose, add white to any area that you feel the spotlight would shine. Once you add these highlights to the rose this is the final step of your coloring process. You can also erase a little bit of your coloring if you do not want to add white to your piece as a highlight.

Remember, the more effort that you put into your drawing the better it will look. When you add extra details, like the etch marks, you need to make sure to take your time and place each details where it looks the bet. When you are finished everyone will enjoy your design, and you will be proud of the drawing that you have created. If you want additional sources, to help you with your details, you can always look for extra pictures. Some people like to look at real life pictures of roses, but others are interested in seeing other illustrations. You need to pick whichever tools give you the best representation of a rose. You can use these images to mimic the light and shading on your picture to make them more accurate.
Drawing can be a difficult process, but it really only requires a bit of patience. You can work on your skills every day and before you know it you will be a top rate illustrator. As long as you follow tips and tricks of professionals you can accomplish anything. Just look back to our tips here, and use them anytime that you choose to draw a rose. The things that bring your drawing to life are the details that you add to them, so make sure to take your time. Once you really get involved in what you are doing, it will overtake you and before you know it you will be looking at a beautiful rose. With just a few simple steps you can draw a professional looking rose that is sure to exceed any purpose that you could have for it.
Need A Helping Hand With The Details?
Getting the details right in your drawing can be hard. We get it. That's why, we have the best freelance graphic designers on deck, ready to help you create amazing illustrations. You're just a couple of clicks away. Simply post a project, and you'll start receiving bids within seconds.