Widget areas are special places on a classic theme that can accept blocks — typically areas like your sidebar or footer. This guide will explain how to use widgets on your website.
In this guide
The information in this guide applies to classic themes. Sites using modern block themes do not use widgets, so you won’t find Appearance → Widgets in your dashboard.
Instead, you can edit all of your website in one place at Appearance → Editor, including the footer and sidebar. Refer to our Site Editor guide to learn how to edit all aspects of your website.
The most common widget areas are the footer and sidebar, but you may see others depending on the theme you are using.
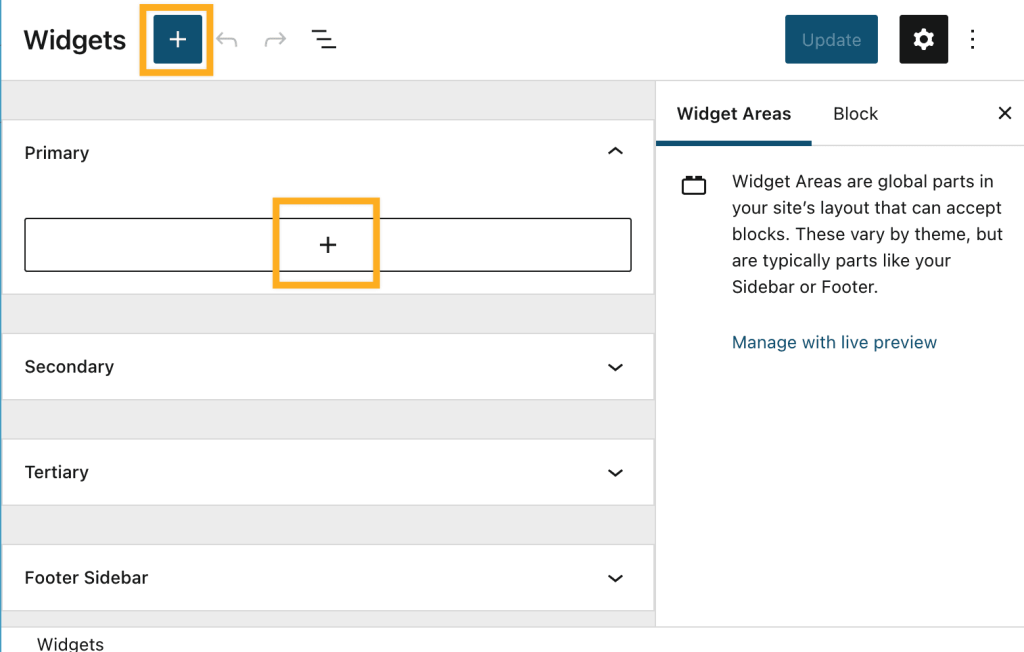
To add a widget to your site:
- Visit your dashboard.
- Navigate to Appearance → Widgets.

If you choose to go to Customize → Widgets, please note that the controls may look different from the guide below.

- Click either of the + block inserter buttons to add a widget.
- Use the search box at the top to find a block, or scroll down to browse all the blocks by category.
- Click any block to add it to your widget area.
- Click the “Update” button when you’re ready to save your changes to the site.
After adding a block, click on it once, and a toolbar will appear with several options specific to that block:

For even more options, click the … (three dots) to choose from additional options:
- Copy: Copy the block to paste it somewhere else later.
- Duplicate: Make a duplicate of the block appear immediately below the one you’re working on.
- Insert before: Insert a new block immediately before the block you’re working on.
- Insert after: Insert a new block immediately after the block you’re working on.
- Group: Add the block to a Group block.
- Lock: Protect the block from being edited.
- Rename: Assign a new name for your block (does not display publicly.)
- Move to: Move the block to a different part of the widget area.
- Edit as HTML: Edit the HTML code behind the block.
- Delete block: Remove the block from your widget area.
After clicking on a block, there may be additional options specific to the block in the Block Settings sidebar menu.
If you do not have the sidebar on the right, click the Settings icon in the top-right corner to bring up the settings. This icon looks like a square with two uneven columns:

If you added a widget to one area but later decide to move it to a different area, follow these steps:
- Click on the block to select it.
- In the toolbar that appears, click the Move to widget area icon (it looks like a squiggly arrow.)
- Select the widget area to move the block to.

You can set widgets to appear only on certain pages or to be hidden on certain pages.
You can access the Visibility settings for legacy widgets by clicking the Visibility button at the bottom of the widget.
To access the Visibility settings for blocks used as widgets:
- Click on the block to select it.
- Scroll to the bottom of the Block Settings sidebar. If you do not see the Block Settings sidebar menu click the Settings cog icon
 at the top of the screen.
- If you’re using Customize → Widgets to edit your widgets, click on the … (three dots) on the right side of the block toolbar and select Show more settings.
- Expand the Advanced tab and click Add new rule under “Visibility,” as shown below.

Visibility is controlled by six aspects:
- page type
- category
- tag
- date
- author
- taxonomy
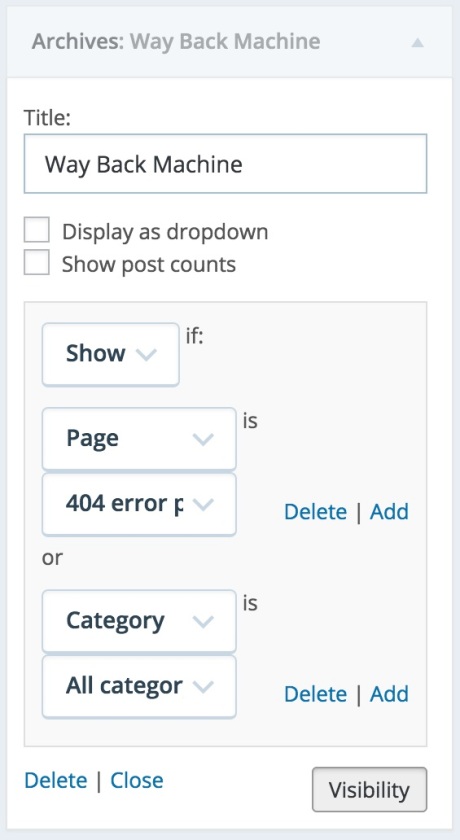
For example, if you want a widget to only appear on category archives and error pages, choose Show from the first dropdown and then add the rules “Page is 404 Error Page” and “Category is All Category Pages,” as shown here:
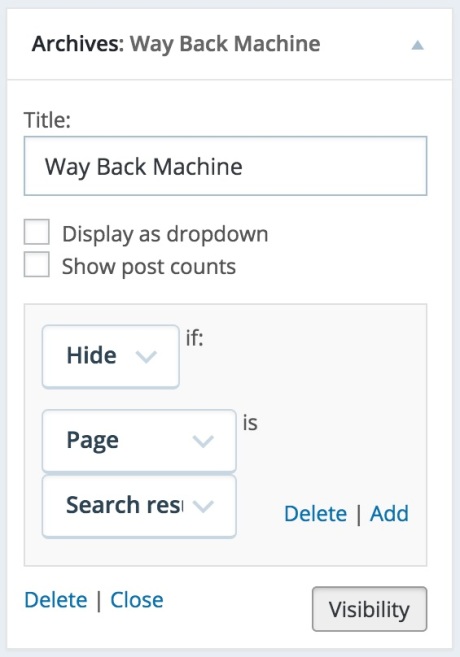
You can also hide widgets based on the current page. For example, if you don’t want a widget to appear on search results pages, choose Hide and add the rule “Page is Search Results” like this:
If you have multiple visibility rules, you can choose whether visibility rules are handled separately or simultaneously by toggling “Match all rules” in block widgets or “Match all conditions” in legacy widgets.
For example, you can display a widget only on posts that are categorized as “Summer” and also tagged with “Picnic” by setting the visibility conditions to match the rules for the category and the tag. If “Match all rules” (or conditions) is on, all rules must be passed (“AND”) to hide or display the widget, while if it’s off, any rule matching (“OR”) will fulfill the conditions.


