Set up and use Live Multicam in Final Cut Pro for iPad
With Live Multicam in Final Cut Pro for iPad, you can wirelessly connect up to four camera angles and record multicam video right from your iPad. Live Multicam works with the Final Cut Camera app, which lets iPhone and iPad serve as remote pro video cameras in a Live Multicam recording. You also have the option to use the iPad running Final Cut Pro as one of the four camera angles.

All your devices must have Wi-Fi and Bluetooth® turned on and be signed in with an Apple ID. During setup, you need to allow access to Wi-Fi and Bluetooth so that your devices are discoverable. You also need to grant access to the camera and microphone on each device you plan to use as a camera angle. To change these permissions later, go to Settings ![]() > Privacy & Security. See Control access to hardware features and Control access to information in apps in the iPhone User Guide.
> Privacy & Security. See Control access to hardware features and Control access to information in apps in the iPhone User Guide.
How Live Multicam works
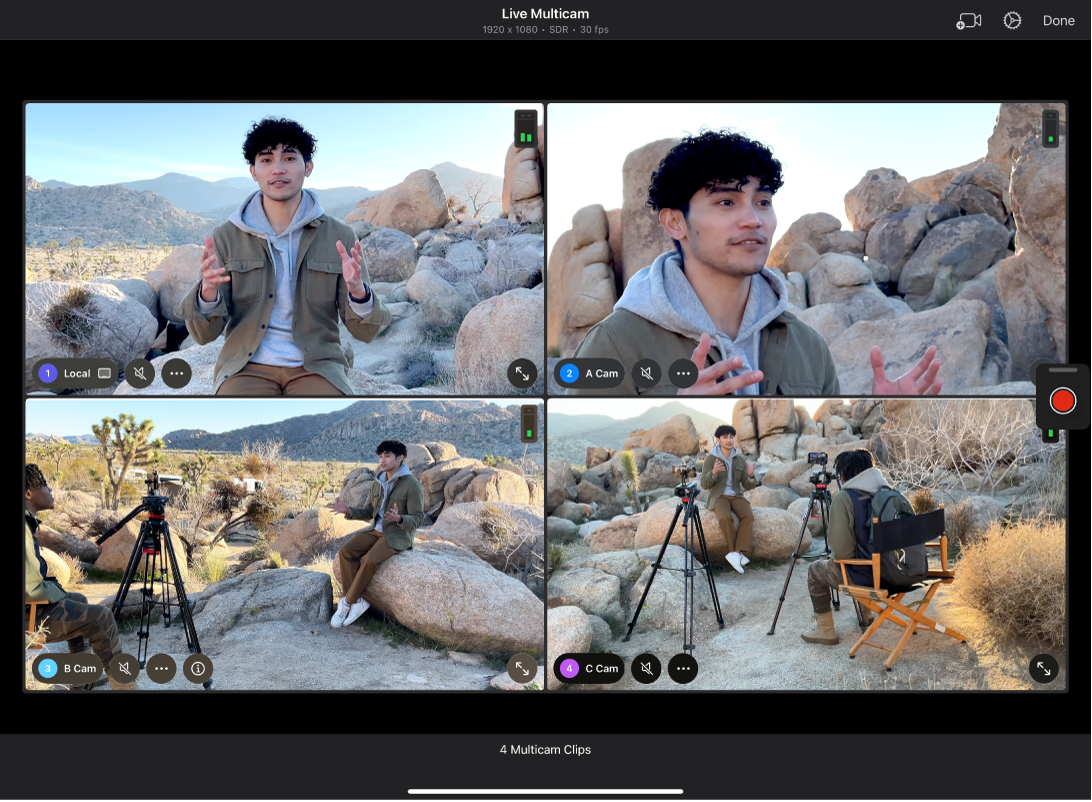
Live Multicam uses a streaming and transfer process that occurs over a wireless point-to-point connection similar to AirDrop. Preview files are streamed from Final Cut Camera on each device during recording, so you can monitor the video from each angle in Final Cut Pro and control camera settings for each angle remotely. You can start and stop recording from any connected device.
Multicam clips from your recording are synced together and appear in the Final Cut Pro browser automatically, so you can begin editing immediately with preview files. After you stop recording, the original video files are transferred to Final Cut Pro in the background, seamlessly replacing the preview files.
Before you begin
To get ready to record a Live Multicam session, do the following:
Make sure all your devices have Wi-Fi turned on and are signed in with an Apple ID. (If devices aren’t signed in with the same Apple ID, you can connect them using a pairing code.)
Make sure Bluetooth is turned on for each device (go to Settings > Bluetooth, then turn on Bluetooth).
For the best results, keep in mind these additional tips:
During the recording session and the subsequent media transfer, Final Cut Pro and Final Cut Camera must be the active app on their respective devices.
Live Multicam recordings create very large files, so plan ahead to make sure you have sufficient available storage on all devices. (To check storage, go to Settings > General > [device] Storage.) If necessary, you can record to or store projects on external storage devices. See Intro to projects and Record video directly to an external storage device.
If your devices are all signed with the same Apple ID, turn on iCloud Keychain to ensure that they connect seamlessly. See the Apple Support article Set up iCloud Keychain.
Ideally, the devices running Final Cut Camera should be within 25 to 30 feet of the iPad running Final Cut Pro, with an unobstructed line of sight.
To avoid interruption of recording sessions and media transfers, consider connecting your devices to a power outlet or a power bank.
To prevent incoming calls from interrupting your Live Multicam recording, turn on a Focus (for example, Do Not Disturb) on each connected device.
AirPods switch automatically between Apple devices. If you’re wearing AirPods, keep in mind that device switching or AirPods notifications may interrupt your Live Multicam session.
You can’t use a connected device as a Personal Hotspot. Be sure to turn off Personal Hotspot before starting a Live Multicam connection. (Go to Settings > Cellular > Personal Hotspot.)
Step 1: Set up a Live Multicam project
When you create a Live Multicam project for the first time, you’re prompted to make your iPad discoverable so that other devices can connect to it. You only need to do this once.
In Final Cut Pro for iPad, tap New Project below the project list (on the left side of the Projects screen), then tap New Project.
Enter a project name, then tap Done in the onscreen keyboard.
Do one of the following:
Use automatic timeline settings: To have Final Cut Pro set the orientation, resolution, and frame rate to match the settings of the first clip you add to the timeline, leave Format set to Automatic.
Choose custom settings: Tap
 to the right of Format, tap Custom, then choose the project’s resolution, orientation, color space, and frame rate.
For details about each setting, see Create a project.
If you want to store the project in a location outside Final Cut Pro, tap
 to the right of Location, then choose a location.
By default, projects are stored inside Final Cut Pro. See Intro to projects.
Note: Storing projects in an external location requires iPadOS 17.5 or later.
Tap Continue, then tap Record with Live Multicam.
If you’re using Live Multicam for the first time, tap Continue, then follow the onscreen instructions.
If you want to use this iPad as a camera angle in the Live Multicam recording session, tap the iPad name under Known Devices.
The first time you use this iPad as a camera angle, you’re prompted to allow access to the camera and the microphone, and to choose whether to record location information with your video.
Tip: To record Live Multicam video into an existing project, open the project, tap ![]() in the toolbar, then tap Live Multicam.
in the toolbar, then tap Live Multicam.
Step 2: Install and set up Final Cut Camera
Install Final Cut Camera on each device you plan to use as a camera angle.
Open the Final Cut Camera app on each device, then follow the onscreen instructions to allow access to the camera and microphone.
In the camera screen, tap
 , then follow the onscreen instructions to make your device discoverable.
Now you’re ready to connect other devices as camera angles. See Step 3: Connect recording devices, next.
Step 3: Connect recording devices
You can connect up to four devices running Final Cut Camera. Make sure that Final Cut Pro and Final Cut Camera are the active app and that both Wi-Fi and Bluetooth are turned on.
If the Add Angles screen isn’t already open, open the Live Multicam project in Final Cut Pro for iPad, tap
 in the toolbar, tap Live Multicam, then tap
  in the toolbar.
Open the Final Cut Camera app on each device you want to use as a camera angle.
Do one of the following:
In Final Cut Pro for iPad, go to the Known Devices section of the Add Angles screen, then tap the names of the devices you want to use as camera angles.
On each device running Final Cut Camera, tap
 , then tap the iPad you want to connect to (under Known Devices).
Devices signed in with the same Apple ID are connected immediately. Devices signed in with different Apple IDs require a pairing code. See Connect Live Multicam camera angles in Final Cut Pro.
To disconnect a device, swipe left on the device name, then tap Disconnect.
When all the devices you want to use as camera angles are connected, tap Next (or, if you opened an existing project, tap
 in the toolbar).
Now you’re ready to choose settings for your Live Multicam session. See Step 4: Choose recording settings, next.
Step 4: Choose recording settings
You can define recording settings so that all the devices in your Live Multicam session record with the same format.
If the recording settings aren’t already open in Final Cut Pro for iPad, open the Live Multicam project, tap
 in the toolbar, tap Live Multicam, then tap
  in the toolbar.
Choose the recording settings you want, then tap Done.
For details about each setting, see Change Live Multicam settings.
Now you’re ready to record with Live Multicam. See Step 5: Record a Live Multicam session, next.
Step 5: Record a Live Multicam session
After you connect devices and choose recording settings, you’re ready to record your Live Multicam session. By default, you can start and stop Live Multicam recording from any connected device.
In the Live Multicam screen in Final Cut Pro for iPad or in Final Cut Camera on any connected device, tap
 to start recording.
Recording starts on all connected devices. Temporary preview files are streamed to the iPad so you can watch all camera angles during recording.
Tip: You can adjust camera settings for an angle during recording. In the Live Multicam screen in Final Cut Pro, tap
 for the angle you want to adjust, choose the settings you want, then tap
  . See Change settings in Final Cut Camera and Use onscreen camera guides in Final Cut Camera.
To pause or end recording, tap
 .
. You can record Live Multicam sessions up to 2 hours long in a single take. To record multiple multicam clips, repeat steps 1 and 2.
Tap Done to close the Live Multicam screen and return to the Edit screen.
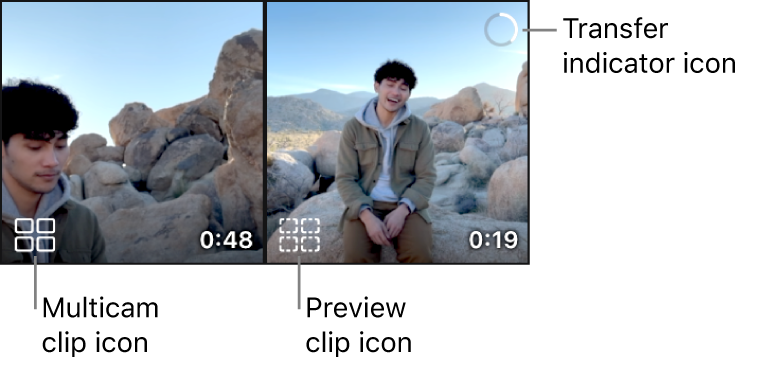
When you end the recording session, new multicam clips appear immediately in the browser, containing temporary preview (proxy) clips that were streamed to your iPad during recording. Multicam clips appear with a multicam clip icon.
Original media files are transferred from each connected device in the background, replacing the preview files in the browser. While the files are being transferred, progress indicators appear on the multicam clip thumbnails in the browser.

You can add multicam clips to the timeline and start editing immediately (even while the original media files are still being transferred).
Important: During the file transfer, both apps must be the active app and Wi-Fi and Bluetooth must be turned on. If a transfer is interrupted, it will resume when the apps are active.