Create and work with projects in Final Cut Pro for iPad
In Final Cut Pro, you organize your work in projects. A project contains media and one or more timelines, which are the edited sequences you create with your media. The media in a project is stored locally on your iPad and available to all timelines within that same project. This allows you to make multiple versions of the same timeline edit or make various deliverables for a production, such as versions for the web, social media apps, and foreign languages.

Create a project
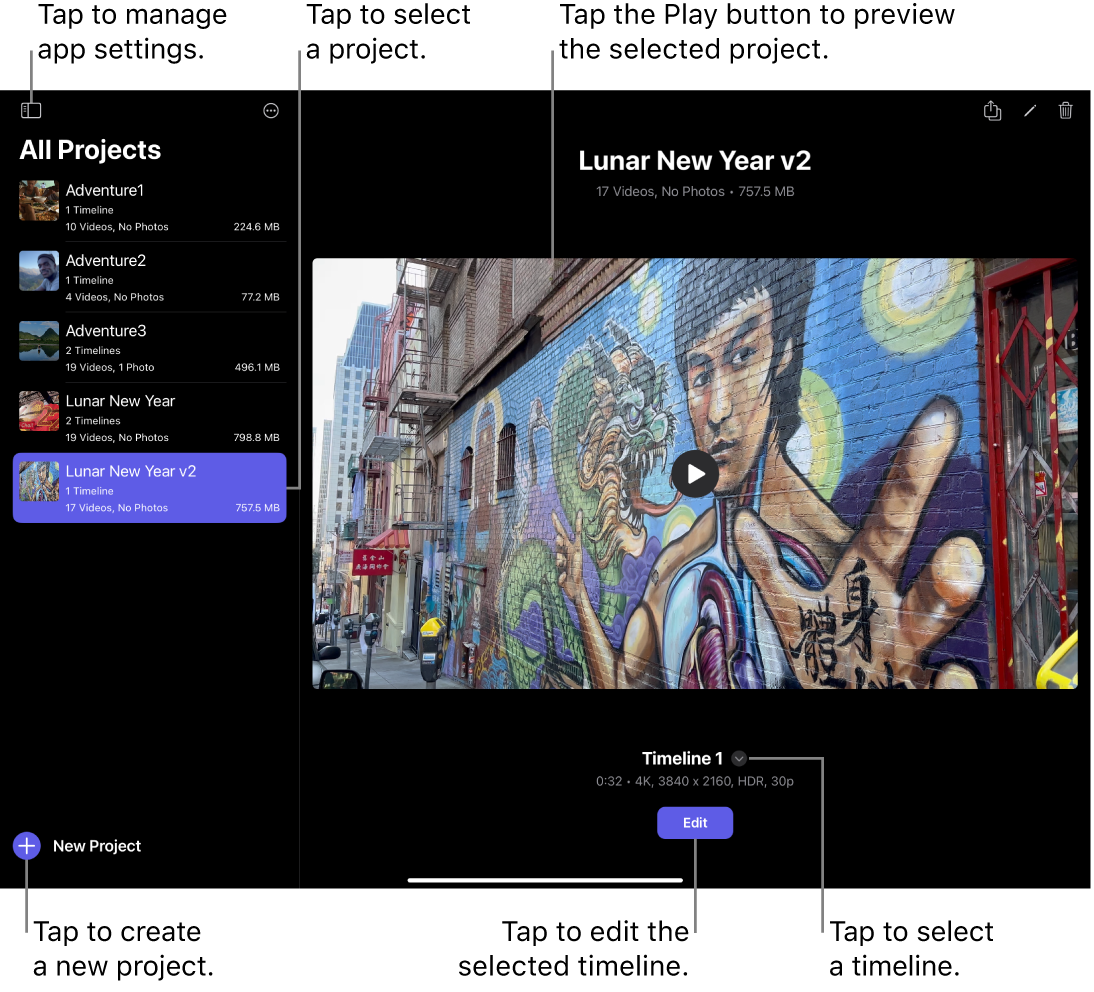
In Final Cut Pro for iPad, tap New Project below the project list (on the left side of the Projects screen).
(If you’re editing an existing project, tap
 at the top left to return to the Projects screen.)
Enter a project name, then tap Done in the onscreen keyboard.
Do one of the following:
Use automatic timeline settings: Tap Continue to have Final Cut Pro set the orientation, resolution, and frame rate to match the settings of the first clip you add to the timeline.
Choose custom settings: Tap
 to the right of Format, tap Custom, then choose the following settings and tap Continue:
Resolution: Choose the frame size for your project (4K, 1080 HD, or 720 HD), or create a custom frame size. The maximum frame size is 4096 pixels (in either dimension). The minimum frame size is 2 pixels (in either dimension).
Orientation: Choose Landscape (horizontal) or Portrait (vertical).
Color Space: Choose HDR (HLG) or SDR (Rec. 709). Choose HDR (HLG) only if your device has an HDR display (for example, the 12.9-inch Liquid Retina XDR display). On devices without an HDR display, timeline clips won’t look accurate.
Frame Rate: Choose from a list of common video frame rates. You can’t change the frame rate of a timeline after you create it.
Tap an option to choose the starting media for your project:
Import from Photos: Select media from your photo library, then tap Add.
The first time you access your photo library from Final Cut Pro, you’re prompted to grant access. You can change these iPad settings later by going to Settings
 > Privacy & Security.
Import from Files: Select media on your iPad or on iCloud Drive, then tap Open.
Record with Camera: Record video with the camera in Final Cut Pro. See Record video with the camera.
The first time you open the camera, you’re prompted to grant access to the camera and the microphone, and to allow Final Cut Pro to use your location. You can change these iPad settings later by going to Settings
 > Privacy & Security. See Control access to hardware features in the iPad User Guide.
Start Blank: Open your project without importing or recording any media.
A new project opens with an empty timeline. If you imported or recorded media, thumbnails appear in the browser at the top right.
Rename a project
In Final Cut Pro for iPad, tap a project in the project list (on the left side of the Projects screen).
Tap the project name at the top of the screen.
Enter a new name, then tap Done in the onscreen keyboard.
Duplicate a project
Duplicating a project duplicates all of its imported media files and all of its timelines.
Note: Before duplicating an entire project, consider whether just duplicating a timeline will meet your needs. See Duplicate a timeline.
In Final Cut Pro for iPad, touch and hold a project in the project list (on the left side of the Projects screen), then tap Duplicate.
Enter a new name or accept the suggested name, then tap Done in the onscreen keyboard.
Open an existing project
In Final Cut Pro for iPad, tap a project in the project list (on the left side of the Projects screen).
The project’s preview image appears on the right, with the name of the active timeline below.
If you want to open a different timeline in the project, tap
 next to the timeline name, then tap the name of the timeline you want to open.
 Below the preview image, tap Edit.
The Edit screen appears.
Delete a project
Deleting a project also deletes that project’s media (imported media and media shot with the Final Cut Pro camera), as well as all the timelines and render files in the project. For this reason, it’s a good idea to back up your project before deleting it. However, deleting a project does not remove the original source media that you imported from your other apps, such as Photos.
In Final Cut Pro for iPad, do one of the following:
Swipe left over a project in the project list (on the left side of the Projects screen), tap Delete, then tap Delete to confirm.
Touch and hold a project in the project list, tap Delete, then tap Delete to confirm.
Tap a project in the project list, tap
 in the top-right corner of the screen, then tap Delete to confirm.
Note: If a Final Cut Pro for iPad project is on a connected external drive, a networked computer, or cloud storage, you must import it into Final Cut Pro for iPad before you can open and edit it. Similarly, to edit a Final Cut Pro for iPad project in Final Cut Pro on your Mac, you must import the project. See Import from Final Cut Pro for iPad in the Final Cut Pro User Guide for Mac.