iPad Användarhandbok
- Välkommen
-
- Modeller som stöds
- iPad Pro 12,9 tum (femte generationen)
- iPad Pro 12,9 tum (fjärde generationen)
- iPad Pro 12,9 tum (tredje generationen)
- iPad Pro 11 tum (tredje generationen)
- iPad Pro 11 tum (andra generationen)
- iPad Pro 11 tum (första generationen)
- iPad Pro 12,9 tum (första och andra generationen)
- iPad Pro 10,5 tum
- iPad Pro 9,7 tum
- iPad Air (fjärde generationen)
- iPad Air (tredje generationen)
- iPad Air 2
- iPad (åttonde generationen)
- iPad (sjunde generationen)
- iPad (sjätte generationen)
- iPad (femte generationen)
- iPad mini (femte generationen)
- iPad mini 4
- Nyheter i iPadOS 14
-
- Väcka och låsa upp
- Justera volymen
- Ändra eller stänga av ljud
- Nå funktioner från låsskärmen
- Öppna appar
- Ta en skärmavbild eller göra en skärminspelning
- Ändra eller låsa skärmriktningen
- Ändra bakgrundsbilden
- Zooma in en app för att fylla skärmen
- Dra och släpp
- Söka med iPad
- Använda AirDrop till att skicka objekt
- Utföra snabbåtgärder
- Använda och anpassa Kontrollcenter
- Lägga till widgetar
- Ladda och övervaka batteriet
- Lär dig vad statussymbolerna betyder
- Resa med iPad
-
-
- Visa kartor
-
- Använd Siri, Kartor och widgeten Kartor till att få färdbeskrivningar
- Välj önskad transporttyp
- Få en färdbeskrivning
- Rapportera trafikincidenter
- Få en färdbeskrivning för cykling
- Hitta platser att stanna på
- Få en färdbeskrivning till fots
- Få en färdbeskrivning för kollektivtrafik
- Visa en översikt över en rutt eller visa stegen i färdbeskrivningen i en lista
- Ändra ljudinställningar för steg-för-steg-färdbeskrivningar
- Välja andra ruttalternativ
- Få en färdbeskrivning mellan två platser utan att någon av dem är din aktuella plats
- Radera nyligen visade färdbeskrivningar
- Använda Kartor på datorn till att få färdbeskrivningar
- Hjälpa till att rätta och förbättra Kartor
-
- Ställa in Meddelanden
- Skicka och ta emot meddelanden
- Skicka ett meddelande till en grupp eller företag
- Skicka bilder, videor och ljud
- Animera meddelanden
- Använda iMessage-appar
- Använda Memoji
- Skicka en Digital Touch-effekt
- Skicka och ta emot pengar med Apple Pay
- Ändra notiser
- Blockera, filtrera och rapportera meddelanden
- Radera meddelanden
-
- Visa bilder och videor
- Radera och gömma bilder och videor
- Redigera bilder och videor
- Redigera Live Photo-bilder
- Ändra bilder i porträttläge
- Ordna bilder i album
- Söka i Bilder
- Dela bilder och videor
- Visa minnen
- Hitta personer i Bilder
- Bläddra i bilder efter plats
- Använda iCloud-bilder
- Dela bilder med Delade album på iCloud
- Använda Min bildström
- Importera bilder och videor
- Skriva ut bilder
- Genvägar
- Aktier
- Tips
-
- Ställa in familjedelning
- Hämta familjemedlemmars inköp
- Sluta dela inköp
- Aktivera Be att få köpa
- Ställa in Apple Cash-familj
- Dela Apple Card
- Dela prenumerationer och iCloud-lagring
- Dela bilder, en kalender och annat med familjemedlemmar
- Hitta en familjemedlems borttappade enhet
- Ställa in Skärmtid via Familjedelning
-
- Tillbehör som följer med iPad
-
- Ställa in AirPods
- Ladda AirPods
- Starta och stoppa uppspelningen av ljud
- Ändra AirPods-volymen
- Ringa och besvara samtal med AirPods
- Växla AirPods mellan enheter
- Använda Siri med AirPods
- Lyssna och svara på meddelanden
- Dela ljud med AirPods och Beats-hörlurar
- Ändra bruskontrolläge
- Styra rumsligt ljud
- Starta om AirPods
- Byta namn på AirPods och andra inställningar
- Använda andra Bluetooth-hörlurar
- Använda EarPods
- Kontrollera ljudnivåer för hörlurar
- HomePod och andra trådlösa högtalare
- Externa lagringsenheter
- Apple Watch med Fitness+
- Fodral och skydd
- Skrivare
-
- Dela internetanslutning
- Ringa och besvara telefonsamtal
- Använda iPad som en andra skärm för datorn
- Flytta uppgifter mellan en iPad och en Mac
- Klippa ut, kopiera och klistra in mellan en iPad och andra enheter
- Ansluta iPad och datorn med en kabel
- Synkronisera iPad med datorn
- Överföra filer mellan iPad och datorn
-
- Komma igång med hjälpmedelsfunktioner
-
-
- Aktivera och öva på VoiceOver
- Ändra inställningar för VoiceOver
- Lära dig VoiceOver-gester
- Styra iPad med VoiceOver-gester
- Styra VoiceOver med rotorn
- Använda tangentbordet på skärmen
- Skriva med fingret
- Använda VoiceOver med ett externt Apple-tangentbord
- Använda en punktskriftsdisplay
- Skriva punktskrift på skärmen
- Anpassa gester och kortkommandon
- Använda VoiceOver med en pekenhet
- Använda VoiceOver i appar
- Zoom
- Förstorare
- Personupptäckt
- Skärm och textstorlek
- Rörelse
- Talat innehåll
- Syntolkning
-
-
- Viktig säkerhetsinformation
- Viktig information om hantering
- Få information om iPad
- Visa eller ändra mobildatainställningar
- Hitta fler resurser för programvara och service
- FCC-överensstämmelse
- ISED Canada-överensstämmelse
- Apple och miljön
- Klass 1-laserinformation
- Information om kassering och återvinning
- Överensstämmelse med ENERGY STAR
- Copyright
Logga in med Apple på iPad
Logga in med Apple gör det möjligt att logga in i appar och på webbplatser som deltar med ditt Apple-ID. Du behöver inte skapa och komma ihåg nya lösenord, och ditt konto skyddas med tvåfaktorsautentisering.
Logga in med Apple är utformat för att respektera din integritet. Appar och webbplatser kan bara fråga efter namn och e-postadress för att skapa ditt konto och Apple spårar dig inte när du använder dem.
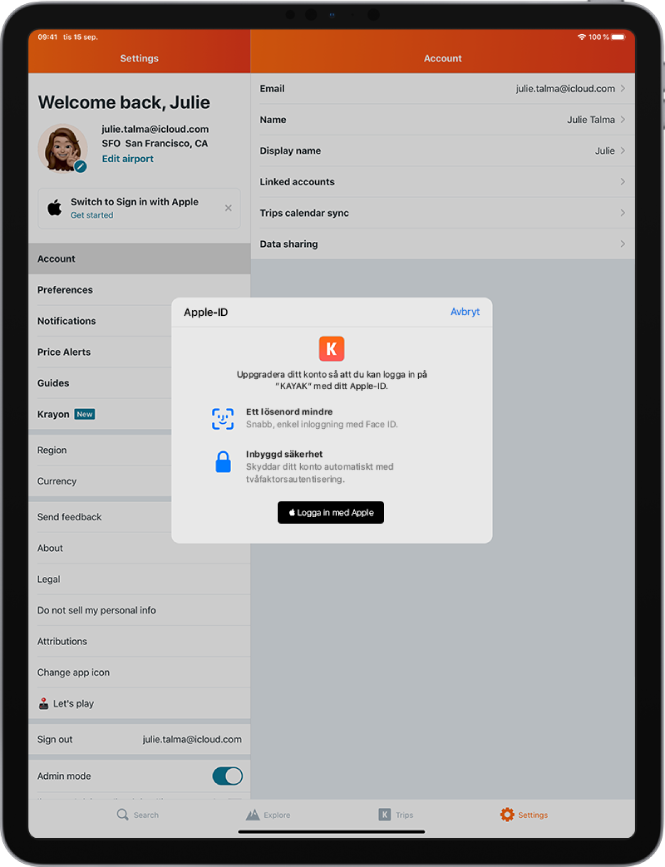
Ställa in eller uppgradera ett konto till Logga in med Apple.
När en app eller webbplats som deltar ber dig att ställa in eller uppgradera ett konto gör du följande:
Tryck på Logga in med Apple.
Följ anvisningarna på skärmen.
En del appar (och webbplatser) kommer inte att fråga efter ditt namn eller din e-postadress. I sådana fall autentiserar du bara med Face ID eller Touch ID (beroende på modell) och börjar sedan att använda appen.
Andra kan fråga efter namn och e-postadress för att skapa ett personligt konto. När en app frågar efter de här uppgifterna visar Logga in med Apple ditt namn och din personliga e-postadress från ditt Apple-ID så att du kan granska dem.
Om du vill redigera namnet trycker du på det och ändrar det med tangentbordet.
Gör något av följande för att specificera en e-postadress:
Använd din personliga e-postadress: Tryck på Dela min e-postadress.
Om du har flera e-postadresser som är förknippade med ditt Apple-ID väljer du den adress du vill använda.
Göm din e-postadress: Tryck på Göm min e-postadress.
Med det här alternativet kan du få mejl från appen utan att lämna ut din personliga e-postadress. När du väljer det här alternativet skapar Apple en unik slumpmässig e-postadress åt dig, och alla mejl som skickas från appen till den adressen vidarebefordras till din personliga e-postadress.
När du har granskat informationen och valt ett e-postalternativ trycker du på Fortsätt, autentiserar med Face ID eller Touch ID (beroende på modell) och kan sedan börja använda appen.
Logga in för att komma åt ditt konto
När du har skapat ett konto i en app eller på en webbplats genom att använda Logga in med Apple behöver du vanligtvis inte logga in igen på din iPad. Om du ändå blir ombedd att logga in (t.ex. om du har loggat ut från ett konto) gör du följande:
Tryck på Logga in med Apple.
Granska det Apple-ID som visas och tryck sedan på Fortsätt.
Autentisera med Face ID eller Touch ID (beroende på modell).
Ändra adressen som används till att vidarebefordra e-post
Om du väljer att gömma din e-postadress när du skapar ett konto, och du har två eller fler adresser som är associerade med ditt Apple-ID, kan du ändra vilken adress som ska få vidarebefordrade mejl.
Öppna Inställningar > [ditt namn] > Namn, telefon, e-post > Vidarebefordra till.
Välj en annan e-postadress och tryck sedan på Klar.
Ändra inställningar för Logga in med Apple för en app eller webbplats
Öppna Inställningar > [ditt namn] > Lösenord och säkerhet.
Tryck på Appar som använder ditt Apple-ID.
Välj en app och gör sedan något av följande:
Stäng av vidarebefordring av mejl: Stäng av Vidarebefordra till. Du får inga fler mejl från appen.
Sluta använda Logga in med Apple: Tryck på Sluta använda Apple-ID. Du kan bli ombedd att skapa ett nytt konto nästa gång du försöker logga in i appen.
Logga in med Apple fungerar också på dina andra enheter, som iPhone, Apple Watch, Mac, Apple TV och iPod touch, där du är inloggad med samma Apple-ID.
Om du vill logga in från en Android-app, en Windows-app eller en webbläsare trycker du på Logga in med Apple och anger sedan ditt Apple-ID och lösenord.
Logga in med Apple kräver tvåfaktorsautentisering för ditt Apple-ID. Det skyddar ditt Apple-ID, dina appkonton och ditt appinnehåll. Läs Apple Support-artikeln Tvåfaktorsautentisering för Apple-ID om du vill veta mer om hur tvåfaktorsautentisering fungerar.
Mer information finns i Apple Support-artikeln Vad är Logga in med Apple?.