iPad Användarhandbok
- Välkommen
-
- Modeller som stöds
- iPad mini (femte generationen)
- iPad mini (sjätte generationen)
- iPad (femte generationen)
- iPad (sjätte generationen)
- iPad (sjunde generationen)
- iPad (åttonde generationen)
- iPad (nionde generationen)
- iPad (tionde generationen)
- iPad Air (tredje generationen)
- iPad Air (fjärde generationen)
- iPad Air (femte generationen)
- iPad Pro 9,7 tum
- iPad Pro 10,5 tum
- iPad Pro 11 tum (första generationen)
- iPad Pro 11 tum (andra generationen)
- iPad Pro 11 tum (tredje generationen)
- iPad Pro 11 tum (fjärde generationen)
- iPad Pro 12,9 tum (första generationen)
- iPad Pro 12,9 tum (andra generationen)
- iPad Pro 12,9 tum (tredje generationen)
- iPad Pro 12,9 tum (fjärde generationen)
- iPad Pro 12,9 tum (femte generationen)
- iPad Pro 12,9 tum (sjätte generationen)
- Nyheter i iPadOS 16
-
-
- Ställa in FaceTime
- Skapa en FaceTime-länk
- Ringa och besvara samtal
- Ta en Live Photo-bild
- Slå på Direkttextning under ett FaceTime-samtal
- Använda andra appar under ett samtal
- Ringa ett FaceTime-gruppsamtal
- Visa deltagare i ett rutnät
- Använda SharePlay till att titta, lyssna och spela tillsammans
- Dela din skärm
- Flytta ett FaceTime-samtal till en annan enhet
- Ändra videoinställningarna
- Ändra ljudinställningarna
- Lägga till kameraeffekter
- Lämna ett samtal eller växla till Meddelanden
- Blockera oönskade kontakter
-
- Introduktion till Hem
- Uppgradera till nya Hem-arkitekturen
- Ställa in tillbehör
- Styra tillbehör
- Styra hemmet med Siri
- Ställa in HomePod
- Fjärrstyr ditt hem
- Skapa och använda scenarier
- Skapa en automatisering
- Konfigurera kameror
- Ansiktsigenkänning
- Konfigurera en router
- Låta andra styra
- Lägga till fler hem
-
- Visa kartor
-
- Söka efter platser
- Hitta sevärdheter, restauranger och tjänster i närheten
- Få information om platser
- Markera platser
- Dela platser
- Betygsätta platser
- Spara favoritplatser
- Utforska nya platser med Guider
- Ordna platser i Mina guider
- Få trafik- och väderinformation
- Radera viktiga platser
- Hitta inställningarna för Kartor
-
- Ställa in Meddelanden
- Skicka och besvara meddelanden
- Dra tillbaka och redigera meddelanden
- Håll koll på meddelanden och konversationer
- Vidarebefordra och dela meddelanden
- Skapa en gruppkonversation
- Lägga till bilder och videor
- Skicka och ta emot innehåll
- Titta, lyssna eller spela tillsammans med SharePlay
- Samarbeta på projekt
- Animera meddelanden
- Använda iMessage-appar
- Använda Memoji
- Skicka en Digital Touch-effekt
- Skicka inspelade ljudmeddelanden
- Skicka, ta emot och be om pengar med Apple Cash
- Ändra notiser
- Blockera, filtrera och rapportera meddelanden
- Radera meddelanden
- Återskapa raderade meddelanden
-
- Hämta musik
- Visa album, spellistor med mera
- Spela upp musik
- Ställ musiken i kö
- Lyssna på radiosändningar
-
- Abonnera på Apple Music
- Lyssna på Lossless-musik
- Lyssna på Dolby Atmos-musik
- Apple Music Sing
- Hitta ny musik
- Lägga till musik och lyssna i nedkopplat läge
- Få personliga rekommendationer
- Lyssna på radio
- Söka efter musik
- Skapa spellistor
- Se vad dina vänner lyssnar på
- Använda Siri till att spela upp musik
- Lyssna på musik med Apple Music Voice
- Ändra hur musiken låter
-
- Lägga till eller ta bort konton
- Skapa och formatera anteckningar
- Teckna eller skriva
- Skanna text och dokument
- Lägga till bilder, videor med mera
- Skapa snabbanteckningar
- Söka i anteckningar
- Ordna i mappar
- Ordna innehåll med taggar
- Använda smarta mappar
- Dela och samarbeta
- Låsa anteckningar
- Ändra inställningar för Anteckningar
- Använda kortkommandon
-
- Visa bilder och videor
- Spela upp videor och bildspel
- Radera eller gömma bilder och videor
- Redigera bilder och videor
- Putsa videolängden och justera slowmotion
- Redigera Live Photo-bilder
- Redigera cinematiska videor
- Ändra bilder i porträttläge
- Använda fotoalbum
- Ändra och ordna album
- Filtrera och sortera bilder och videor i album
- Duplicera och kopiera bilder och videor
- Slå ihop dubblettbilder
- Söka i Bilder
- Hitta och identifiera personer i Bilder
- Bläddra i bilder efter plats
- Dela bilder och videor
- Dela långa videor
- Visa bilder och videor som har delats med dig
- Använda Livetext till att interagera med innehåll i en bild eller video
- Använda Slå upp visuellt till att identifiera objekt i bilder
- Lyfta ett motiv från bildbakgrunden
- Titta på minnen
- Skapa personligt anpassade minnen
- Hantera minnen och bilder i blickfånget
- Importera bilder och videor
- Skriva ut bilder
-
- Surfa på webben
- Anpassa Safari-inställningarna
- Ändra layouten
- Söka efter webbplatser
- Bokmärka favoritwebbplatser
- Spara sidor i en läslista
- Hitta länkar som har delats med dig
- Anteckna på och spara en webbsida som en PDF
- Fylla i formulär automatiskt
- Hämta tillägg
- Gömma reklam och distraherande objekt
- Rensa cachen
- Genvägar
- Tips
-
- Strömadapter och laddningskabel
- Använda funktioner för ljudvolym i hörlurar
-
- Parkoppla och ladda Apple Pencil (andra generationen)
- Parkoppla och ladda Apple Pencil (första generationen)
- Skriva text med Handskrift
- Rita med Apple Pencil
- Ta och märka en skärmavbild med Apple Pencil
- Snabbt skriva anteckningar
- Förhandsvisa verktyg och reglage när Apple Pencil hålls ovanför skärmen
- HomePod och andra trådlösa högtalare
- Externa lagringsenheter
- Bluetooth-tillbehör
- Apple Watch med Fitness+
- Skrivare
-
- Dela internetanslutning
- Ringa och besvara telefonsamtal
- Använda iPad som en andra skärm för datorn
- Använda ett tangentbord och en mus eller styrplatta mellan en Mac och iPad
- Flytta uppgifter mellan enheter
- Strömma video, bilder och ljud trådlöst till en Mac
- Klippa ut, kopiera och klistra in mellan en iPad och andra enheter
- Ansluta iPad och datorn med en kabel
-
- Överföra filer mellan enheter
- Överföra filer med e-post, meddelanden eller AirDrop
- Hålla filer uppdaterade automatiskt med iCloud
- Överföra filer med en extern lagringsenhet
- Använda en filserver till att dela filer mellan iPad och datorn
- Dela filer med en molnlagringstjänst
- Synkronisera innehåll eller överföra filer med Finder eller iTunes
-
- Komma igång med hjälpmedelsfunktioner
-
-
- Aktivera och öva på VoiceOver
- Ändra inställningar för VoiceOver
- Lära dig VoiceOver-gester
- Använda iPad när VoiceOver är aktiverat
- Styra VoiceOver med rotorn
- Använda tangentbordet på skärmen
- Skriva med fingret
- Använda VoiceOver med ett externt Apple-tangentbord
- Använda en punktskriftsdisplay
- Skriva punktskrift på skärmen
- Anpassa gester och kortkommandon
- Använda VoiceOver med en pekenhet
- Använda VoiceOver med bilder och video
- Använda VoiceOver i appar
- Zoom
- Text under pekaren
- Skärm och textstorlek
- Rörelse
- Talat innehåll
- Syntolkning
-
-
- Använda inbyggda skydd för integritet och säkerhet
- Skydda ditt Apple-ID
-
- Logga in med nycklar
- Logga in med Apple
- Fylla i starka lösenord automatiskt
- Ändra svaga eller äventyrade lösenord
- Visa lösenord och relaterad information
- Dela nycklar och lösenord på ett säkert sätt med AirDrop
- Göra dina nycklar och lösenord tillgängliga på alla dina enheter
- Fylla i verifieringskoder automatiskt
- Logga in med färre CAPTCHA-verifieringar på iPad
- Hantera tvåfaktorsautentisering för ditt Apple-ID
- Använda säkerhetsnycklar
- Skapa och hantera e-postadresser med Dölj min e-postadress
- Skydda din surfning med Privat reläservice på iCloud
- Använda en privat nätverksadress
- Använda Avancerat dataskydd
- Låst läge
-
- Slå på eller stänga av iPad
- Tvinga iPad att starta om
- Uppdatera iPadOS
- Säkerhetskopiera iPad
- Nollställ iPad-inställningarna till förvalen.
- Återskapa allt innehåll från en säkerhetskopia
- Återskapa köpta och raderade objekt
- Sälja, ge bort eller byta in din iPad
- Radera iPad
- Installera eller ta bort konfigurationsprofiler
-
- Viktig säkerhetsinformation
- Viktig information om hantering
- Hitta fler resurser för programvara och service
- FCC-överensstämmelse
- ISED Canada-överensstämmelse
- Apple och miljön
- Klass 1-laserinformation
- Information om kassering och återvinning
- Oauktoriserad ändring av iPadOS
- Överensstämmelse med ENERGY STAR
- Copyright
Ställa in ett fokus på iPad
Fokus är en funktion som hjälper dig att koncentrera dig på en uppgift genom att minimera distraktionerna. När du vill koncentrera dig på en viss aktivitet kan du anpassa ett tillhandahållet fokusalternativ, exempelvis Arbete, Egentid eller Sömn, eller skapa ett anpassat fokus. Med fokus kan du tillfälligt tysta alla notiser, eller endast tillåta specifika notiser (till exempel sådana som gäller för din uppgift), och visa för andra personer och appar att du är upptagen. Se Tillåta eller tysta notiser för ett fokus på iPad.
På samma sätt kan du anpassa en hemskärmsida som endast har appar relaterade till ett fokus och göra den till din hemskärm när det fokuset är på. iPad föreslår även hemskärmar med appar och widgetar som är relevanta för det fokus du ställer in.
Tips: Om du snabbt vill stänga av ljudet för alla notiser öppnar du Kontrollcenter, trycker på Fokus och slår på Stör ej.
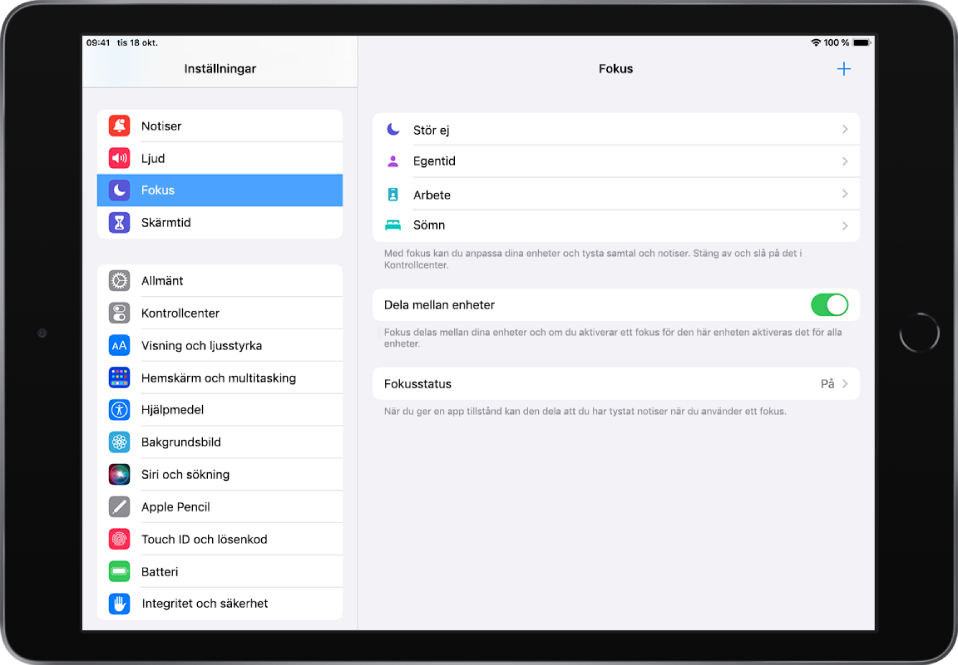
Ställa in ett fokus
När du ställer in ett fokus kan du välja appar och personer som du vill ta emot notiser från. Du kan till exempel ställa in ett arbetsfokus och endast tillåta notiser från dina kollegor och de appar du använder i arbetet.
Öppna Inställningar
 > Fokus och tryck sedan på ett fokus, till exempel Egentid, Sömn eller Arbete.
Du kan ställa in alternativen som beskrivs i stegen nedan för det fokus du väljer, men du behöver inte ställa in alla.
Ange vilka appar och personer som kan skicka notiser till dig under fokuset. Se Tysta eller tillåta notiser för ett fokus.
Tryck på Alternativ och gör något av följande:
Visa tystade notiser på låsskärmen eller skicka dem till Notiscenter: Slå på eller stäng av Visa på låst skärm.
Gör låsskärmen mörkare under detta fokus: Slå på Tona ned låst skärm.
Göm notisbrickor för appar på hemskärmen: Slå på Göm notisbrickor.
När du har valt alternativ trycker du på
 högst upp på skärmen.
Om du vill välja en hemskärmssida som ska användas med detta fokus trycker du på miniatyren för hemskärmen under Anpassa skärmar. Välj skärmen, tryck på Klar och tryck sedan på
.Om du vill göra ändringar på hemskärmen för att anpassa den ytterligare för ditt fokus läser du Flytta appar och widgetar på hemskärmen
Om du vill dela fokuset mellan dina Apple-enheter aktiverar du Dela mellan enheter (du måste vara inloggad med samma Apple-ID på alla dina enheter).
När du har ställt in ett fokus kan du när som helst återgå till Inställningar > Fokus och ändra alternativ som du valde ovan.
Du kan slå på eller stänga av ett fokus i Kontrollcenter eller schemalägga att det ska aktiveras automatiskt.
När du ställer in fokusläget Sover följer fokuset det sovschema du ställer in på iPhone. Om du vill lägga till eller ändra ett sovschema öppnar du appen Hälsa på iPhone, trycker på Bläddra och sedan Sömn.
Lägga till fokusfilter
När du ställer in ett fokus kan du lägga till appfilter som avgör vilken information som appar ska visa när fokuset är på. Du kan till exempel välja vilket e-postkonto eller vilken kalender som ska användas under fokuset.
Öppna Inställningar > Fokus och tryck på det fokus där du vill lägga till filter.
Tryck på Lägg till filter (under Fokusfilter).
Tryck på en app och sedan på Välj. Välj sedan informationen från appen som du vill visa under fokuset:
Kalender: Välj vilken kalender du vill visa under fokuset.
Mail: Välj vilka e-postkonton du vill använda under fokuset.
Meddelanden: Välj vilka meddelandekonversationer du vill se under fokuset. Du kan till exempel välja att bara visa konversationer från personer som du har tillåtit notiser från under fokuset.
Safari: Välj vilken flikgrupp du vill använda under fokuset.
Tryck på Lägg till om du vill lägga till filtret i fokuset.
Skapa ett anpassat fokus
Om du vill koncentrera dig på en aktivitet som inte passar med något av de fokusalternativ som finns kan du skapa ett anpassat fokus.
Öppna Inställningar
> Fokus.Tryck på
 högst upp till höger och sedan på Anpassat.
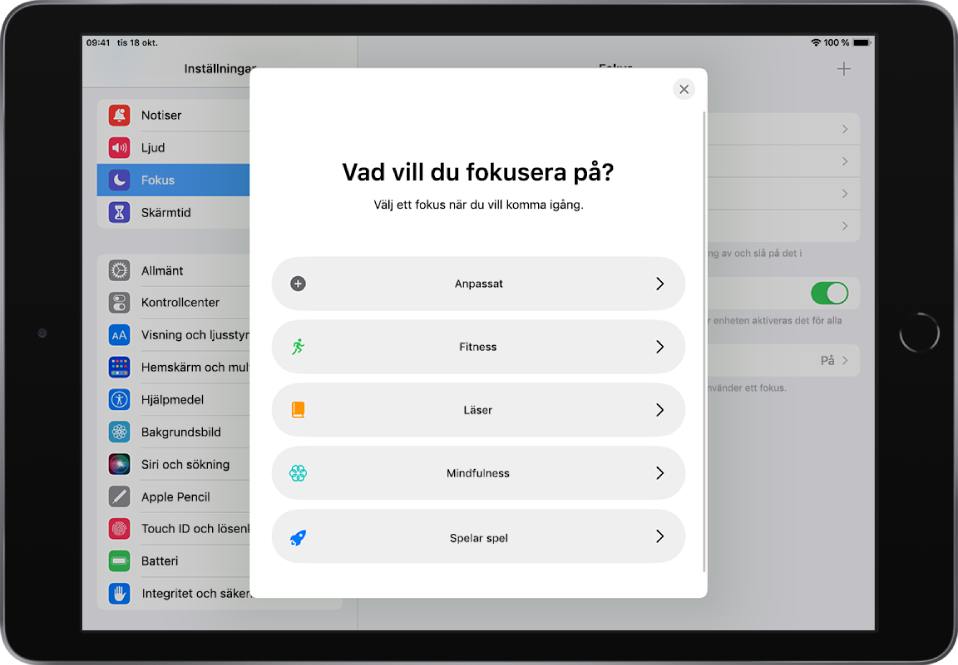
Ange ett namn på fokuset och tryck på returtangenten.
Välj en färg och en symbol för fokuset och tryck på Nästa.
Anpassa alternativen under steg 3 i Ställa in ett fokus ovan.
Hålla dina fokusinställningar uppdaterade på alla dina Apple-enheter
Du kan använda samma fokusinställningar på alla dina Apple-enheter där du är inloggad med samma Apple-ID.
Öppna Inställningar
> Fokus.Slå på Dela mellan enheter.