Logic Pro User Guide for iPad
- What’s new in Logic Pro 1.1
-
- What is Logic Pro?
- Working areas
- Work with function buttons
- Work with numeric values
-
- Intro to tracks
- Create tracks
- Create tracks using drag and drop
- Choose the default region type for a software instrument track
- Select tracks
- Duplicate tracks
- Reorder tracks
- Rename tracks
- Change track icons
- Change track colors
- Use the tuner on an audio track
- Show the output track in the Tracks area
- Delete tracks
- Edit track parameters
- Start a Logic Pro subscription
- How to get help
-
- Intro to recording
-
- Before recording software instruments
- Record software instruments
- Record additional software instrument takes
- Record to multiple software instrument tracks
- Record multiple MIDI devices to multiple tracks
- Record software instruments and audio simultaneously
- Merge software instrument recordings
- Spot erase software instrument recordings
- Replace software instrument recordings
- Capture your most recent MIDI performance
- Use the metronome
- Use the count-in
-
- Intro to arranging
-
- Intro to regions
- Select regions
- Cut, copy, and paste regions
- Move regions
- Remove gaps between regions
- Delay region playback
- Trim regions
- Loop regions
- Repeat regions
- Mute regions
- Split and join regions
- Stretch regions
- Separate a MIDI region by note pitch
- Bounce regions in place
- Change the gain of audio regions
- Create regions in the Tracks area
- Convert a MIDI region to a Drummer region or a pattern region
- Rename regions
- Change the color of regions
- Delete regions
- Create fades on audio regions
- Access mixing functions using the Fader
-
- Intro to Step Sequencer
- Use Step Sequencer with Drum Machine Designer
- Record Step Sequencer patterns live
- Step record Step Sequencer patterns
- Load and save patterns
- Modify pattern playback
- Edit steps
- Edit rows
- Edit Step Sequencer pattern, row, and step settings in the inspector
- Customize Step Sequencer
-
- Effect plug-ins overview
-
- Instrument plug-ins overview
-
- ES2 overview
- Interface overview
-
- Modulation overview
-
- Vector Envelope overview
- Use Vector Envelope points
- Use Vector Envelope solo and sustain points
- Set Vector Envelope segment times
- Vector Envelope XY pad controls
- Vector Envelope Actions menu
- Vector Envelope loop controls
- Vector Envelope release phase behavior
- Vector Envelope point transition shapes
- Use Vector Envelope time scaling
- Use the Mod Pad
- Modulation source reference
- Via modulation source reference
-
- Sample Alchemy overview
- Interface overview
- Add source material
- Save a preset
- Edit mode
- Play modes
- Source overview
- Synthesis modes
- Granular controls
- Additive effects
- Additive effect controls
- Spectral effect
- Spectral effect controls
- Filter module
- Low and highpass filter
- Comb PM filter
- Downsampler filter
- FM filter
- Envelope generators
- Mod Matrix
- Modulation routing
- Motion mode
- Trim mode
- More menu
- Sampler
- Copyright
View settings in Logic Pro for iPad

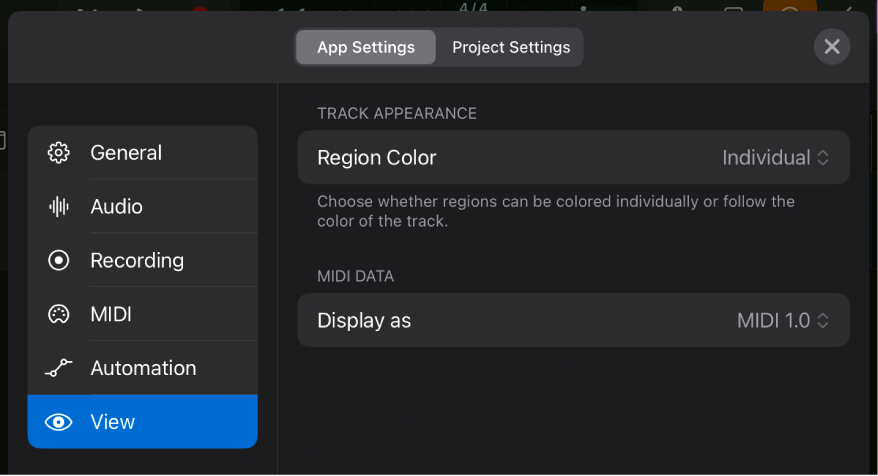
Track appearance
Region Color pop-up menu: Set whether you can color regions individually or whether they follow the track color. Choose from two options:
Individual: You can color regions individually independent from the track color.
As Track Color: Regions conform to the color of the track they are on, but they remember the individual color of a region if you switch back to Individual.
This option hides the Automatically Colorize Takes switch in the Recording project settings.
MIDI data
Display as pop-up menu: Choose with what resolution MIDI data is displayed in the editors and the inspector. The second and third options provide a higher data resolution introduced with MIDI 2.0—16-bit for velocity and 32-bit for pitch bend, aftertouch, and continuous controllers.
MIDI 1.0: Values are shown in a 7-bit range from 0 to 127 as in previous versions (based on the MIDI 1.0 standard).
0.0 - 127.9: The value before the decimal separator maps to the MIDI 1.0 value. The decimals represent the resolution of the additional bits.
Percent: Values are represented as percentages from 0% to 100% with varying decimals, depending on the parameter.
The MIDI data display settings affect the following areas:
Note inspector: The Velocity and Release Velocity fields in the Note inspector show the MIDI data value of the MIDI notes selected in the Piano Roll Editor.
Automation Point inspector: The Continuous Controller, Aftertouch, Polyphonic Aftertouch, and Pitch Bend fields in the Automation Point inspector show the MIDI data value of the automation points selected in the Piano Roll Editor.
Note: Settings other than “MIDI 1.0” are only recommended if you’re using MIDI 2.0–compatible devices and plug-ins that can take advantage of the higher data resolution.
Download this guide: PDF