Logic Pro User Guide for iPad
- What’s new in Logic Pro 1.1
-
- What is Logic Pro?
- Working areas
- Work with function buttons
- Work with numeric values
-
- Intro to tracks
- Create tracks
- Create tracks using drag and drop
- Choose the default region type for a software instrument track
- Select tracks
- Duplicate tracks
- Reorder tracks
- Rename tracks
- Change track icons
- Change track colors
- Use the tuner on an audio track
- Show the output track in the Tracks area
- Delete tracks
- Edit track parameters
- Start a Logic Pro subscription
- How to get help
-
- Intro to recording
-
- Before recording software instruments
- Record software instruments
- Record additional software instrument takes
- Record to multiple software instrument tracks
- Record multiple MIDI devices to multiple tracks
- Record software instruments and audio simultaneously
- Merge software instrument recordings
- Spot erase software instrument recordings
- Replace software instrument recordings
- Capture your most recent MIDI performance
- Use the metronome
- Use the count-in
-
- Intro to arranging
-
- Intro to regions
- Select regions
- Cut, copy, and paste regions
- Move regions
- Remove gaps between regions
- Delay region playback
- Trim regions
- Loop regions
- Repeat regions
- Mute regions
- Split and join regions
- Stretch regions
- Separate a MIDI region by note pitch
- Bounce regions in place
- Change the gain of audio regions
- Create regions in the Tracks area
- Convert a MIDI region to a Drummer region or a pattern region
- Rename regions
- Change the color of regions
- Delete regions
- Create fades on audio regions
- Access mixing functions using the Fader
-
- Intro to Step Sequencer
- Use Step Sequencer with Drum Machine Designer
- Record Step Sequencer patterns live
- Step record Step Sequencer patterns
- Load and save patterns
- Modify pattern playback
- Edit steps
- Edit rows
- Edit Step Sequencer pattern, row, and step settings in the inspector
- Customize Step Sequencer
-
- Effect plug-ins overview
-
- Instrument plug-ins overview
-
- ES2 overview
- Interface overview
-
- Modulation overview
-
- Vector Envelope overview
- Use Vector Envelope points
- Use Vector Envelope solo and sustain points
- Set Vector Envelope segment times
- Vector Envelope XY pad controls
- Vector Envelope Actions menu
- Vector Envelope loop controls
- Vector Envelope release phase behavior
- Vector Envelope point transition shapes
- Use Vector Envelope time scaling
- Use the Mod Pad
- Modulation source reference
- Via modulation source reference
-
- Sample Alchemy overview
- Interface overview
- Add source material
- Save a preset
- Edit mode
- Play modes
- Source overview
- Synthesis modes
- Granular controls
- Additive effects
- Additive effect controls
- Spectral effect
- Spectral effect controls
- Filter module
- Low and highpass filter
- Comb PM filter
- Downsampler filter
- FM filter
- Envelope generators
- Mod Matrix
- Modulation routing
- Motion mode
- Trim mode
- More menu
- Sampler
- Copyright
Use the ES1 LFO in Logic Pro for iPad
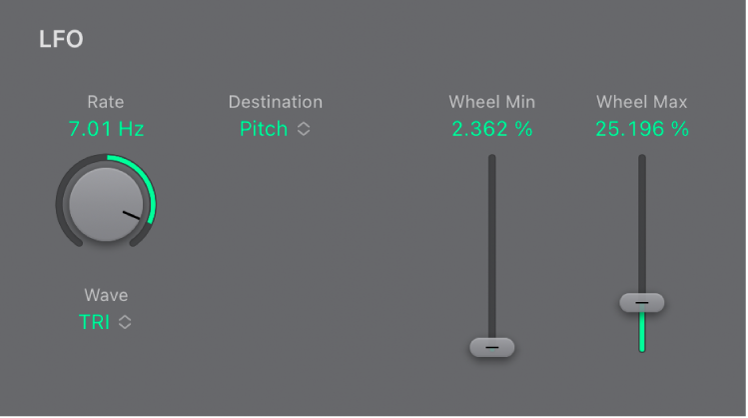
The LFO (low frequency oscillator) generates an adjustable, cyclic waveform that you can use to modulate other ES1 parameters.

LFO parameters
Rate knob and field: Set the speed, or frequency, of the LFO waveform cycles.
If you set values to the right of 0, the LFO phase runs freely.
If you set values to the left of 0, the LFO phase is synchronized with the Logic Pro tempo—with phase lengths adjustable between 1/96 bar and 32 bars.
When set to 0, the LFO outputs at a constant, full level, which allows you to manually control the LFO speed with your keyboard modulation wheel. For example, to change the pulse width by moving your keyboard modulation wheel, choose pulse width as the LFO modulation target and set the modulation intensity range using the Int via Whl slider.
Wave pop-up menu: Set the LFO waveform. Each waveform has its own shape, providing different types of modulation.
You can choose the following waveforms: triangle; ascending and descending sawtooth; square wave; sample & hold (random); and a lagged, smoothly changing random wave.
You can also choose EXT to assign a side chain signal as a modulation source. Choose the side chain source channel strip from the Side Chain pop-up menu in the upper-right corner of ES1.
Destination pop-up menu: Choose a modulation target for the LFO.
Pitch: Modulate the pitch—the frequency—of the oscillators.
PW: Modulate the pulse width of the pulse wave.
Mix: Modulate the mix between the primary oscillator and the sub-oscillator.
Cutoff: Modulate the cutoff frequency of the filter.
Res.: Modulate the resonance of the filter.
VCA: Modulate the main volume.
Wheel Min/Max sliders and fields: Set the LFO intensity at the minimum and maximum mod wheel position. The distance between the sliders indicates the modulation wheel range.
Download this guide: PDF