Logic Pro User Guide for iPad
- What’s new in Logic Pro 1.1
-
- What is Logic Pro?
- Working areas
- Work with function buttons
- Work with numeric values
-
- Intro to tracks
- Create tracks
- Create tracks using drag and drop
- Choose the default region type for a software instrument track
- Select tracks
- Duplicate tracks
- Reorder tracks
- Rename tracks
- Change track icons
- Change track colors
- Use the tuner on an audio track
- Show the output track in the Tracks area
- Delete tracks
- Edit track parameters
- Start a Logic Pro subscription
- How to get help
-
- Intro to recording
-
- Before recording software instruments
- Record software instruments
- Record additional software instrument takes
- Record to multiple software instrument tracks
- Record multiple MIDI devices to multiple tracks
- Record software instruments and audio simultaneously
- Merge software instrument recordings
- Spot erase software instrument recordings
- Replace software instrument recordings
- Capture your most recent MIDI performance
- Use the metronome
- Use the count-in
-
- Intro to arranging
-
- Intro to regions
- Select regions
- Cut, copy, and paste regions
- Move regions
- Remove gaps between regions
- Delay region playback
- Trim regions
- Loop regions
- Repeat regions
- Mute regions
- Split and join regions
- Stretch regions
- Separate a MIDI region by note pitch
- Bounce regions in place
- Change the gain of audio regions
- Create regions in the Tracks area
- Convert a MIDI region to a Drummer region or a pattern region
- Rename regions
- Change the color of regions
- Delete regions
- Create fades on audio regions
- Access mixing functions using the Fader
-
- Intro to Step Sequencer
- Use Step Sequencer with Drum Machine Designer
- Record Step Sequencer patterns live
- Step record Step Sequencer patterns
- Load and save patterns
- Modify pattern playback
- Edit steps
- Edit rows
- Edit Step Sequencer pattern, row, and step settings in the inspector
- Customize Step Sequencer
-
- Effect plug-ins overview
-
- Instrument plug-ins overview
-
- ES2 overview
- Interface overview
-
- Modulation overview
-
- Vector Envelope overview
- Use Vector Envelope points
- Use Vector Envelope solo and sustain points
- Set Vector Envelope segment times
- Vector Envelope XY pad controls
- Vector Envelope Actions menu
- Vector Envelope loop controls
- Vector Envelope release phase behavior
- Vector Envelope point transition shapes
- Use Vector Envelope time scaling
- Use the Mod Pad
- Modulation source reference
- Via modulation source reference
-
- Sample Alchemy overview
- Interface overview
- Add source material
- Save a preset
- Edit mode
- Play modes
- Source overview
- Synthesis modes
- Granular controls
- Additive effects
- Additive effect controls
- Spectral effect
- Spectral effect controls
- Filter module
- Low and highpass filter
- Comb PM filter
- Downsampler filter
- FM filter
- Envelope generators
- Mod Matrix
- Modulation routing
- Motion mode
- Trim mode
- More menu
- Sampler
- Copyright
ES2 LFOs in Logic Pro for iPad
ES2 features two multi-waveform LFOs. Both are available as sources in Mod Matrix Slot 1—10.

LFO 1 is polyphonic, which means that if used for any modulation of multiple voices, they are not phase-locked. LFO 1 is also key-synced: each time you play a key, LFO 1 modulation of this voice is started from zero.
To understand the non phase-locked characteristic more fully, imagine a scenario where a chord is played on the keyboard. If LFO 1 is used to modulate pitch, for example, the pitch of one voice may rise, the pitch of another voice might fall, and the pitch of a third voice may reach its minimum value. As you can see, the modulation is independent for each voice, or note.
The key-sync feature ensures that the LFO waveform cycle always starts from zero, which results in consistent modulation of each voice. If the LFO waveform cycles were not synchronized in this way, individual note modulations would be uneven.
LFO 1 is preconfigured to control the pitch of all three oscillators. It can be simultaneously used for modulation of other parameters.
LFO 1 can also be faded in or out automatically, courtesy of a built-in envelope generator.
LFO 2 is monophonic, which means that the modulation is identical for all voices. For example, imagine a chord is played on the keyboard. If LFO 2 is used to modulate pitch, the pitch of all voices in the played chord rises and falls synchronously. LFO 2 is ideally suited for creating rhythmic modulation effects that retain perfect synchronicity, even during project tempo changes.
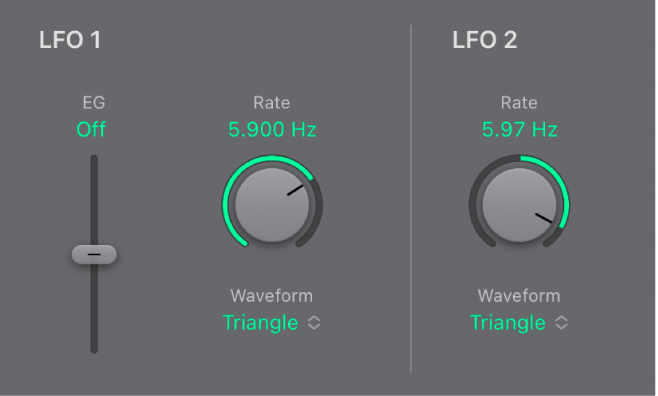
LFO parameters
LFO 1 EG slider and field: Set the time it takes for the LFO modulation to fade in or fade out. The value is displayed in milliseconds beneath the slider.
LFO 1 Rate knob and field: Set the frequency (speed) of LFO 1 modulation. The value is displayed in hertz (Hz).
LFO 1 Waveform pop-up menu: Choose the waveform used by LFO 1. See ES2 LFO waveforms.
LFO 2 Rate knob and field: Set the frequency of LFO 2 modulation. LFO 2 can be synchronized with the Logic Pro tempo by choosing a value to the left of the center (DC) position.
LFO 2 Waveform pop-up menu: Choose the waveform used by LFO 2.
Download this guide: PDF