Logic Pro User Guide for iPad
- What’s new in Logic Pro 1.1
-
- What is Logic Pro?
- Working areas
- Work with function buttons
- Work with numeric values
-
- Intro to tracks
- Create tracks
- Create tracks using drag and drop
- Choose the default region type for a software instrument track
- Select tracks
- Duplicate tracks
- Reorder tracks
- Rename tracks
- Change track icons
- Change track colors
- Use the tuner on an audio track
- Show the output track in the Tracks area
- Delete tracks
- Edit track parameters
- Start a Logic Pro subscription
- How to get help
-
- Intro to recording
-
- Before recording software instruments
- Record software instruments
- Record additional software instrument takes
- Record to multiple software instrument tracks
- Record multiple MIDI devices to multiple tracks
- Record software instruments and audio simultaneously
- Merge software instrument recordings
- Spot erase software instrument recordings
- Replace software instrument recordings
- Capture your most recent MIDI performance
- Use the metronome
- Use the count-in
-
- Intro to arranging
-
- Intro to regions
- Select regions
- Cut, copy, and paste regions
- Move regions
- Remove gaps between regions
- Delay region playback
- Trim regions
- Loop regions
- Repeat regions
- Mute regions
- Split and join regions
- Stretch regions
- Separate a MIDI region by note pitch
- Bounce regions in place
- Change the gain of audio regions
- Create regions in the Tracks area
- Convert a MIDI region to a Drummer region or a pattern region
- Rename regions
- Change the color of regions
- Delete regions
- Create fades on audio regions
- Access mixing functions using the Fader
-
- Intro to Step Sequencer
- Use Step Sequencer with Drum Machine Designer
- Record Step Sequencer patterns live
- Step record Step Sequencer patterns
- Load and save patterns
- Modify pattern playback
- Edit steps
- Edit rows
- Edit Step Sequencer pattern, row, and step settings in the inspector
- Customize Step Sequencer
-
- Effect plug-ins overview
-
- Instrument plug-ins overview
-
- ES2 overview
- Interface overview
-
- Modulation overview
-
- Vector Envelope overview
- Use Vector Envelope points
- Use Vector Envelope solo and sustain points
- Set Vector Envelope segment times
- Vector Envelope XY pad controls
- Vector Envelope Actions menu
- Vector Envelope loop controls
- Vector Envelope release phase behavior
- Vector Envelope point transition shapes
- Use Vector Envelope time scaling
- Use the Mod Pad
- Modulation source reference
- Via modulation source reference
-
- Sample Alchemy overview
- Interface overview
- Add source material
- Save a preset
- Edit mode
- Play modes
- Source overview
- Synthesis modes
- Granular controls
- Additive effects
- Additive effect controls
- Spectral effect
- Spectral effect controls
- Filter module
- Low and highpass filter
- Comb PM filter
- Downsampler filter
- FM filter
- Envelope generators
- Mod Matrix
- Modulation routing
- Motion mode
- Trim mode
- More menu
- Sampler
- Copyright
Randomize Sculpture morphs in Logic Pro for iPad
The randomize feature creates random variations of selected morph points. When combined with the copy/paste functions, randomizing lends itself to using the Morph Pad as an automatic sound generator.
Use of the Morph Pad can yield interesting composite sounds—hybrids of the original and morphed sound. You can copy this hybrid sound to a corner of the Morph Pad, or to multiple corners, and randomize it by a definable amount. The morphed sound then becomes a new timbral element that can, in turn, be moved to the corners, randomized, and so on.
In effect, you’re “breeding” a sound, while maintaining some control by selecting parent and child sounds. This approach can result in new, complex sounds—even if your sound programming knowledge is limited.

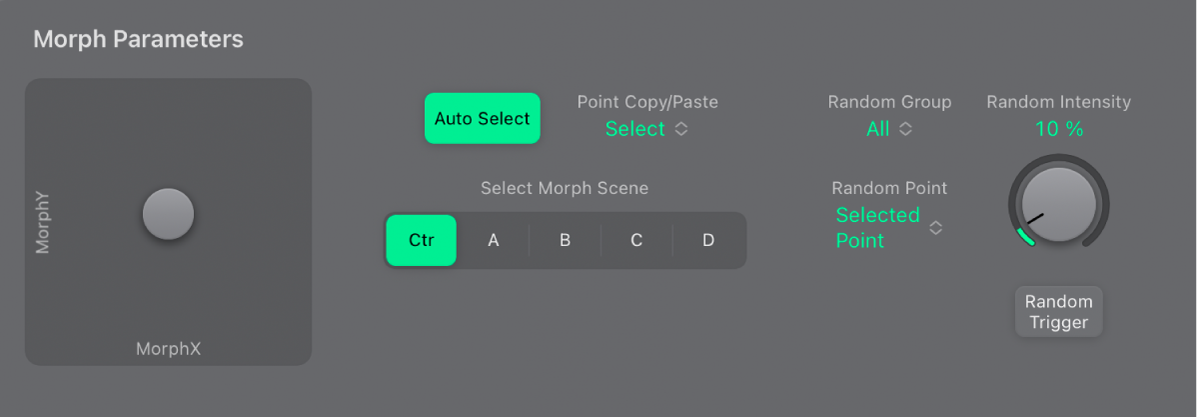
Morph Randomize parameters
Random Group pop-up menu: Limit the type of morphable parameters that are affected by randomization.
All morphable parameters: Randomizes all parameters in the following groups, which can lead to unusual sounds. This can lead to some interesting results, but it is uncontrolled, making it unsuitable for the “sound breeding” idea.
All except TensMod: Identical to All morphable parameters, but excludes the TensionMod parameter from randomization.
String Material/Media: Includes the Material Pad position, Stiffness, Inner Loss, Media Loss, Resolution, and Tension Modulation parameters for randomization.
Objects&Pickups: Alters the positions of objects and pickups, plus various object parameters, when randomization is used.
Waveshaper&Filter: Alters the positions of all Waveshaper and filter parameters when randomization is used.
Random Point pop-up menu: Choose the morph points (or edges) you want to randomize.
Random Intensity knob: Set the amount of randomization from 1% (slight deviation) to 100% (completely random values).
Random Trigger button: Create randomized values for all parameters of the chosen morph points.
Randomize morph points in Sculpture
This example provides a general approach you can follow for morph point randomization.
In Logic Pro, tap a Morph Scene button (Ctr, A, B, C, or D).
Tap the Auto Select button.
Set the Random Intensity knob to a value of 25%.
Tap the Random Trigger button.
Drag the gray dot to each corner in the Morph Pad. Do this along the edges and through the center of the Morph Pad.
Note how this affects the morph.
Strike a few notes on your MIDI keyboard while dragging the gray dot.
Note that positions on the Morph Pad that fall in between the various morph points cause the randomized parameters to interpolate between values. You can use the Copy and Paste commands to make use of these in-between values.
Download this guide: PDF