Logic Pro User Guide for iPad
- What’s new in Logic Pro 1.1
-
- What is Logic Pro?
- Working areas
- Work with function buttons
- Work with numeric values
-
- Intro to tracks
- Create tracks
- Create tracks using drag and drop
- Choose the default region type for a software instrument track
- Select tracks
- Duplicate tracks
- Reorder tracks
- Rename tracks
- Change track icons
- Change track colors
- Use the tuner on an audio track
- Show the output track in the Tracks area
- Delete tracks
- Edit track parameters
- Start a Logic Pro subscription
- How to get help
-
- Intro to recording
-
- Before recording software instruments
- Record software instruments
- Record additional software instrument takes
- Record to multiple software instrument tracks
- Record multiple MIDI devices to multiple tracks
- Record software instruments and audio simultaneously
- Merge software instrument recordings
- Spot erase software instrument recordings
- Replace software instrument recordings
- Capture your most recent MIDI performance
- Use the metronome
- Use the count-in
-
- Intro to arranging
-
- Intro to regions
- Select regions
- Cut, copy, and paste regions
- Move regions
- Remove gaps between regions
- Delay region playback
- Trim regions
- Loop regions
- Repeat regions
- Mute regions
- Split and join regions
- Stretch regions
- Separate a MIDI region by note pitch
- Bounce regions in place
- Change the gain of audio regions
- Create regions in the Tracks area
- Convert a MIDI region to a Drummer region or a pattern region
- Rename regions
- Change the color of regions
- Delete regions
- Create fades on audio regions
- Access mixing functions using the Fader
-
- Intro to Step Sequencer
- Use Step Sequencer with Drum Machine Designer
- Record Step Sequencer patterns live
- Step record Step Sequencer patterns
- Load and save patterns
- Modify pattern playback
- Edit steps
- Edit rows
- Edit Step Sequencer pattern, row, and step settings in the inspector
- Customize Step Sequencer
-
- Effect plug-ins overview
-
- Instrument plug-ins overview
-
- ES2 overview
- Interface overview
-
- Modulation overview
-
- Vector Envelope overview
- Use Vector Envelope points
- Use Vector Envelope solo and sustain points
- Set Vector Envelope segment times
- Vector Envelope XY pad controls
- Vector Envelope Actions menu
- Vector Envelope loop controls
- Vector Envelope release phase behavior
- Vector Envelope point transition shapes
- Use Vector Envelope time scaling
- Use the Mod Pad
- Modulation source reference
- Via modulation source reference
-
- Sample Alchemy overview
- Interface overview
- Add source material
- Save a preset
- Edit mode
- Play modes
- Source overview
- Synthesis modes
- Granular controls
- Additive effects
- Additive effect controls
- Spectral effect
- Spectral effect controls
- Filter module
- Low and highpass filter
- Comb PM filter
- Downsampler filter
- FM filter
- Envelope generators
- Mod Matrix
- Modulation routing
- Motion mode
- Trim mode
- More menu
- Sampler
- Copyright
Pitch Correction effect parameters in Logic Pro for iPad

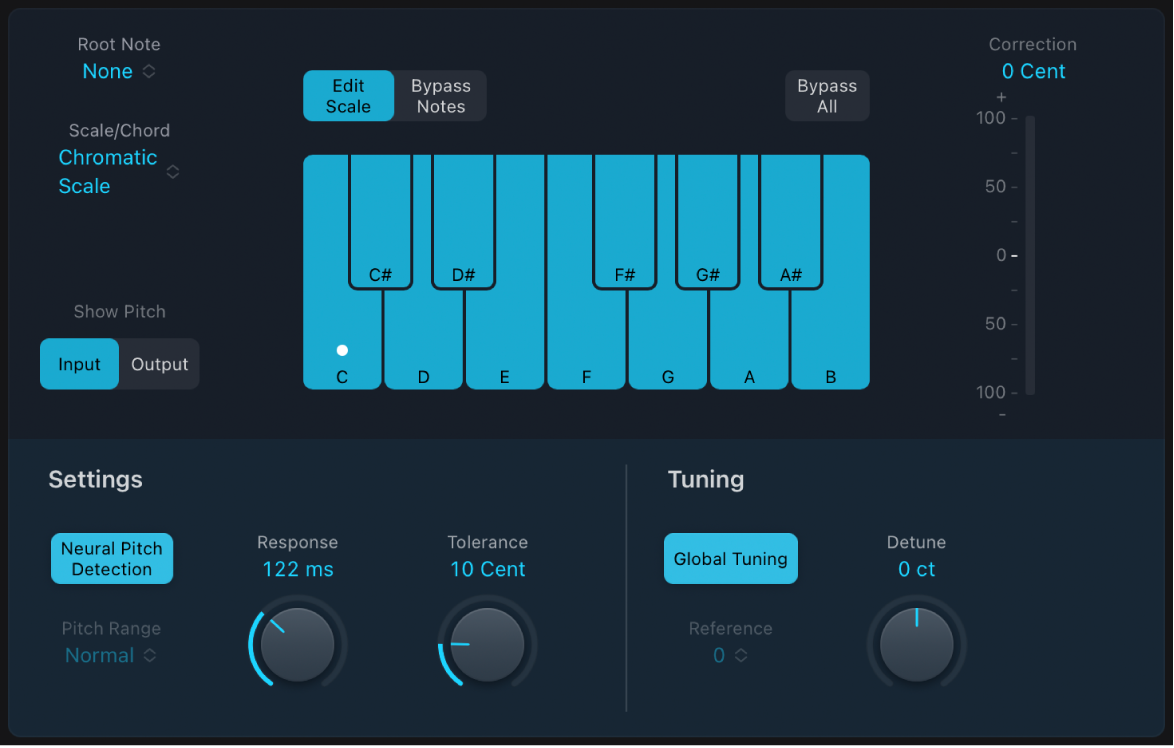
Pitch Correction parameters
 Root Note pop-up menu: Choose the root note of the scale.
 Scale/Chord pop-up menu: Choose a pitch quantization grid.
Show Pitch buttons: Show the pitch of the input or output signal, respectively, on the notes of the keyboard.
Edit Scale and Bypass Notes buttons: Choose a mode that allows you to change the scale and/or exclude notes from pitch correction.
Bypass All button: Quickly compare the corrected and original signals or audition automation changes.
Keyboard: Tap a key to exclude the corresponding note from pitch quantization grids. This effectively removes this key from the scale, resulting in note corrections that are forced to the nearest available pitch (key). See Exclude notes from Pitch Correction.
Correction display: Indicates the amount of pitch change. The marker indicates the average correction amount over a longer time period. You can use the display when discussing (and optimizing) the vocal intonation with a singer during a recording session.
Neural Pitch Detection button: Turn on pitch detection to automatically detect the Pitch Range. You can turn it off to set the pitch range manually in the Pitch Range pop-up menu.
Pitch Range pop-up menu and field: Choose a low or normal pitch range that is scanned (for notes that need correction). See Pitch Correction effect quantization.
Note: When Neural Pitch Detection is turned on, it is not necessary to set Pitch Range manually.
 Response knob and field: Determine how quickly the voice reaches the corrected destination pitch.
Singers use portamenti and other gliding techniques. If you choose a Response value that’s too low, seamless portamenti turn into semitone-stepped glissandi, but the intonation is perfect. If the Response value is too high, the pitch of the output signal won’t change quickly enough. The optimum setting for this parameter depends on the singing style, tempo, vibrato, and accuracy of the original performance.
Tolerance knob and field: Set a zone around the core frequency where no correction takes place. A low value results in more extreme or faster corrections, and higher values allow for more pitch variation (for example, vibrato) to happen before any correction is applied.
Global Tuning button: Turn on to use project Tuning settings for the pitch correction process. Turn off to manually set tuning with the Reference parameter. See Use Pitch Correction reference tuning.
Reference pop-up menu: Set the reference tuning in cents (relative to the root).
Detune knob and field: Detune the output signal by the set value.
Download this guide: PDF