Logic Pro User Guide for iPad
- What’s new in Logic Pro 1.1
-
- What is Logic Pro?
- Working areas
- Work with function buttons
- Work with numeric values
-
- Intro to tracks
- Create tracks
- Create tracks using drag and drop
- Choose the default region type for a software instrument track
- Select tracks
- Duplicate tracks
- Reorder tracks
- Rename tracks
- Change track icons
- Change track colors
- Use the tuner on an audio track
- Show the output track in the Tracks area
- Delete tracks
- Edit track parameters
- Start a Logic Pro subscription
- How to get help
-
- Intro to recording
-
- Before recording software instruments
- Record software instruments
- Record additional software instrument takes
- Record to multiple software instrument tracks
- Record multiple MIDI devices to multiple tracks
- Record software instruments and audio simultaneously
- Merge software instrument recordings
- Spot erase software instrument recordings
- Replace software instrument recordings
- Capture your most recent MIDI performance
- Use the metronome
- Use the count-in
-
- Intro to arranging
-
- Intro to regions
- Select regions
- Cut, copy, and paste regions
- Move regions
- Remove gaps between regions
- Delay region playback
- Trim regions
- Loop regions
- Repeat regions
- Mute regions
- Split and join regions
- Stretch regions
- Separate a MIDI region by note pitch
- Bounce regions in place
- Change the gain of audio regions
- Create regions in the Tracks area
- Convert a MIDI region to a Drummer region or a pattern region
- Rename regions
- Change the color of regions
- Delete regions
- Create fades on audio regions
- Access mixing functions using the Fader
-
- Intro to Step Sequencer
- Use Step Sequencer with Drum Machine Designer
- Record Step Sequencer patterns live
- Step record Step Sequencer patterns
- Load and save patterns
- Modify pattern playback
- Edit steps
- Edit rows
- Edit Step Sequencer pattern, row, and step settings in the inspector
- Customize Step Sequencer
-
- Effect plug-ins overview
-
- Instrument plug-ins overview
-
- ES2 overview
- Interface overview
-
- Modulation overview
-
- Vector Envelope overview
- Use Vector Envelope points
- Use Vector Envelope solo and sustain points
- Set Vector Envelope segment times
- Vector Envelope XY pad controls
- Vector Envelope Actions menu
- Vector Envelope loop controls
- Vector Envelope release phase behavior
- Vector Envelope point transition shapes
- Use Vector Envelope time scaling
- Use the Mod Pad
- Modulation source reference
- Via modulation source reference
-
- Sample Alchemy overview
- Interface overview
- Add source material
- Save a preset
- Edit mode
- Play modes
- Source overview
- Synthesis modes
- Granular controls
- Additive effects
- Additive effect controls
- Spectral effect
- Spectral effect controls
- Filter module
- Low and highpass filter
- Comb PM filter
- Downsampler filter
- FM filter
- Envelope generators
- Mod Matrix
- Modulation routing
- Motion mode
- Trim mode
- More menu
- Sampler
- Copyright
Audio Devices settings in Logic Pro for iPad
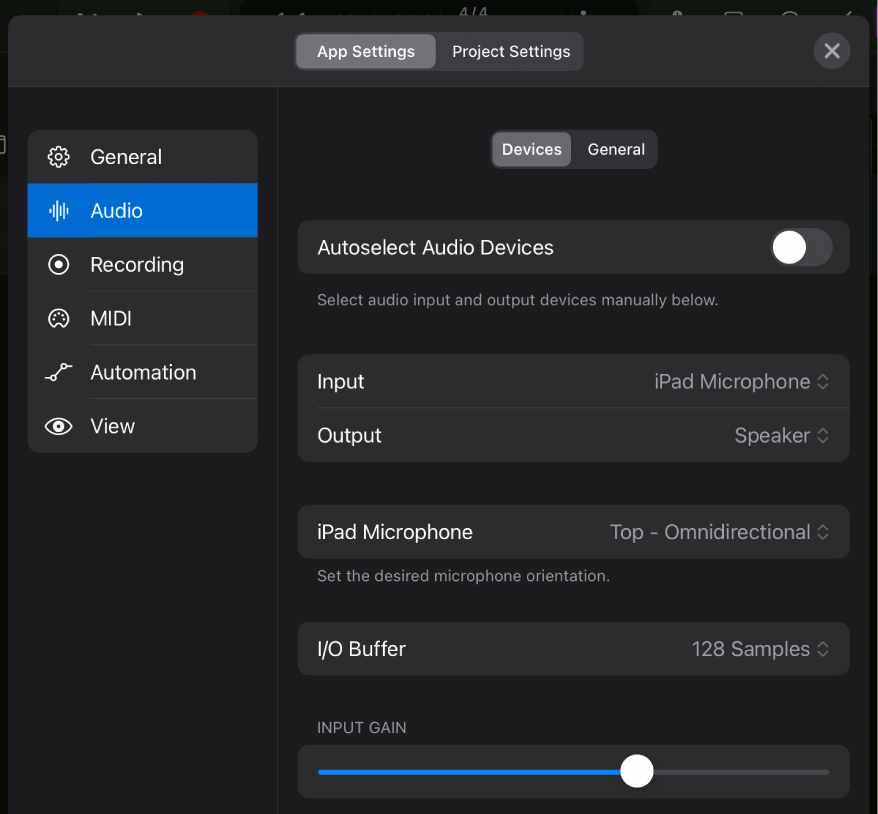
Audio devices
These settings determine what audio device Logic Pro for iPad uses to record audio signals in your project and what audio device it uses to play back the audio signal from your project.
The visibility of these settings depends on what audio devices are connected to your iPad via cable, Bluetooth, or Wi-Fi and what you’ve selected.
Autoselect Audio Devices: Tap the switch to turn autoselect on or off. The status of the switch determines how audio devices are selected:
On: Connecting an audio device to your iPad automatically selects that device as the input and output device.
The Input and Output pop-up menus below the switch are read-only, listing the devices that are in use.
Off: You can choose any device from the Input and Output pop-up menus.
If a previously selected audio device is disconnected, the Input and Output pop-up menus switch to iPad Microphone and Speaker respectively, displayed in parentheses.
Input pop-up menu: Choose one of the available options as the audio input device:
iPad Microphone: Uses the iPad’s built-in microphones with the microphone orientation selected in the iPad Microphone pop-up menu.
Connected audio interface: If a supported audio interface is connected to your iPad, its name is listed in the menu.
Note: The Input option is not displayed if AirPlay Multi-Destination is selected as the Output device.
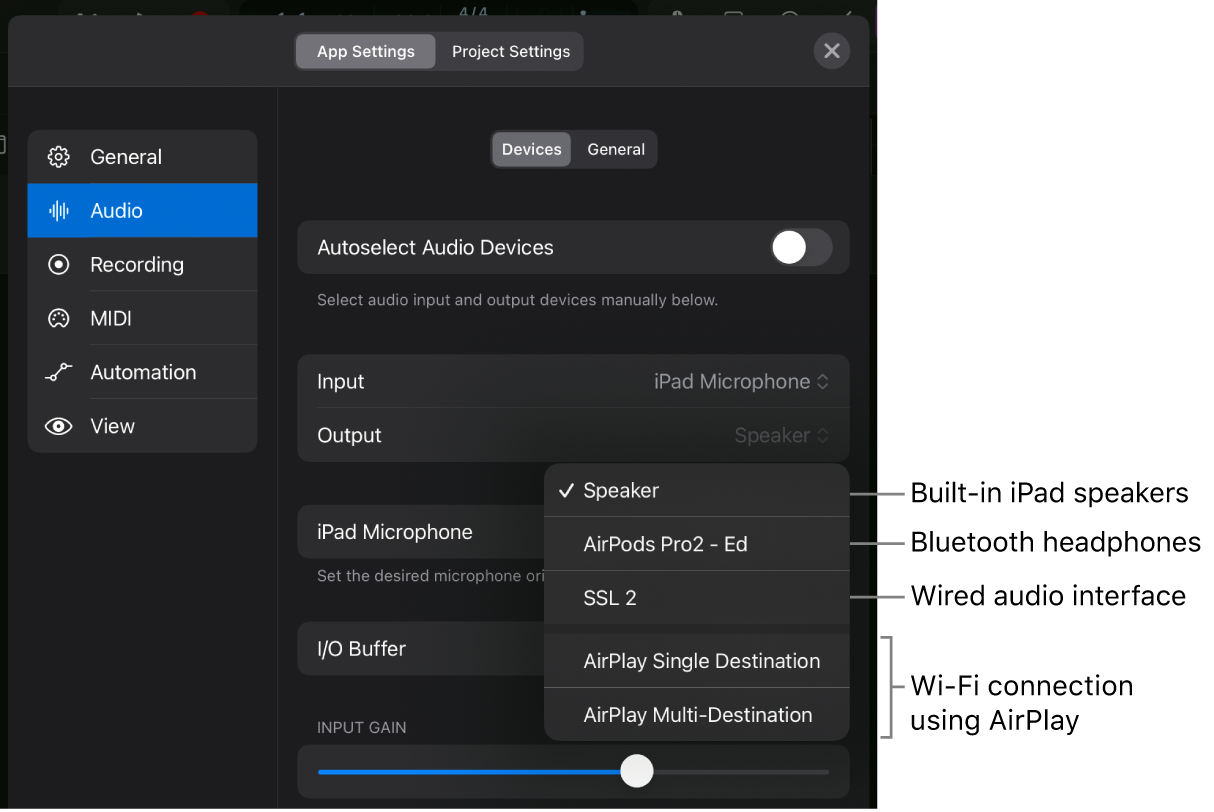
Output pop-up menu: Choose one of the available options as the audio output device to play back your project.
Speaker: The built-in iPad speakers are selected by default.
Bluetooth device: If you have AirPods connected to your iPad via Bluetooth, the name of the paired AirPods are displayed in the menu.
Connected audio interface: If a supported audio interface is connected to your iPad, its name is listed in the menu.
AirPlay Single Destination: You can choose one available AirPlay destination to play back your project when you tap the Select AirPlay Device button.
AirPlay Multi-Destination: You can choose multiple AirPlay destinations when you tap the Select AirPlay Device button to play back your project simultaneously on those devices.
iPad Microphone pop-up menu: Choose one of the five options that determine the microphone orientation and polar pattern. The available options depend on the iPad model.
Top - Omnidirectional: Mono signal.
Back - Subcardioid: Mono signal.
Back - Stereo: Stereo signal.
Front - Cardioid: Mono signal.
Front - Stereo: Stereo signal.
The selection is remembered when you switch to an external audio device and back to iPad Microphone.
Input Gain slider: Set the input level of the currently selected audio input device.
Note: The Input Gain slider is not displayed if AirPlay Multi-Destination is selected as the Output device.
AirPlay devices
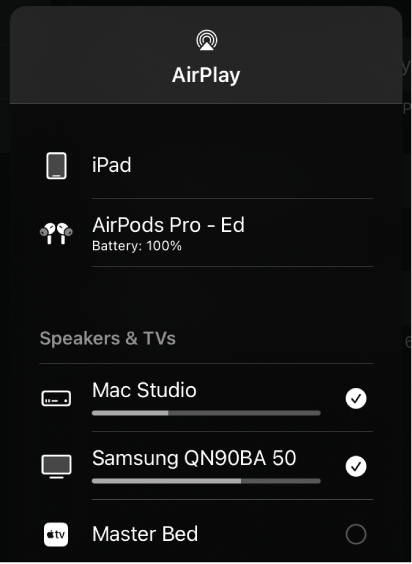
When playing back your project, you can send the audio signal wirelessly from your iPad to any device that supports AirPlay (computer, speakers, TV, and so on). When you choose AirPlay Single Destination or Airplay Multi-Destination from the Output pop-up menu, a button appears that lets you select one or multiple AirPlay destinations.
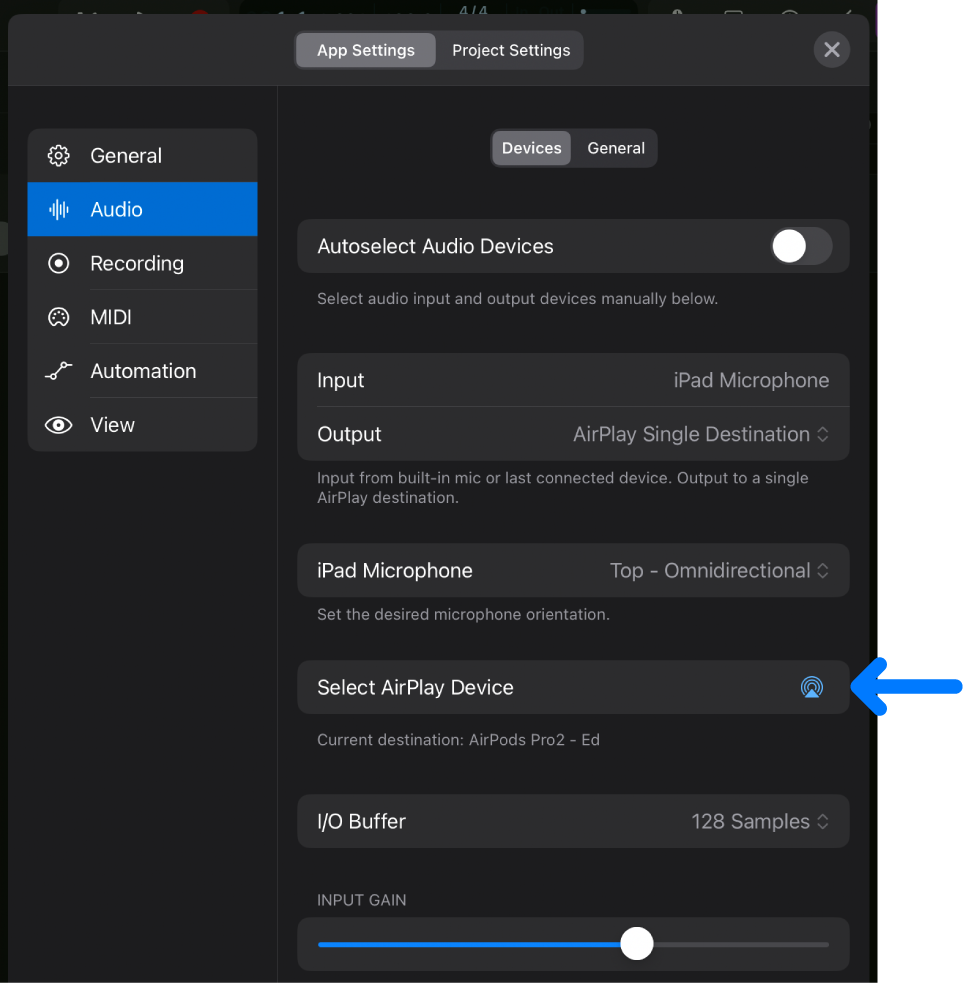
Select AirPlay Device button: Tap the blue AirPlay button
 to open the AirPlay dialog, where you can choose any available AirPlay destinations on your network.
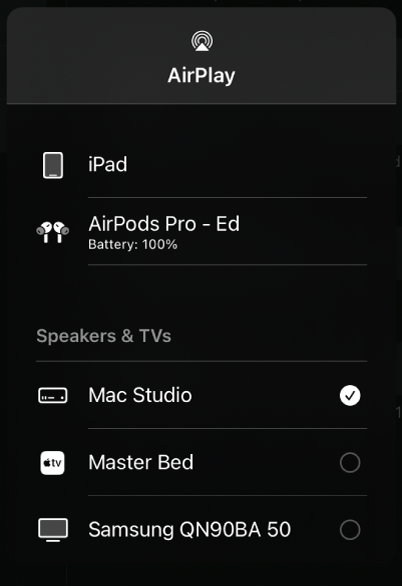
Note: With AirPlay Multi-Destination selected, you can tap multiple destinations in the AirPlay dialog. Each selected device shows a checkbox and a volume slider to adjust the playback volume for each destination (if supported by the device).
Multichannel audio devices
When you select a connected audio interface in the Output pop-up menu that has more than one stereo output channel, two additional options become available.
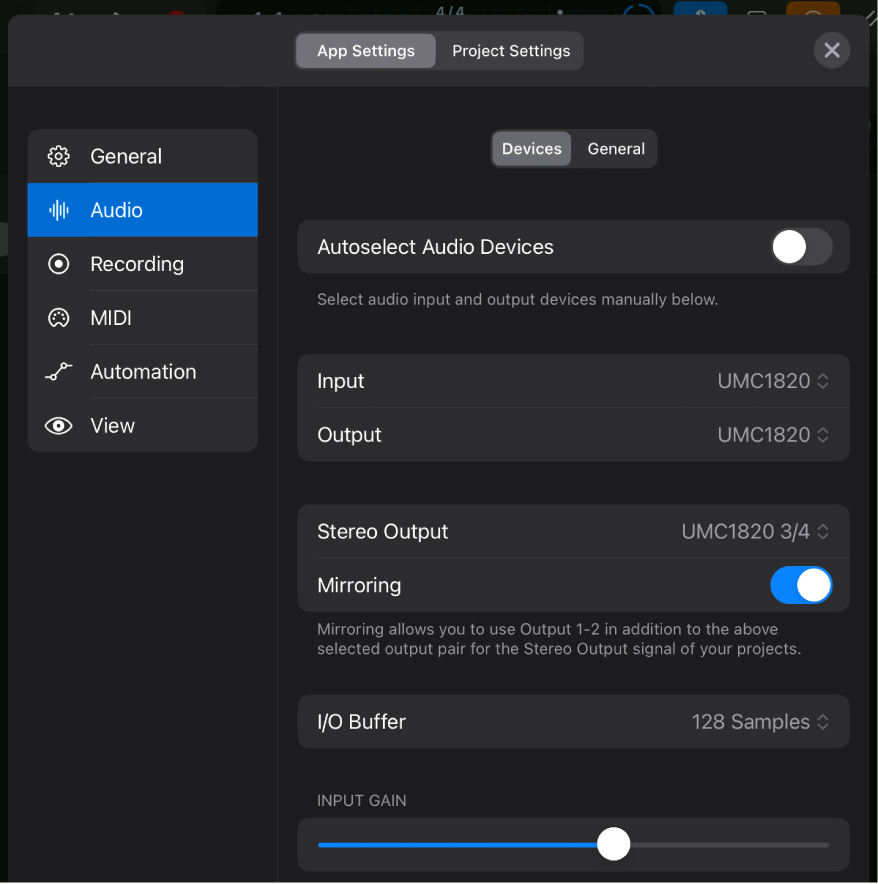
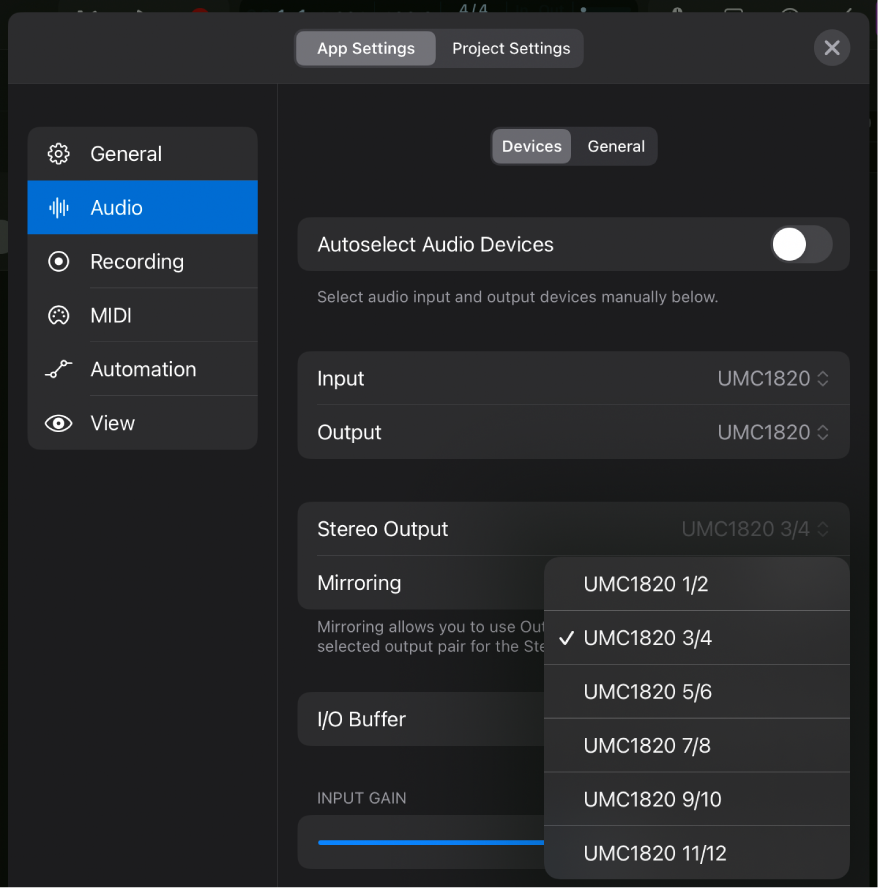
Stereo Output pop-up menu: The menu lists all the stereo output channels available on the selected device. The stereo output channel strip in your project is routed to the output channel you choose from this menu.
Mirroring: When you choose an output channel other than channel 1/2 from the Stereo Output pop-up menu, this switch becomes available. When you turn on mirroring, the stereo output channel strip is routed to output channel 1/2 in addition to the output channel you choose from the Stereo Output pop-up menu.
I/O buffer size
The I/O buffer size setting represents a compromise between CPU performance and low latency (delay). You might change those settings during the production, depending on whether you’re recording or mixing.
I/O Buffer pop-up menu: Determines the size of the buffer used by the audio device for both input and output.
Tip: Considerations for choosing the I/O buffer size:
During recording of audio tracks and software instrument tracks, the musician is monitoring through Logic Pro (with software monitoring enabled), and any noticeable delay caused by latency can negatively impact their performance. Setting the I/O buffer to the smallest amount minimizes the monitoring delay but also places a higher strain on your iPad’s processor.
The more processor-intensive plug-ins you use in your project, the higher the demand on your iPad’s processor during playback, which begins to affect playback in the form of clicks, pops, and crackles in your audio. Setting the I/O buffer to a higher value allows you to use more plug-ins during mixing without overpowering the CPU.
The CPU display in the control bar indicates how high the demand on your processor is when you play back or record in your project.
Tap the CPU/Memory display to show either CPU usage or memory usage.
You can tap the Low Latency Monitoring Mode button
 in the control bar to automatically turn off plug-ins in your project that cause high latency. See General Audio settings.

Download this guide: PDF