Logic Pro User Guide for iPad
- What’s new in Logic Pro 1.1
-
- What is Logic Pro?
- Working areas
- Work with function buttons
- Work with numeric values
-
- Intro to tracks
- Create tracks
- Create tracks using drag and drop
- Choose the default region type for a software instrument track
- Select tracks
- Duplicate tracks
- Reorder tracks
- Rename tracks
- Change track icons
- Change track colors
- Use the tuner on an audio track
- Show the output track in the Tracks area
- Delete tracks
- Edit track parameters
- Start a Logic Pro subscription
- How to get help
-
- Intro to recording
-
- Before recording software instruments
- Record software instruments
- Record additional software instrument takes
- Record to multiple software instrument tracks
- Record multiple MIDI devices to multiple tracks
- Record software instruments and audio simultaneously
- Merge software instrument recordings
- Spot erase software instrument recordings
- Replace software instrument recordings
- Capture your most recent MIDI performance
- Use the metronome
- Use the count-in
-
- Intro to arranging
-
- Intro to regions
- Select regions
- Cut, copy, and paste regions
- Move regions
- Remove gaps between regions
- Delay region playback
- Trim regions
- Loop regions
- Repeat regions
- Mute regions
- Split and join regions
- Stretch regions
- Separate a MIDI region by note pitch
- Bounce regions in place
- Change the gain of audio regions
- Create regions in the Tracks area
- Convert a MIDI region to a Drummer region or a pattern region
- Rename regions
- Change the color of regions
- Delete regions
- Create fades on audio regions
- Access mixing functions using the Fader
-
- Intro to Step Sequencer
- Use Step Sequencer with Drum Machine Designer
- Record Step Sequencer patterns live
- Step record Step Sequencer patterns
- Load and save patterns
- Modify pattern playback
- Edit steps
- Edit rows
- Edit Step Sequencer pattern, row, and step settings in the inspector
- Customize Step Sequencer
-
- Effect plug-ins overview
-
- Instrument plug-ins overview
-
- ES2 overview
- Interface overview
-
- Modulation overview
-
- Vector Envelope overview
- Use Vector Envelope points
- Use Vector Envelope solo and sustain points
- Set Vector Envelope segment times
- Vector Envelope XY pad controls
- Vector Envelope Actions menu
- Vector Envelope loop controls
- Vector Envelope release phase behavior
- Vector Envelope point transition shapes
- Use Vector Envelope time scaling
- Use the Mod Pad
- Modulation source reference
- Via modulation source reference
-
- Sample Alchemy overview
- Interface overview
- Add source material
- Save a preset
- Edit mode
- Play modes
- Source overview
- Synthesis modes
- Granular controls
- Additive effects
- Additive effect controls
- Spectral effect
- Spectral effect controls
- Filter module
- Low and highpass filter
- Comb PM filter
- Downsampler filter
- FM filter
- Envelope generators
- Mod Matrix
- Modulation routing
- Motion mode
- Trim mode
- More menu
- Sampler
- Copyright
Quick Sampler waveform display in Logic Pro for iPad
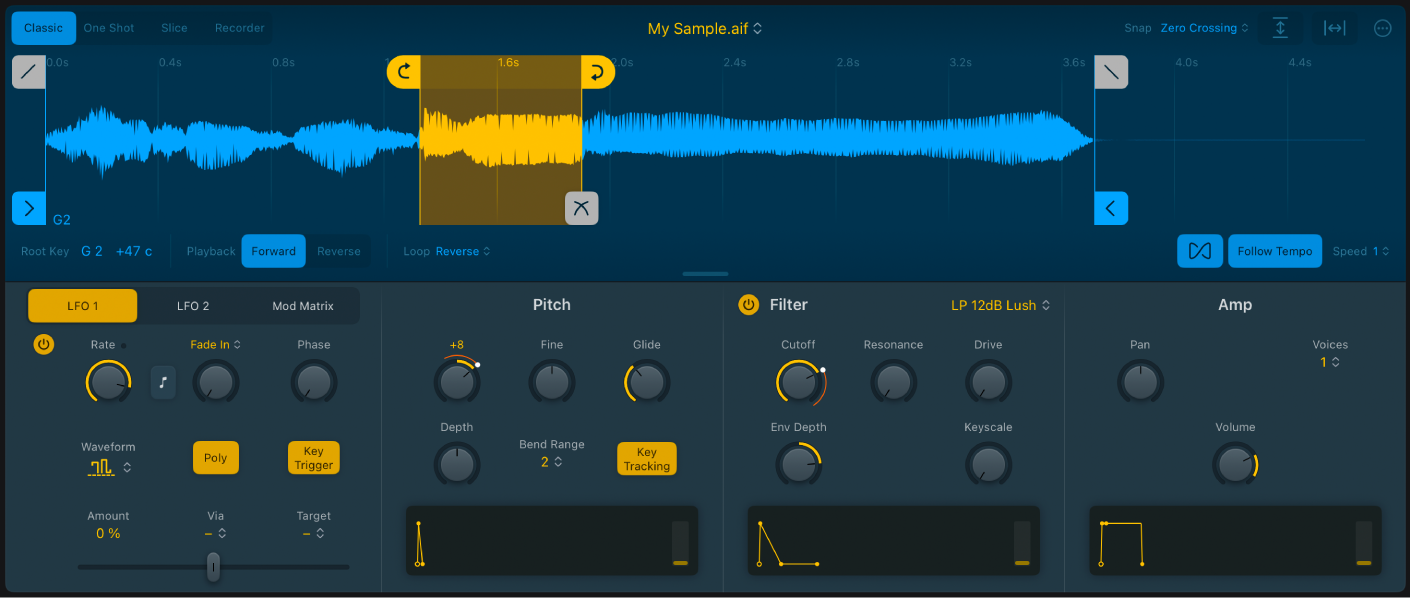
You can see the current audio file in the waveform display and directly edit a number of sample playback parameters. You can zoom in or out with pinch gestures, or scroll using swipes or by dragging the scroll bar. You can change the height of the waveform display with the resize handle.
When you tap or drag markers and handles in the waveform display, parameters and values related to the current action are shown below the waveform display. Tap ![]() in the parameter display bar to revert to the default behavior and parameter view.
in the parameter display bar to revert to the default behavior and parameter view.

Note: Some editing features are available only in certain modes.

Waveform display parameters
Sample name field and pop-up menu: Choose, rename, or perform file-handling tasks for audio.
Rename Current File: Opens a file renaming dialog. Type the new filename and tap OK.
Remove Current File: Removes the selected audio file, indicated with a checkmark beside the filename.
Clear History: Clears all but the most recently used file.
Browse Samples: Opens the Browser, where you can audition audio files. Drag the audio file directly into the waveform display area, where you can choose an Original or Optimized import. See Add audio to Quick Sampler.
Snap pop-up menu: Choose a value. Edits to crossfade, sample, slice, or loop start and end markers in the waveform display automatically snap to the nearest possible value.
Zoom vertical button: Tap
 to switch between the maximum vertical zoom view and the default waveform display view.
Zoom horizontal button: Tap
 to switch between the last manually set zoom level, if applicable, and an optimized zoom level that shows the area between the sample start and end markers. When no manual zoom level is set, the entire audio file is shown.
Tip: You can horizontally zoom in or out on the waveform display with pinch gestures, or scroll using swipes or by dragging the scroll bar.
Note: To make this facility useful, you should change the height of the waveform display with the Zoom vertical button.
More menu: Tap
 to choose a sample handling or processing command, or choose a crossfade, display, or MIDI behavior option. See Quick Sampler More menu.
Resize handle: Drag vertically to change the height of the waveform display.
Use Quick Sampler start, end, loop, fade, crossfade, and slice markers
In Logic Pro, you can use markers to alter audio playback. You can define the possible positions for markers using the Snap menu.
Note: Different marker types are shown in each mode.

Start and end markers: Drag the blue start or end marker to set the sample start and end point. Playback occurs between these markers.
Loop start and end markers: Drag the yellow loop start or end marker to set loop boundaries. Playback cycles between these markers when you hold a note. Drag the yellow shaded area between the loop start and end markers to move the entire loop.
Note: Loop boundaries can’t be dragged past the sample start and end markers.
Crossfade marker: Drag the gray crossfade marker to set the length of the crossfade at the beginning and end of loop boundaries, smoothing out audible glitches as the loop cycles across the loop end and start points.
Fade in/fade out markers: Drag the gray fade in or fade out marker to adjust the length of the fade at the beginning and end of the audio file segment between the start and end markers.
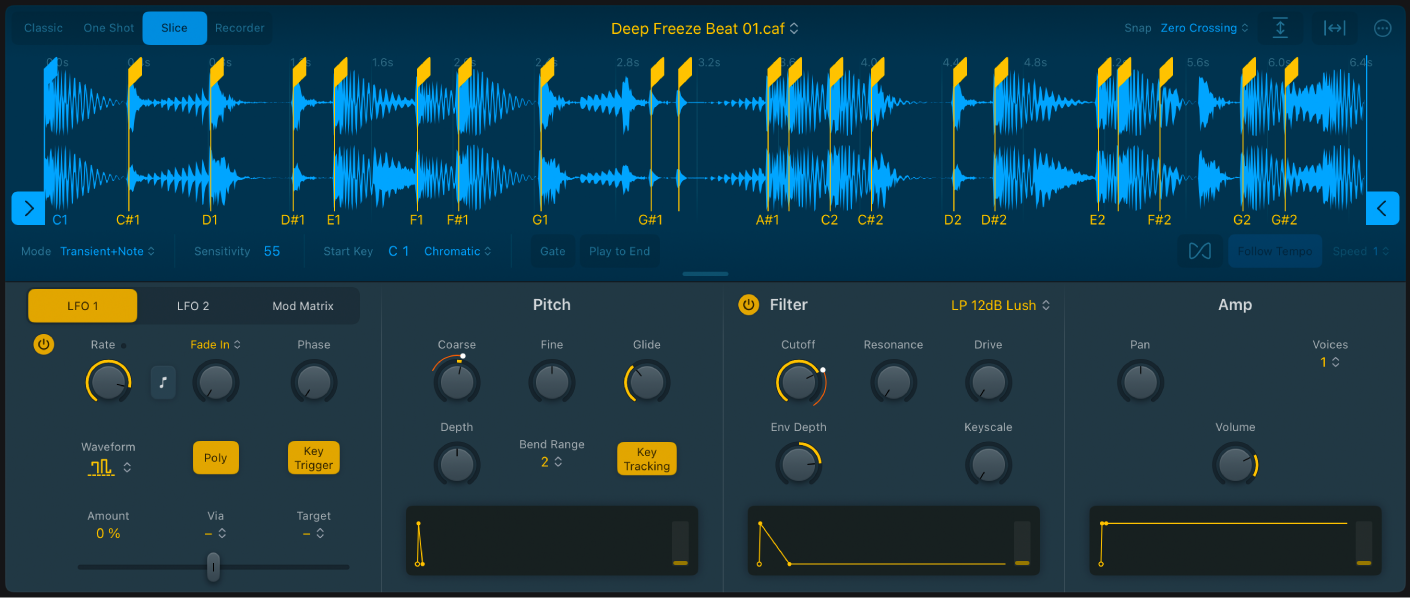
Slice marker: Shown in Slice mode. Drag any yellow slice marker to set its position. Tap between slice markers to create a new slice marker. Double-tap a slice marker to delete it.
Use slice markers to create new instruments and regions
In Logic Pro, you can use slice markers to create Drum Machine Designer tracks and to create MIDI regions containing note-on events.

In the Slice mode waveform display, drag the slice handles to adjust existing transient and start and end markers. You can also choose a number of commands from the More menu.
In Logic Pro, do any of the following:
Tap the More button
 in Quick Sampler, tap Functions, then tap Create Drum Machine Designer Track.
A new Drum Machine Designer track is created, and a new MIDI region is created on this track. The MIDI region contains note-on events that correspond to each slice between the start and markers, and you can edit these as you can any other MIDI region. Individual audio slices are automatically mapped to pads in Drum Machine Designer, and you can edit, replace, process, or route these as you like.
Tap the More button
 in Quick Sampler, tap Functions, then tap Copy MIDI Pattern. This analyzes and copies all slice markers between the start and end markers to the Clipboard.
You can paste the Clipboard contents to a MIDI or instrument track as a new MIDI region. This feature is ideal for creating perfectly synchronized instrument parts and for drum replacement, Foley, and other uses.
Download this guide: PDF