Logic Pro User Guide for iPad
- What’s new in Logic Pro 1.1
-
- What is Logic Pro?
- Working areas
- Work with function buttons
- Work with numeric values
-
- Intro to tracks
- Create tracks
- Create tracks using drag and drop
- Choose the default region type for a software instrument track
- Select tracks
- Duplicate tracks
- Reorder tracks
- Rename tracks
- Change track icons
- Change track colors
- Use the tuner on an audio track
- Show the output track in the Tracks area
- Delete tracks
- Edit track parameters
- Start a Logic Pro subscription
- How to get help
-
- Intro to recording
-
- Before recording software instruments
- Record software instruments
- Record additional software instrument takes
- Record to multiple software instrument tracks
- Record multiple MIDI devices to multiple tracks
- Record software instruments and audio simultaneously
- Merge software instrument recordings
- Spot erase software instrument recordings
- Replace software instrument recordings
- Capture your most recent MIDI performance
- Use the metronome
- Use the count-in
-
- Intro to arranging
-
- Intro to regions
- Select regions
- Cut, copy, and paste regions
- Move regions
- Remove gaps between regions
- Delay region playback
- Trim regions
- Loop regions
- Repeat regions
- Mute regions
- Split and join regions
- Stretch regions
- Separate a MIDI region by note pitch
- Bounce regions in place
- Change the gain of audio regions
- Create regions in the Tracks area
- Convert a MIDI region to a Drummer region or a pattern region
- Rename regions
- Change the color of regions
- Delete regions
- Create fades on audio regions
- Access mixing functions using the Fader
-
- Intro to Step Sequencer
- Use Step Sequencer with Drum Machine Designer
- Record Step Sequencer patterns live
- Step record Step Sequencer patterns
- Load and save patterns
- Modify pattern playback
- Edit steps
- Edit rows
- Edit Step Sequencer pattern, row, and step settings in the inspector
- Customize Step Sequencer
-
- Effect plug-ins overview
-
- Instrument plug-ins overview
-
- ES2 overview
- Interface overview
-
- Modulation overview
-
- Vector Envelope overview
- Use Vector Envelope points
- Use Vector Envelope solo and sustain points
- Set Vector Envelope segment times
- Vector Envelope XY pad controls
- Vector Envelope Actions menu
- Vector Envelope loop controls
- Vector Envelope release phase behavior
- Vector Envelope point transition shapes
- Use Vector Envelope time scaling
- Use the Mod Pad
- Modulation source reference
- Via modulation source reference
-
- Sample Alchemy overview
- Interface overview
- Add source material
- Save a preset
- Edit mode
- Play modes
- Source overview
- Synthesis modes
- Granular controls
- Additive effects
- Additive effect controls
- Spectral effect
- Spectral effect controls
- Filter module
- Low and highpass filter
- Comb PM filter
- Downsampler filter
- FM filter
- Envelope generators
- Mod Matrix
- Modulation routing
- Motion mode
- Trim mode
- More menu
- Sampler
- Copyright
Space Designer global parameters in Logic Pro for iPad
The details and output parameters affect the overall input, output, or behavior of the effect.
Note: Some parameters discussed in this section are available only in Sampled IR or Synthesized IR mode. Most parameters are available in both modes. Some parameters are specific to stereo use, and are not available when Space Designer is used in other channel formats.

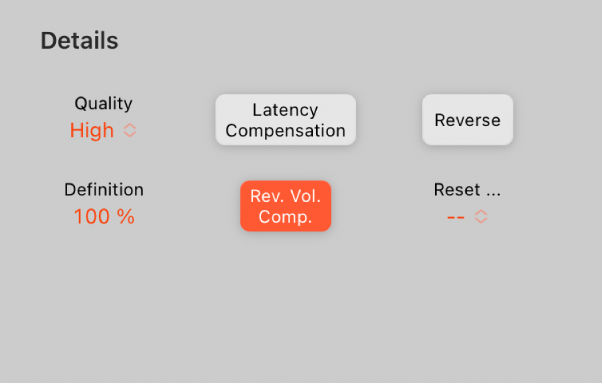
Details parameters
After your impulse response is loaded or generated, use these parameters to determine how Space Designer operates on the overall signal and impulse response.
Quality pop-up menu: Choose the sample rate. Lo-Fi produces a grainy reverb. Low halves the host application sample rate. Medium matches the host application sample rate. High is smooth and clean sounding.
Definition field: Set a crossover point (as a percentage of the overall length) to reduce the synthesized impulse response resolution. This emulates reverb diffusion and saves CPU resources.
Latency Compensation button: Enable or disable the internal latency compensation feature. When active, the direct signal in the output section is delayed to match the processing delay of the effect signal.
The complex calculations made by Space Designer take a small amount of time, which results in a processing delay, or latency, between the direct input signal and the processed output signal. Space Designer processing latency increases if Low or Lo-Fi is chosen in the Quality pop-up menu. Processing latency does not increase at sample rates above 44.1 kHz (Medium or High settings in the Quality pop-up menu).
Note: This compensation feature is not related to latency compensation in Logic Pro; it occurs entirely within Space Designer.
Rev Vol Comp button: Disable or enable the internal impulse response volume matching function.
The reverb volume compensation feature attempts to match the perceived—not the actual—volume differences between impulse response files. It should generally be left on, although it may not work with all types of impulse responses. If you have an impulse response with a different level, turn off volume compensation, then adjust input and output levels accordingly.
Reverse button: Reverse the impulse response and envelopes. When the impulse response is reversed, you’re effectively using the tail rather than the front end of the sample. You may need to adjust the Predelay and other parameter values when reversing.
Reset pop-up menu: Choose a menu command.
EQ: Reset the Output EQ to default values.
Volume Envelope: Reset the volume envelope to default values.
Filter Envelope: Reset the filter envelope to default values.
Density Envelope: Reset the density envelope to default values.
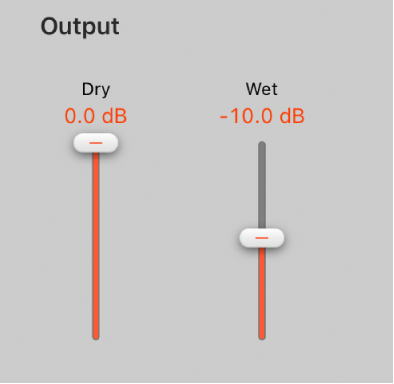
Output parameters
 Dry/Wet Output controls: Set output levels for the dry (source) and wet (effect) signal.
Set the impulse response sample rate and preserve length
Changing the sample rate upward increases—or changing it downward decreases—the frequency response (and length) of the impulse response, and to a degree the overall sound quality of the reverb. Upward sample rate changes are of benefit only if the original impulse response sample actually contains higher frequencies. When reducing the sample rate, use your ears to decide if the sonic quality meets your needs.
Note: Room surfaces—except concrete and tiles—tend to have minimal reflections in higher frequency ranges, making half-rate and full-rate impulse responses sound almost identical.
In Logic Pro, choose one of the following from the Quality pop-up menu to set the sample rate of an impulse response:
Lo-Fi: This setting divides the sample rate by four. If the project sample rate is 96 kHz, the impulse response sample rate is converted to 24 kHz. If the project sample rate is 44.1 kHz, the impulse response sample rate is converted to 11.025 kHz, and so on.
Low: This setting effectively halves the sample rate. If the project sample rate is 96 kHz, the impulse response sample rate is converted to 48 kHz. If the project sample rate is 44.1 kHz, the impulse response sample rate is converted to 22.05 kHz, and so on.
When you select a half sample rate, the impulse response becomes twice as long. The highest frequency that can be reverberated is halved. This results in a behavior that is much like doubling every dimension of a virtual room—multiplying the volume of a room by eight. The Low (and Lo-Fi) setting can also be used for interesting tempo, pitch, and retro digital effects. Another benefit of reducing the sample rate is that processing requirements drop significantly, making the lower quality settings useful for large, open spaces.
This behavior also applies when you choose Lo-Fi, but the sample rate is divided by four and the impulse response is multiplied in length four times.
Medium: Space Designer uses the current project sample rate. The sample rate of a loaded impulse response is automatically converted to match the current project sample rate, if necessary. For example, this allows you to load a 44.1 kHz impulse response into a project running at 96 kHz, and vice versa.
High: Space Designer uses the highest possible sample rate.
To retain the original length of the impulse response when the sample rate is changed: Adjust the Size knob value. Using this parameter with your Quality pop-up menu choice can lead to interesting results.
If you’re running Space Designer in a project that uses a higher sample rate than the impulse response, you may also want to reduce the impulse response sample rate. Adjust the Size knob value to reduce CPU processing time without compromising reverb quality.
Tip: You can make similar adjustments while running in Synthesized IR mode. Most typical reverb sounds don’t contain an excessive amount of high frequency content. If your project is running at 96 kHz, for example, you would need to use lowpass filtering to obtain the mellow frequency response characteristics of many reverb sounds. A better approach would be to first reduce the high frequencies by choosing a lower rate from the Quality pop-up menu, followed by using the lowpass filter, thus conserving significant CPU resources. It is also worth noting that longer impulse responses (sampled or synthesized) place a higher strain on the CPU.
Use the Space Designer Definition parameter
The Definition parameter emulates the diffusion of natural reverb patterns when in Synthesized IR mode.
Natural reverbs contain most of their spatial information in the first few milliseconds. Toward the end of the reverb, the pattern of reflections—signals bouncing off walls, and so on—becomes more diffuse. In other words, the reflected signals become quieter and increasingly nondirectional, containing far less spatial information. To emulate this phenomenon, use the full impulse response resolution only at the onset of the reverb, then use a reduced impulse response resolution toward the end of the reverb.
In Logic Pro, vertically drag the Definition field to set the crossover point—where the switch to the reduced impulse response resolution occurs.
The Definition field is shown as a percentage, where 100% is equal to the length of the full resolution impulse response.
Set Space Designer output parameters
In Logic Pro, use the output parameters to adjust the balance between the direct (dry) signals and the processed (wet) signals.
Space Designer provides two output sliders—the Dry slider for the direct signal, and the Wet slider for the reverb signal—when you insert it as a mono, mono to stereo, or stereo effect.

Set the level of the Dry slider: Move to set the level of the non-effect, or dry, signal. Move the slider to a value of 0 (mute) if Space Designer is inserted in a bus channel or when you’re using modeling impulse responses, such as speaker simulations.
Set the level of the Wet slider: Move to adjust the level of the effect signal.
Download this guide: PDF