Logic Pro User Guide for iPad
- What’s new in Logic Pro 1.1
-
- What is Logic Pro?
- Working areas
- Work with function buttons
- Work with numeric values
-
- Intro to tracks
- Create tracks
- Create tracks using drag and drop
- Choose the default region type for a software instrument track
- Select tracks
- Duplicate tracks
- Reorder tracks
- Rename tracks
- Change track icons
- Change track colors
- Use the tuner on an audio track
- Show the output track in the Tracks area
- Delete tracks
- Edit track parameters
- Start a Logic Pro subscription
- How to get help
-
- Intro to recording
-
- Before recording software instruments
- Record software instruments
- Record additional software instrument takes
- Record to multiple software instrument tracks
- Record multiple MIDI devices to multiple tracks
- Record software instruments and audio simultaneously
- Merge software instrument recordings
- Spot erase software instrument recordings
- Replace software instrument recordings
- Capture your most recent MIDI performance
- Use the metronome
- Use the count-in
-
- Intro to arranging
-
- Intro to regions
- Select regions
- Cut, copy, and paste regions
- Move regions
- Remove gaps between regions
- Delay region playback
- Trim regions
- Loop regions
- Repeat regions
- Mute regions
- Split and join regions
- Stretch regions
- Separate a MIDI region by note pitch
- Bounce regions in place
- Change the gain of audio regions
- Create regions in the Tracks area
- Convert a MIDI region to a Drummer region or a pattern region
- Rename regions
- Change the color of regions
- Delete regions
- Create fades on audio regions
- Access mixing functions using the Fader
-
- Intro to Step Sequencer
- Use Step Sequencer with Drum Machine Designer
- Record Step Sequencer patterns live
- Step record Step Sequencer patterns
- Load and save patterns
- Modify pattern playback
- Edit steps
- Edit rows
- Edit Step Sequencer pattern, row, and step settings in the inspector
- Customize Step Sequencer
-
- Effect plug-ins overview
-
- Instrument plug-ins overview
-
- ES2 overview
- Interface overview
-
- Modulation overview
-
- Vector Envelope overview
- Use Vector Envelope points
- Use Vector Envelope solo and sustain points
- Set Vector Envelope segment times
- Vector Envelope XY pad controls
- Vector Envelope Actions menu
- Vector Envelope loop controls
- Vector Envelope release phase behavior
- Vector Envelope point transition shapes
- Use Vector Envelope time scaling
- Use the Mod Pad
- Modulation source reference
- Via modulation source reference
-
- Sample Alchemy overview
- Interface overview
- Add source material
- Save a preset
- Edit mode
- Play modes
- Source overview
- Synthesis modes
- Granular controls
- Additive effects
- Additive effect controls
- Spectral effect
- Spectral effect controls
- Filter module
- Low and highpass filter
- Comb PM filter
- Downsampler filter
- FM filter
- Envelope generators
- Mod Matrix
- Modulation routing
- Motion mode
- Trim mode
- More menu
- Sampler
- Copyright
Vintage Clav misc parameters in Logic Pro for iPad
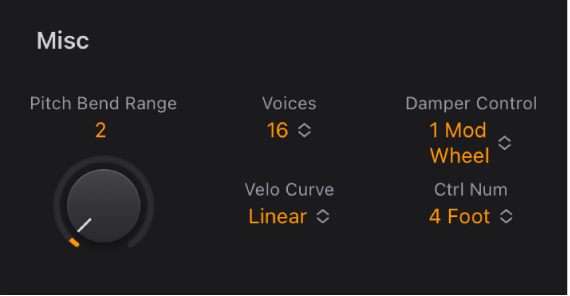
The Misc parameters affect the polyphony, keyboard response, and other core aspects of Vintage Clav.

Misc parameters
Pitch Bend Range knob and field: Determine the pitch bend range in semitone steps. Use your MIDI keyboard pitch bend wheel to control pitch bends.
Voices pop-up menu: Choose the maximum number of voices that can be played simultaneously. Lowering the value of this parameter limits the polyphony and processing requirements of Vintage Clav. There are two monophonic settings: mono and legato. Each setting provides a single voice when playing Vintage Clav.
Mono: Vintage Clav voice is triggered each time a key is pressed.
Legato: Vintage Clav sound-shaping processes are not triggered if the notes are played legato—only the pitch changes. If the notes are played staccato, a Vintage Clav voice with all sound-shaping processes is triggered.
Velo Curve pop-up menu: Choose one of nine preset velocity curves to suit your playing style or the selected model. The nine curves available are: Fix 25%, Fix 50%, Fix 75%, Fix 100%, Convex 1, Convex 2, Linear (the default), Concave 1, and Concave 2.
Fixed curves: These are linear curves with a fixed dynamic range of 25%, 50%, 75%, and 100%.
Convex curves: These curves are more dynamically responsive in the center octaves of the keyboard range.
Concave curves: These curves are less dynamically responsive in the center octaves of the keyboard range.
Damper Control pop-up menu: Choose the MIDI controller (or MIDI velocity or aftertouch) you want to use to control the Damper parameter. Off disables MIDI control of damping.
Ctrl Num pop-up menu: Choose the MIDI controller you want to use as a manual Wah effect control. MIDI foot controllers such as Expression pedals are commonly used for this type of task, but any controller can be assigned. You can also use MIDI velocity or aftertouch messages to control the Wah effect. Off disables MIDI control.
Choose the Learn menu item to automatically assign the parameter to the first appropriate incoming MIDI data message, then move the controller on your MIDI keyboard. Learn mode has a 20 second time-out feature. If Vintage Clav does not receive a MIDI message within 20 seconds, the parameter reverts to its original MIDI controller assignment.
Note: You can simultaneously control the Wah effect with both the integrated envelope follower function (“auto-wah”) and a manual controller. In this situation, the controller events of the envelope follower and manual controls are mixed.
Download this guide: PDF