MainStage User Guide
- Welcome
-
- Overview of Edit mode
-
- Select patches and sets in the Patch List
- Copy, paste, and delete patches
- Reorder and move patches in the Patch List
- Add and rename patches
- Create a patch from several patches
-
- Overview of the Patch Settings Inspector
- Select patch settings in the Patch Library
- Set the time signature for patches
- Change the tempo when you select a patch
- Set program change and bank numbers
- Defer patch changes
- Instantly silence the previous patch
- Change patch icons
- Transpose the pitch of incoming notes for a patch
- Change the tuning for a patch
- Add text notes to a patch
-
- Overview of channel strips
- Add a channel strip
- Change a channel strip setting
- Configure channel strip components
- Show signal flow channel strips
- Hide the metronome channel strip
- Create an alias of a channel strip
- Add a patch bus
- Set channel strip pan or balance positions
- Set channel strip volume levels
- Mute and solo channel strips
- Use multiple instrument outputs
- Use external MIDI instruments
- Reorganize channel strips
- Delete channel strips
-
- Overview of the Channel Strip Inspector
- Choose channel strip settings
- Rename channel strips
- Change channel strip colors
- Change channel strip icons
- Use feedback protection with channel strips
- Set keyboard input for a software instrument channel strip
- Transpose individual software instruments
- Filter MIDI messages
- Scale channel strip velocity
- Set channel strips to ignore Hermode tuning
- Override concert- and set-level key ranges
- Add text notes to a channel strip in the Channel Strip Inspector
- Route audio via send effects
-
- Screen Control Inspector overview
- Replace parameter labels
- Choose custom colors for screen controls
- Change background or grouped screen control appearance
- Set screen controls to show the hardware value
- Set parameter change behavior for screen controls
- Set hardware matching behavior for screen controls
- Reset and compare changes to a patch
- Override concert- and set-level mappings
-
- Overview of mapping screen controls
- Map to channel strip and plug-in parameters
- Map screen controls to actions
- Map a screen control to multiple parameters
- Use screen controls to display PDF document pages
- Edit the saved value for a mapped parameter
- Set drum pads or buttons to use note velocity
- Map screen controls to all channel strips in a patch
- Undo screen control parameter mappings
- Remove screen control mappings
- Work with graphs
- Create controller transforms
- Share patches and sets between concerts
- Record the audio output of a concert
-
- Overview of concerts
- Create a concert
- Open and close concerts
- Save concerts
- How saving affects parameter values
- Clean up concerts
- Consolidate assets in a concert
- Rename the current concert
-
- Overview of the Concert Settings Inspector
- Set MIDI Routing to channel strips
- Transpose incoming note pitch for a concert
- Define the program change message source
- Send unused program changes to channel strips
- Set the time signature for a concert
- Change the tuning for a concert
- Set the pan law for a concert
- Add text notes to a concert
- Control the metronome
- Silence MIDI notes
- Mute audio output
-
- Layout mode overview
-
- Screen control parameter editing overview
- Lift and stamp screen control parameters
- Reset screen control parameters
- Common screen control parameters
- Keyboard screen control parameters
- MIDI activity screen control parameters
- Drum pad screen control parameters
- Waveform screen control parameters
- Selector screen control parameters
- Text screen control parameters
- Background screen control parameters
- How MainStage passes through MIDI messages
- Export and import layouts
- Change the aspect ratio of a layout
-
- Before performing live
- Use Perform mode
- Screen controls in performance
- Tempo changes during performance
- Tips for performing with keyboard controllers
- Tips for performing with guitars and other instruments
- Tune guitars and other instruments with the Tuner
- The Playback plug-in in performance
- Record your performances
- After the performance
- Tips for complex hardware setups
-
- Overview of keyboard shortcuts and command sets
-
- Concerts and layouts keyboard shortcuts
- Patches and sets (Edit mode) keyboard shortcuts
- Editing keyboard shortcuts
- Actions keyboard shortcuts
- Parameter mapping (Edit mode) keyboard shortcuts
- Channel strips (Edit mode) keyboard shortcuts
- Screen controls (Layout mode) keyboard shortcuts
- Perform in Full Screen keyboard shortcuts
- Window and view keyboard shortcuts
- Help and support keyboard shortcuts
-
-
- Use MIDI plug-ins
-
- Arpeggiator overview
- Arpeggiator control parameters
- Note order parameters overview
- Note order variations
- Note order inversions
- Arpeggiator pattern parameters overview
- Use Live mode
- Use Grid mode
- Arpeggiator options parameters
- Arpeggiator keyboard parameters
- Use keyboard parameters
- Assign controllers
- Modifier controls
- Note Repeater controls
- Randomizer controls
-
- Use Scripter
- Use the Script Editor
- Scripter API overview
- MIDI processing functions overview
- HandleMIDI function
- ProcessMIDI function
- GetParameter function
- SetParameter function
- ParameterChanged function
- Reset function
- JavaScript objects overview
- Use the JavaScript Event object
- Use the JavaScript TimingInfo object
- Use the Trace object
- Use the MIDI event beatPos property
- Use the JavaScript MIDI object
- Create Scripter controls
- Transposer controls
-
-
- Alchemy overview
- Alchemy interface overview
- Alchemy Name bar
- Alchemy file locations
-
- Alchemy source overview
- Source master controls
- Import browser
- Source subpage controls
- Source filter controls
- Source filter use tips
- Source elements overview
- Additive element controls
- Additive element effects
- Spectral element controls
- Spectral element effects
- Pitch correction controls
- Formant filter controls
- Granular element controls
- Sampler element controls
- VA element controls
- Wide unison mode
- Source modulations
- Morph controls
- Alchemy master voice section
- Alchemy Extended parameters
-
- Playback plug-in overview
- Add a Playback plug-in
- Playback interface
- Use the Playback waveform display
- Playback transport and function buttons
- Playback information display
- Playback Sync, Snap To, and Play From parameters
- Use the Playback group functions
- Use the Playback Action menu and File field
- Use markers with the Playback plug-in
-
- Sample Alchemy overview
- Interface overview
- Add source material
- Edit mode
- Play modes
- Source overview
- Synthesis modes
- Granular controls
- Additive effects
- Additive effect controls
- Spectral effect
- Spectral effect controls
- Filter module
- Lowpass, bandpass, and highpass filters
- Comb PM filter
- Downsampler filter
- FM filter
- Envelope generators
- Mod Matrix
- Modulation routing
- Motion mode
- Trim mode
- More menu
-
- Sculpture overview
- Sculpture interface
- Global parameters
- Amplitude envelope parameters
- Use the Waveshaper
- Filter parameters
- Output parameters
- Define MIDI controllers
- Extended parameters
-
- Studio Piano
- Copyright

Program a sustained synthesizer sound in Sculpture in MainStage
First, load the default setting—the very simple sound consisting of a plucked string that vibrates and fades away. This sound needs some drastic changes to become a sustained or extended pad sound.
Examine the three objects. Notice that only Object 1 is active, and acts on the string with an Impulse object type: the string is briefly excited when the note is played, then the sound decays. A sustained pad sound requires an exciting agent that constantly acts upon the string. The appropriate object types are Bow or Bow wide (the string is played with either short bow strokes or long, extended bow strokes), Noise (excited by a random noise signal), or Blow (excited by being blown—much like a clarinet or flute).
Test the above mentioned object types one after the other. Drag the Object 1 Pickup slider, responsible for the exact position of the exciting agent, up and down the string while you’re playing. You will come to two conclusions: First, the sound is now sustained for as long as you hold down a key. Second, dragging the Object 1 slider with the Bow type selected results in the most pronounced sonic changes. This setting promises the most rewarding possibilities for varying the sound, and that’s why this type has been chosen.
The sonic variations created by the Bow type are very appealing when the virtual bow stroke is moved along the string. You can control this movement by using an envelope, thus creating the foundation of your pad sound.
It makes more sense and is more convenient to record the envelope rather than program it, even if it is easy to program it with the graphic display.
Record an envelope in Sculpture
In MainStage, make sure you have loaded the default setting, then drag the Object 1 slider all the way to the left. Starting from this position, where it generates only an overtone-rich scratch, start animating it by using the envelope.
Locate the Envelope section in the lower-right corner of the Sculpture window. Select the first of the two envelopes by clicking the envelope 1 button to select it. In the left part of the Envelope section, notice the two routing possibilities that are used to assign a modulation target to the envelope.
Click the 1 button to activate the first routing link, and choose Object1 Position from the Target pop-up menu as the modulation target. Drag the amt slider all the way to the right to set the modulation intensity to its maximum value.
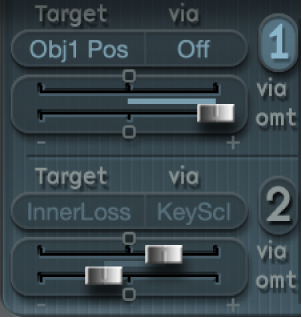
The envelope can now be recorded. It is assumed that your MIDI keyboard has a modulation wheel that outputs the corresponding MIDI controller message (CC number 1) and that option 1 ModWhl is selected for control of Envelope 1 (choose 1 ModWhl from the CtrlEnv 1 pop-up menu in the dark bottom edge of the Sculpture window).
Click the R button near the top of the Envelope section below Record Trigger, to prepare the envelope for recording. Choose Note + Ctrl Movement from the Record Trigger pop-up menu.
This option specifies that the recording of the controller messages from the modulation wheel begins the instant the first note is played.
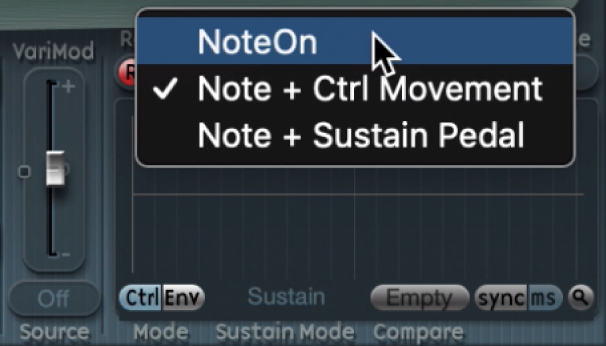
Play a note when you want to start the recording, and move the modulation wheel slowly upward while keeping the key on the keyboard depressed. Notice the sound variations you create while moving the modulation wheel.
At the end of the recording, return the wheel to its initial starting position and, after you release the depressed note, click the R button to deactivate the recording mode.
Increase stereo breadth and chorus in Sculpture
To give the very dry-sounding “0001 raw pad” setting a little more stereo breadth and chorus effect, modulate the Pickup positions, and assign them to the left and right channels.
In MainStage, load the “0001 raw pad” setting.
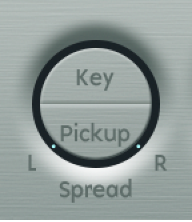
Drag the Spread Pickup semicircle upward until the light blue dots come to rest near the line that separates both semicircles.
This separates the stereo pan positions of the Pickups.
Click the 1 and 2 buttons to activate both of the modulation links in LFO1.
For the first link, choose PickupA Position from the Target pop-up menu, and then drag the amt slider to a small positive value of about 0.03 Hz to modulate the position of Pickup A.
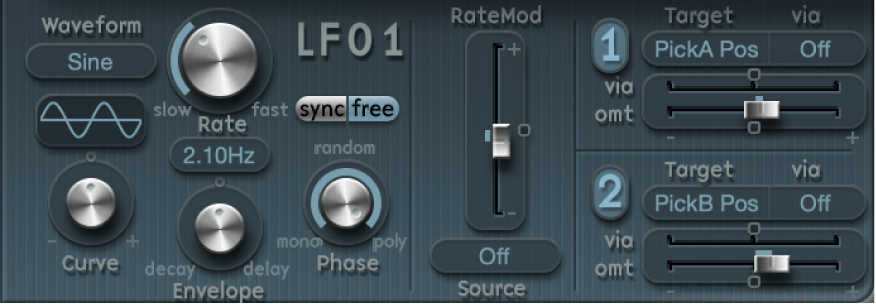
For the second link, choose PickupB Position from the Target pop-up menu, and then drag the amt slider to a small negative value of about −0.03 Hz to modulate the position of Pickup B.
You can hear a pleasant beating or chorus effect in the sound, which makes it broader and more full, alleviating the unpleasant, dry character. Another unpleasant aspect is that the sound is too strong in the mid frequency range and could use some equalization. You can use the Body EQ to correct this.
Activate the Body EQ, and experiment with the Lo Mid Hi model—the standard setting. Try reducing Mid to −0.5 and dragging the Mid Frequency slider to 0.37.

To give the pad a little depth, activate the Delay. Set the Delay Time to 1/4 and adjust the Xfeed knob to 30%.
The pad now has a pleasant and unobtrusive ambience; you can leave the other Delay parameters at their original values.

Make the sound more lively using the jitter modulators in Sculpture
You can make the sound more animated with some subtle modulation, which makes the jitter modulators the perfect tool for the job. The jitter modulators are basically LFOs that use a random waveform.
In MainStage, click the Jitter button below the LFO section to activate the display for both of the jitter modulators.
Click the 1 button to turn on the first link in Jitter 1, and choose Object1 Timbre from the Target pop-up menu.
Drag the slider below the Target pop-up menu to −0.40 to adjust the Intensity, and reduce the Rate parameter to 1 Hz. There should be subtle inconsistencies in the pressure applied by the bow to the string. To better recognize this effect, temporarily increase the Intensity level.
You can use the second jitter modulator for random position deviations with the modulation target Pickup Pos A+B (pickup position A and B).
Activate Jitter 2 and choose the Pickup Pos A+B setting from the Target pop-up menu.
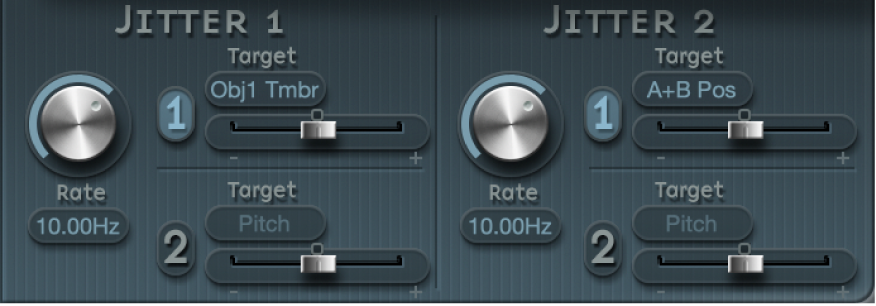
Drag the slider below the Target pop-up menu to an Intensity of about 0.2, and adjust the Rate knob to 1.5 Hz. As you increase the Intensity, the sound develops a distinct clinking or rattling—adjust this effect to taste.
You now have a satisfactory pad sound, which you should leave alone at this point, even though a few Sculpture features such as the Filter and the Waveshaper lie idle—not to mention the two additional Objects—but sometimes it’s a good idea to quit while you’re ahead.