MainStage User Guide
- Welcome
-
- Overview of Edit mode
-
- Select patches and sets in the Patch List
- Copy, paste, and delete patches
- Reorder and move patches in the Patch List
- Add and rename patches
- Create a patch from several patches
-
- Overview of the Patch Settings Inspector
- Select patch settings in the Patch Library
- Set the time signature for patches
- Change the tempo when you select a patch
- Set program change and bank numbers
- Defer patch changes
- Instantly silence the previous patch
- Change patch icons
- Transpose the pitch of incoming notes for a patch
- Change the tuning for a patch
- Add text notes to a patch
-
- Overview of channel strips
- Add a channel strip
- Change a channel strip setting
- Configure channel strip components
- Show signal flow channel strips
- Hide the metronome channel strip
- Create an alias of a channel strip
- Add a patch bus
- Set channel strip pan or balance positions
- Set channel strip volume levels
- Mute and solo channel strips
- Use multiple instrument outputs
- Use external MIDI instruments
- Reorganize channel strips
- Delete channel strips
-
- Overview of the Channel Strip Inspector
- Choose channel strip settings
- Rename channel strips
- Change channel strip colors
- Change channel strip icons
- Use feedback protection with channel strips
- Set keyboard input for a software instrument channel strip
- Transpose individual software instruments
- Filter MIDI messages
- Scale channel strip velocity
- Set channel strips to ignore Hermode tuning
- Override concert- and set-level key ranges
- Add text notes to a channel strip in the Channel Strip Inspector
- Route audio via send effects
-
- Screen Control Inspector overview
- Replace parameter labels
- Choose custom colors for screen controls
- Change background or grouped screen control appearance
- Set screen controls to show the hardware value
- Set parameter change behavior for screen controls
- Set hardware matching behavior for screen controls
- Reset and compare changes to a patch
- Override concert- and set-level mappings
-
- Overview of mapping screen controls
- Map to channel strip and plug-in parameters
- Map screen controls to actions
- Map a screen control to multiple parameters
- Use screen controls to display PDF document pages
- Edit the saved value for a mapped parameter
- Set drum pads or buttons to use note velocity
- Map screen controls to all channel strips in a patch
- Undo screen control parameter mappings
- Remove screen control mappings
- Work with graphs
- Create controller transforms
- Share patches and sets between concerts
- Record the audio output of a concert
-
- Overview of concerts
- Create a concert
- Open and close concerts
- Save concerts
- How saving affects parameter values
- Clean up concerts
- Consolidate assets in a concert
- Rename the current concert
-
- Overview of the Concert Settings Inspector
- Set MIDI Routing to channel strips
- Transpose incoming note pitch for a concert
- Define the program change message source
- Send unused program changes to channel strips
- Set the time signature for a concert
- Change the tuning for a concert
- Set the pan law for a concert
- Add text notes to a concert
- Control the metronome
- Silence MIDI notes
- Mute audio output
-
- Layout mode overview
-
- Screen control parameter editing overview
- Lift and stamp screen control parameters
- Reset screen control parameters
- Common screen control parameters
- Keyboard screen control parameters
- MIDI activity screen control parameters
- Drum pad screen control parameters
- Waveform screen control parameters
- Selector screen control parameters
- Text screen control parameters
- Background screen control parameters
- How MainStage passes through MIDI messages
- Export and import layouts
- Change the aspect ratio of a layout
-
- Before performing live
- Use Perform mode
- Screen controls in performance
- Tempo changes during performance
- Tips for performing with keyboard controllers
- Tips for performing with guitars and other instruments
- Tune guitars and other instruments with the Tuner
- The Playback plug-in in performance
- Record your performances
- After the performance
- Tips for complex hardware setups
-
- Overview of keyboard shortcuts and command sets
-
- Concerts and layouts keyboard shortcuts
- Patches and sets (Edit mode) keyboard shortcuts
- Editing keyboard shortcuts
- Actions keyboard shortcuts
- Parameter mapping (Edit mode) keyboard shortcuts
- Channel strips (Edit mode) keyboard shortcuts
- Screen controls (Layout mode) keyboard shortcuts
- Perform in Full Screen keyboard shortcuts
- Window and view keyboard shortcuts
- Help and support keyboard shortcuts
-
-
- Use MIDI plug-ins
-
- Arpeggiator overview
- Arpeggiator control parameters
- Note order parameters overview
- Note order variations
- Note order inversions
- Arpeggiator pattern parameters overview
- Use Live mode
- Use Grid mode
- Arpeggiator options parameters
- Arpeggiator keyboard parameters
- Use keyboard parameters
- Assign controllers
- Modifier controls
- Note Repeater controls
- Randomizer controls
-
- Use Scripter
- Use the Script Editor
- Scripter API overview
- MIDI processing functions overview
- HandleMIDI function
- ProcessMIDI function
- GetParameter function
- SetParameter function
- ParameterChanged function
- Reset function
- JavaScript objects overview
- Use the JavaScript Event object
- Use the JavaScript TimingInfo object
- Use the Trace object
- Use the MIDI event beatPos property
- Use the JavaScript MIDI object
- Create Scripter controls
- Transposer controls
-
-
- Alchemy overview
- Alchemy interface overview
- Alchemy Name bar
- Alchemy file locations
-
- Alchemy source overview
- Source master controls
- Import browser
- Source subpage controls
- Source filter controls
- Source filter use tips
- Source elements overview
- Additive element controls
- Additive element effects
- Spectral element controls
- Spectral element effects
- Pitch correction controls
- Formant filter controls
- Granular element controls
- Sampler element controls
- VA element controls
- Wide unison mode
- Source modulations
- Morph controls
- Alchemy master voice section
- Alchemy Extended parameters
-
- Playback plug-in overview
- Add a Playback plug-in
- Playback interface
- Use the Playback waveform display
- Playback transport and function buttons
- Playback information display
- Playback Sync, Snap To, and Play From parameters
- Use the Playback group functions
- Use the Playback Action menu and File field
- Use markers with the Playback plug-in
-
- Sample Alchemy overview
- Interface overview
- Add source material
- Edit mode
- Play modes
- Source overview
- Synthesis modes
- Granular controls
- Additive effects
- Additive effect controls
- Spectral effect
- Spectral effect controls
- Filter module
- Lowpass, bandpass, and highpass filters
- Comb PM filter
- Downsampler filter
- FM filter
- Envelope generators
- Mod Matrix
- Modulation routing
- Motion mode
- Trim mode
- More menu
-
- Sculpture overview
- Sculpture interface
- Global parameters
- Amplitude envelope parameters
- Use the Waveshaper
- Filter parameters
- Output parameters
- Define MIDI controllers
- Extended parameters
-
- Studio Piano
- Copyright

Create Alchemy sounds from scratch in MainStage
Alchemy provides a number of different synthesizer engines that can be used to resynthesize, or reconstruct, imported sampled sounds. It does this by analyzing sonic characteristics of the source, such as level, frequency, phase, and other components. This analysis is then mapped to values that are reconstructed by one or more of the synthesis engines. Details on importing and analysis of source material are covered in Alchemy Import browser in MainStage and in individual source sections. See Alchemy source elements overview in MainStage.
Alchemy also allows you to use several of the built-in synthesizer engines to create sounds without sample importing and analysis. This section explores these pure synthesis options and other approaches to creating the basic building blocks of your sounds.
Once you have added the raw material to your sources, Alchemy’s filters, modulation, and Effects sections are available to further refine your sound. See the information and tasks outlined in these sections: Alchemy main filter controls in MainStage, Alchemy modulation overview in MainStage, and Alchemy effects overview in MainStage. Also look at the Alchemy performance controls in MainStage and Alchemy arpeggiator overview in MainStage sections.
Note: Images shown in tutorials are not specific to presets used in tasks. They are included as a guide to help you find areas and parameters in the Alchemy interface.
Explore pure additive synthesis in Alchemy
Pure additive synthesis allows you to create sounds by combining sine wave harmonics and overtones (or partials) of different levels, phase, pitch, and pan position. If you’re unfamiliar with this method of synthesis, see Alchemy additive edit window in MainStage and Additive synthesis.
In Alchemy in MainStage, click the File button in the Name bar and choose Initialize Preset from the pop-up menu to reset all Alchemy parameters to default settings.
Important: Use of Initialize Preset automatically turns on wide unison mode. See Alchemy wide unison mode.
Click the A button (below Global) to view source A parameters.
This defaults to the VA (Virtual Analog) synthesis engine. Play a few notes to hear the sound.
Click the Additive button, just below the File button in the Name bar, then click the Additive On button to enable the additive engine.
Double-click the Additive Vol knob to reset the level, then play a few notes to hear the sound.

Click the Edit button to the left of the realtime spectrogram (waveform) display.
The main edit window opens.
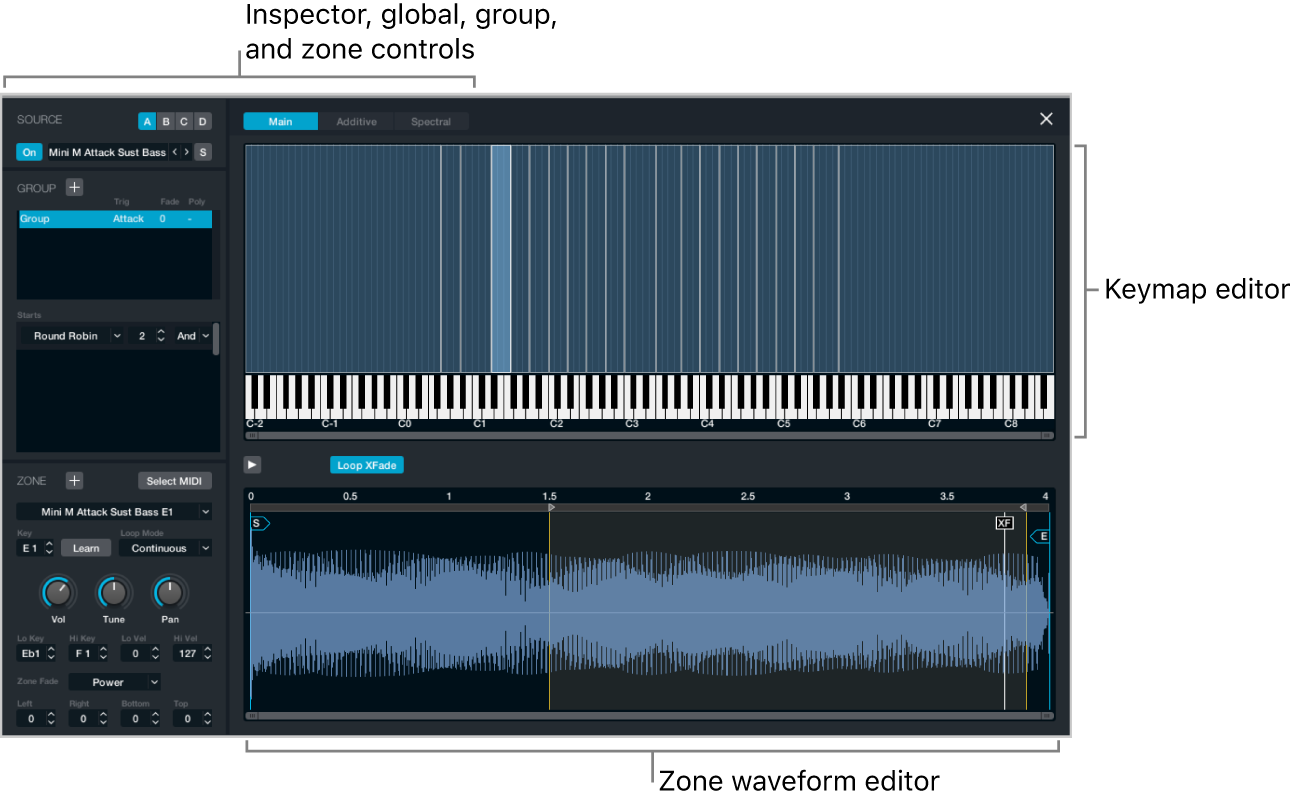
Click the Additive button to view the additive edit window, where the Vol button should be active and a single column is shown at the left of the Partial bar display.
This is the first (and only) harmonic of your sound.
Drag vertically and horizontally across the Partial bar display to create a series of new harmonics of different levels. Create a pseudo waveform shape.
Play your keyboard to hear how this sounds. Depending on what you’ve drawn, you should hear a harsh and edgy digital sound.
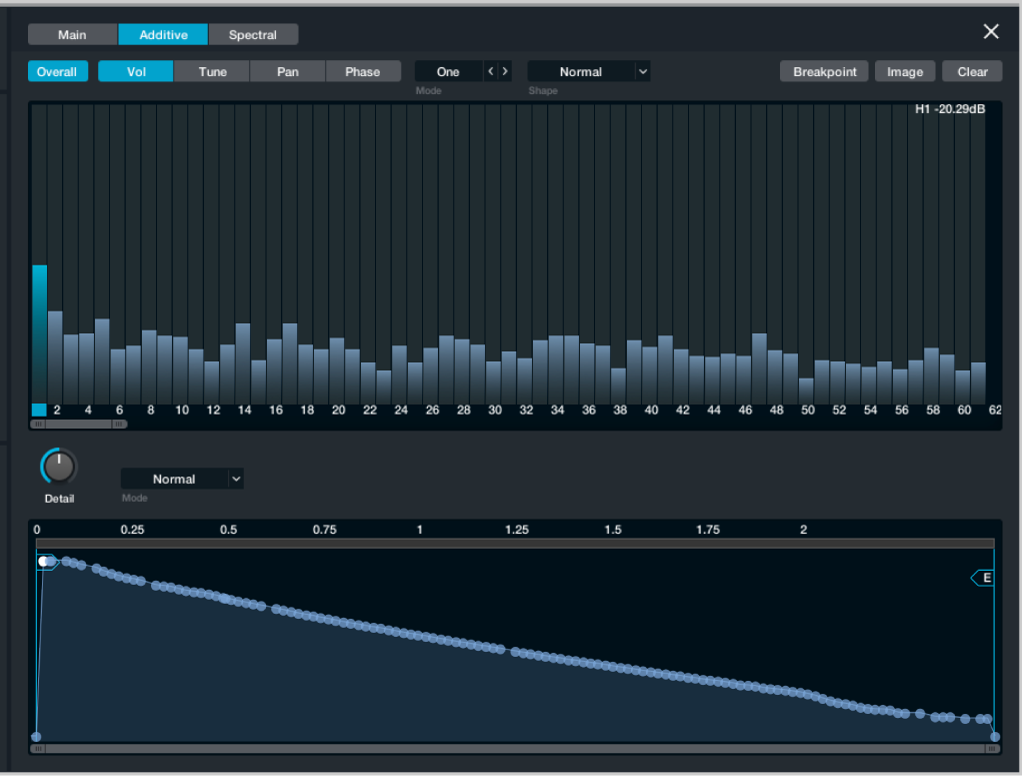
Click the Mode pop-up menu, and choose Fifth (harmonics).
Drag the first harmonic vertically to see how the fifth harmonics only are changed, noting that the change is relative to the first harmonic.
This is how you adjust grouped harmonics. Adjusting groups of, rather than individual, harmonics is the best approach to take when creating additive sounds. Creating and adjusting individual harmonics is possible (using One in the Mode pop-up menu), but it is tedious and not an efficient approach. In general terms, even harmonics sound more musical and odd harmonics sound noisy or dissonant.
Click the Tune button, choose One (single harmonics) from the Mode pop-up menu, then draw horizontally and vertically (creating another pseudo waveform shape) in the Partial bar display.
Play the keyboard to hear a deranged metallic sort of sound.
Choose Fifth from the Mode pop-up menu, then drag some points vertically and horizontally in the Partial envelope display.
Play the keyboard to hear the fifth harmonics bend in pitch, controlled by the envelope associated with this group of harmonics.
Harmonic envelopes control the level, pitch, pan, and phase of harmonics over time. This level of control over each harmonic (if required) enables you to recreate almost any type of sound, but as mentioned, it is far more efficient to work with groups of harmonics. Individual editing of harmonics or their associated envelopes is only recommended for fixes to unwanted partials or for more impactful edits to the lower harmonics, such as the fundamental, second, fourth, and so on. Edits of upper harmonics are unlikely to be audible in many cases.
Close the edit window, and experiment with the Fundamental, Octaves, Odd/Even, and Fifths knobs in the additive effects section. Also adjust the PVar and Sym knobs to hear their impact.
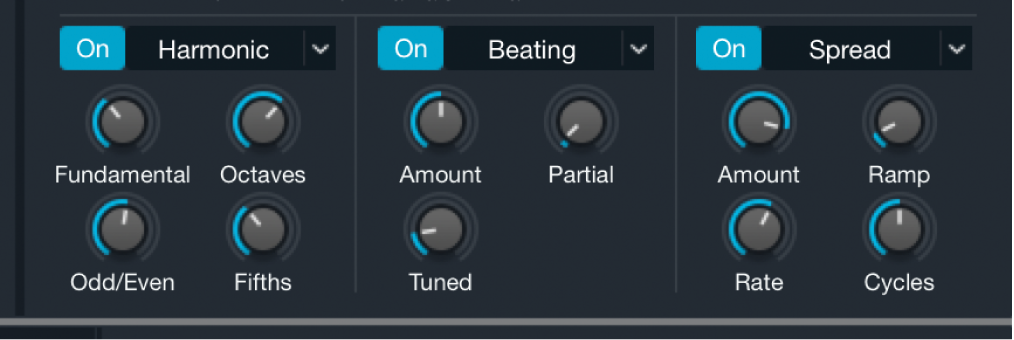
Choose Stretch from the second additive effects pop-up menu, and experiment with the Stretch and String knobs.
As further steps, you may also want to Control-click different Additive controls to assign modulation routings. Try assigning a modulation sequencer to the String parameter in the additive effects section to create a stepped sample-and-hold type of sound. You can use a File menu preset for the sequencer or create your own sequence.
If you want to take the modulation sequence concept further, you could create a sequence of individual harmonic pitches, resulting in a melody. Similarly, you could sweep a comb filter across the harmonic series, again resulting in a melody.
Explore VA synthesis in Alchemy
In Alchemy in MainStage, click the File button in the Name bar and choose Initialize Preset from the pop-up menu to reset all Alchemy parameters to default settings.
Important: Use of Initialize Preset automatically turns on wide unison mode. See Alchemy wide unison mode.
Click the A button (below Global) to view source A parameters.
This defaults to the VA (Virtual Analog) synthesis engine. Play a few notes to hear the sound.
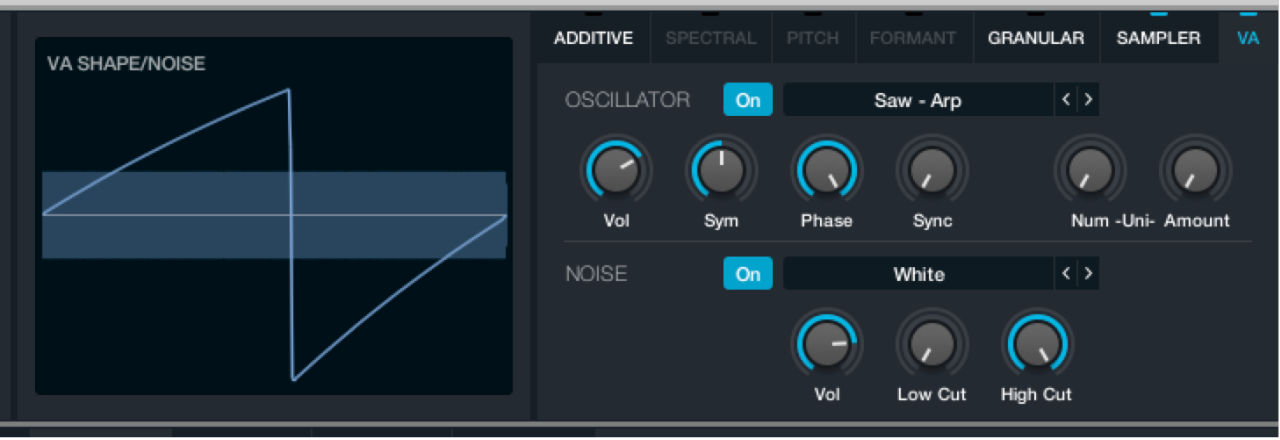
Choose several waveforms from each category in the source select field, and play the keyboard each time to hear the sound.
Alchemy has dozens of waveforms to choose from, providing a wealth of raw source material. Once you’ve explored the options, choose Complex > Soft Edge. This resembles a cheap electronic keyboard piano sound.
Turn on the first filter in the source parameters on the left, then double-click the Cutoff knob.
Play to hear a much mellower sound evoking an electric piano. Feel free to try different filters, but LP 12 dB Smooth is a good option.
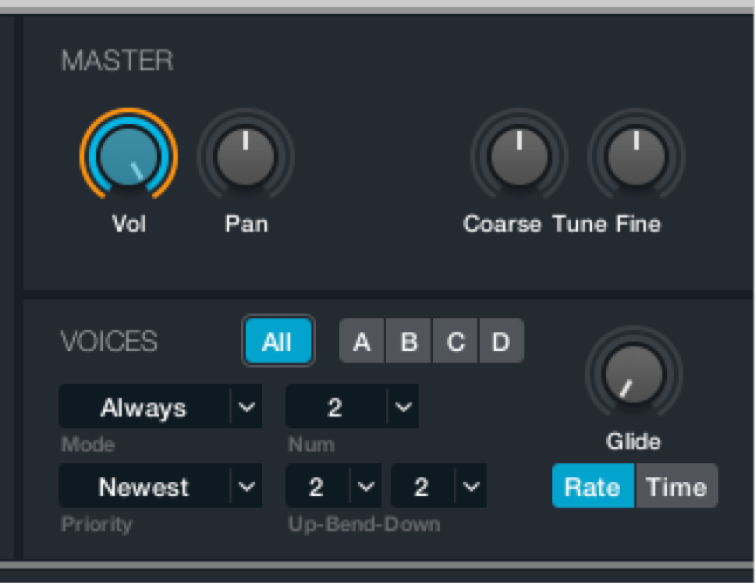
Click the Global button at the top left, then click the Master Vol knob.
Adjust the Release knob to a value around 1.00 in the central AHDSR envelope section.
Click the Effects button at the lower left to view the Effects section.

Choose Mod FX in the top effects slot, then click the Mod FX File button and choose Preset > Big Chorus.
You may want to adjust the Rate to around 2.8 Hz.
Choose Phaser in the second effects slot, then click the Phaser File button and choose Preset > Subtle Vibrato.
Turn on the Sync button, then play to hear a simple, effected electric piano sound that is created from a single source. It goes without saying that this sound could be improved in many ways, but this primer should give you a feel for how quickly a basic preset can be created in Alchemy’s VA engine. Keep the sound you’ve created for the next task.
Combine synthesis methods to create sounds in Alchemy
Alchemy provides up to four sources in a preset. Each source has a full set of synthesis parameters associated with the chosen synthesis engine. This allows you to combine multiple synthesis types, such as virtual analog, additive, resynthesis, granular, or straight sample playback in a single preset. Because each synthesis method has different strengths and weaknesses, it is both easier and will deliver better results if you choose the most appropriate engine for the task.
Though there are areas of crossover between synthesis engines, the VA engine is strong for synthesizer type sounds, the additive engine is strong for digital and bell-like sounds, and the sampler/granular engines are best suited for sample manipulation, with the latter being particularly useful for loop mangling.
Alchemy also offers resynthesis which uses the additive or spectral synthesis engines, or a combination of the two, along with optional formant control. Resynthesis, put simply, analyzes a source audio file and reconstructs a facsimile of this sound using sine waves and noise signals. You can then manipulate these reconstructed elements to create new presets. The additive engine is well suited for single notes with a strong harmonic character. The spectral engine is suitable for chordal material and other complex signals. In many cases, you will achieve the best results by combining the two synthesis engines. This lets you manipulate the resynthesized source more precisely, playing to the strengths of each synthesis method.
In Alchemy in MainStage, choose advanced view and click the source B select field, then choose Import Audio from the pop-up menu to open the Import browser window.
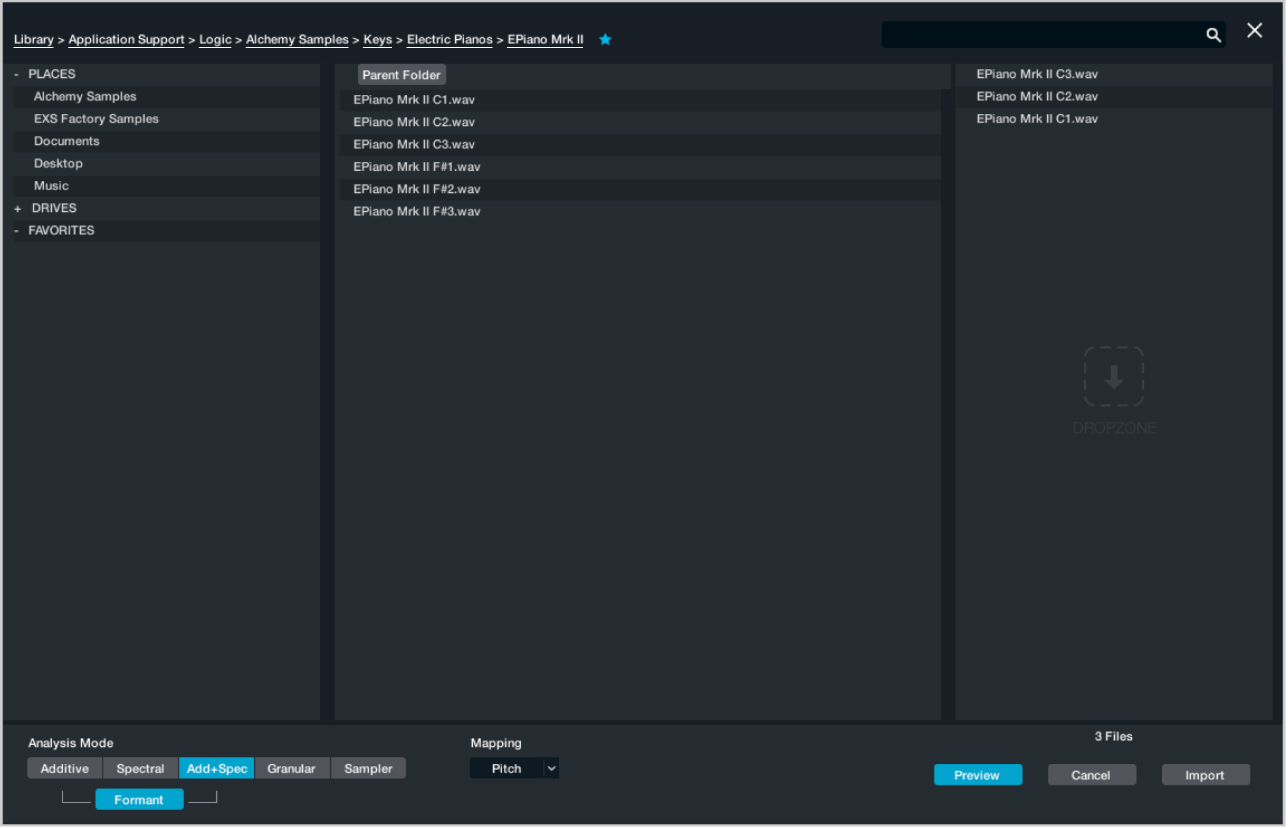
Click the Preview button to enable or disable automatic preview of selected files.
Click the Sampler button to choose the import analysis mode.
If the audio data is imported to the additive, spectral, add+spectral, or granular elements, analysis may take a moment or two. No analysis occurs when the Sampler analysis mode button is active.
Choose Alchemy Samples > Strings > Single Samples > Strings Mid, then click the Import button.
The Import browser closes when the import is complete, and the previous window is displayed.
Click the Global button (if not active), then adjust the Vol knobs of source A and B to hear an electric piano/string layer.
Repeat for sources C and D, using different analysis modes and the same or different samples.
An import progress dialog is shown when import methods other than Sample are used. The Import browser automatically closes when the import is complete.
Click the source select buttons at the left for sources B, C, and D, then click the Additive, Spectral, Pitch, Formant, Granular, and Sampler buttons at the upper right to view the parameters of each synthesis engine.

Listen to each source in isolation, and experiment with these synthesizer engine parameters to get a feel for what each engine provides for imported material.
The use of different synthesis engines enables different kinds of manipulation options for each source, providing different sonic characteristics. Beyond the comparatively simple combining of sources and synthesis engines in this way, you can perform a sophisticated form of cross-synthesis with Alchemy morphing features. See Alchemy elemental morphs overview in MainStage.