Resize, reposition, and rotate clips in Final Cut Pro for iPad
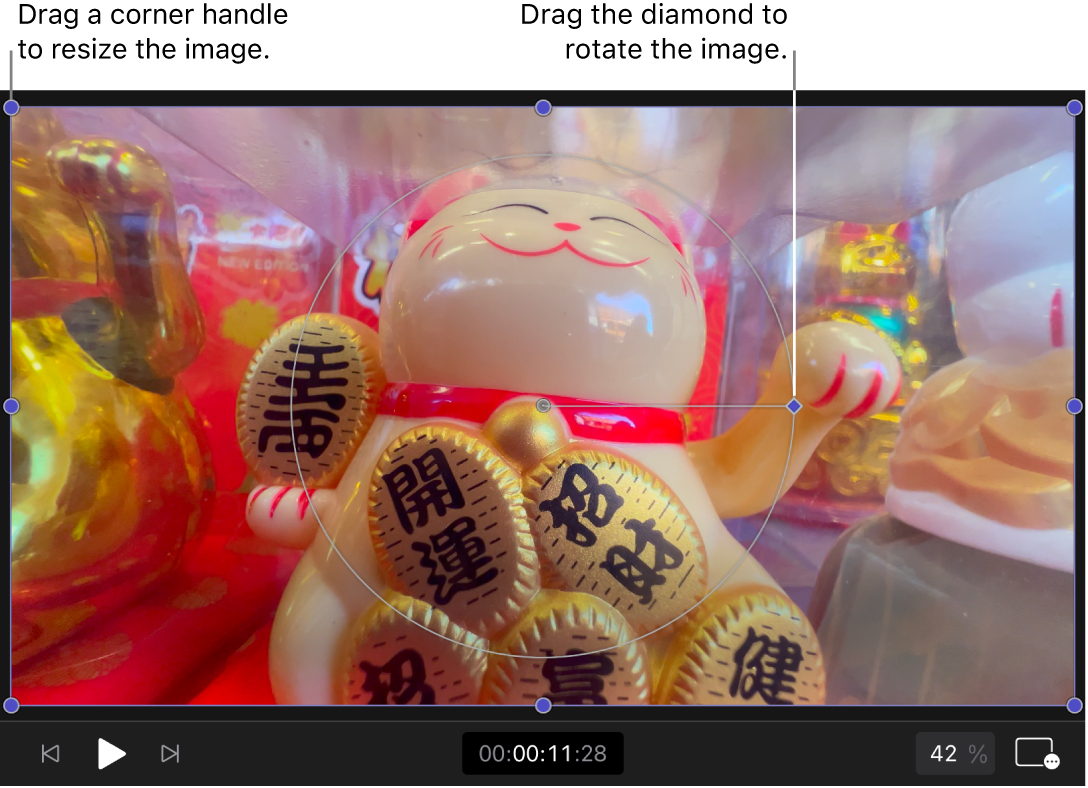
You can resize, reposition, rotate, and distort an image using the transform controls in the inspector, or by dragging onscreen controls in the viewer. For example, you could place a clip above the primary storyline in the timeline, and then reduce that clip’s size in the viewer so that it “floats” over the full-size background clip.

Proportionally resize a clip’s image
In Final Cut Pro for iPad, open a project.
In the timeline, tap the clip you want to resize, then drag the playhead over the clip (to see its image in the viewer).
Tap Inspect in the lower-left corner of the screen, then tap
 at the top of the inspector and make sure Lock Proportions is turned on.
Do one of the following:
In the viewer: Drag a purple corner or side handle.
In the inspector: Tap the Scale field, then use the keypad to change the image width or height.
The image in the viewer is rescaled proportionally.
Stretch or squeeze a clip’s image
In Final Cut Pro for iPad, open a project.
In the timeline, tap the clip you want to resize, then drag the playhead over the clip (to see its image in the viewer).
Tap Inspect in the lower-left corner of the screen, then tap
 at the top of the inspector and turn off Lock Proportions.
Do one of the following:
In the viewer: Drag a side, top, or bottom handle to change the image width or height.
In the inspector: Tap the Scale field, then use the keypad to change the image width or height.
The image is stretched or squeezed horizontally or vertically.
Reposition a clip in the viewer
In Final Cut Pro for iPad, open a project.
In the timeline, tap the clip you want to reposition, then drag the playhead over the clip (to see its image in the viewer).
Tap Inspect in the lower-left corner of the screen, then tap
 at the top of the inspector.
Do one of the following:
In the viewer: Drag anywhere in the image to reposition it in the frame.
In the inspector: Tap the Position number field, then use the keypad to modify the clip’s X (horizontal) or Y (vertical) position.
Change the rotation angle of a clip
In Final Cut Pro for iPad, open a project.
In the timeline, tap the clip you want to rotate, then drag the playhead over the clip (to see its image in the viewer).
Tap Inspect in the lower-left corner of the screen, then tap
 at the top of the inspector.
Do one of the following:
In the viewer: Drag the rotation handle (the purple diamond). Drag the handle away from the center for finer control over the degree of rotation.
In the inspector: Drag in the Rotation dial, or tap the Rotation number field, then use the keypad to enter a new angle value.
The image rotates around its anchor point. To change the point of rotation, you can relocate a clip’s anchor point, as described in the task below.
Change a clip’s anchor point
When you rotate a clip’s image in the viewer, the image rotates around its anchor point. By default, an image’s anchor point is at its center. You can modify the point of rotation by repositioning the anchor point.
In Final Cut Pro for iPad, open a project.
In the timeline, tap the clip you want to modify, then drag the playhead over the clip (to see its image in the viewer).
Tap Inspect in the lower-left corner of the screen, then tap
 at the top of the inspector.
In the inspector, do one of the following:
Tap
 next to Anchor Point, then tap a blank circle.
Tap the number field below Anchor Point, then use the keypad to modify the anchor point’s X (horizontal) or Y (vertical) position.
Distort the edges of the video frame
You can distort and skew the framing and perspective of a clip in the viewer by relocating its corner positions. For example, you could turn a standard video rectangle into a trapezoid.
In Final Cut Pro for iPad, open a project.
In the timeline, tap the clip you want to distort, then drag the playhead over the clip (to see its image in the viewer).
Tap Inspect in the lower-left corner of the screen, then tap
 at the top of the inspector.
In the inspector, tap Distort (you may have to scroll down), then do one of the following:
In the viewer: Drag any of the purple handles to distort the image; each handle distorts the image in a different direction.
In the inspector: Tap any of the corner position number fields, then use the keypad to modify the X (horizontal) or Y (vertical) corner position. Repeat this step with any of the other corner positions.
Note: To restore the frame to its original shape, tap Reset at the top of the inspector. To temporarily disable the distortion settings, tap Disable.
When you’re finished, tap
 at the top of the inspector.
Tip: For best playback quality, render the clip after you transform it.