Motion User Guide
- Welcome
- What’s new in Motion
-
- Intro to basic compositing
-
- Intro to transforming layers
-
- Intro to transforming layers in the canvas
- Transform layer properties in the canvas
- Transform tools
- Change layer position, scale, or rotation
- Move a layer’s anchor point
- Add a drop shadow to a layer
- Distort or shear a layer
- Crop a layer
- Modify shape or mask points
- Transform text glyphs and other object attributes
- Align layers in the canvas
- Transform layers in the HUD
- Transform 2D layers in 3D space
-
- Intro to behaviors
- Behaviors versus keyframes
-
- Intro to behavior types
-
- Intro to Parameter behaviors
- Audio behavior
- Average behavior
- Clamp behavior
- Custom behavior
- Add a Custom behavior
- Exponential behavior
- Link behavior
- Logarithmic behavior
- MIDI behavior
- Add a MIDI behavior
- Negate behavior
- Oscillate behavior
- Create a decaying oscillation
- Overshoot behavior
- Quantize behavior
- Ramp behavior
- Randomize behavior
- Rate behavior
- Reverse behavior
- Stop behavior
- Track behavior
- Wriggle behavior
-
- Intro to Simulation behaviors
- Align to Motion behavior
- Attracted To behavior
- Attractor behavior
- Drag behavior
- Drift Attracted To behavior
- Drift Attractor behavior
- Edge Collision behavior
- Gravity behavior
- Orbit Around behavior
- Random Motion behavior
- Repel behavior
- Repel From behavior
- Rotational Drag behavior
- Spring behavior
- Vortex behavior
- Wind behavior
- Additional behaviors
-
- Intro to using generators
- Add a generator
-
- Intro to image generators
- Caustics generator
- Cellular generator
- Checkerboard generator
- Clouds generator
- Color Solid generator
- Concentric Polka Dots generator
- Concentric Shapes generator
- Gradient generator
- Grid generator
- Japanese Pattern generator
- Lens Flare generator
- Manga Lines generator
- Membrane generator
- Noise generator
- One Color Ray generator
- Op Art 1 generator
- Op Art 2 generator
- Op Art 3 generator
- Overlapping Circles generator
- Radial Bars generator
- Soft Gradient generator
- Spirals generator
- Spiral Drawing generator
- Use Spiral Drawing onscreen controls
- Star generator
- Stripes generator
- Sunburst generator
- Truchet Tiles generator
- Two Color Ray generator
- Save a modified generator
-
- Intro to filters
- Browse and preview filters
- Apply or remove filters
-
- Intro to filter types
-
- Intro to Color filters
- Brightness filter
- Channel Mixer filter
- Color Adjustments filter
- Color Balance filter
- Example: Color-balance two layers
- Color Curves filter
- Use the Color Curves filter
- Color Reduce filter
- Color Wheels filter
- Use the Color Wheels filter
- Colorize filter
- Contrast filter
- Custom LUT filter
- Use the Custom LUT filter
- Gamma filter
- Gradient Colorize filter
- HDR Tools filter
- Hue/Saturation filter
- Hue/Saturation Curves filter
- Use the Hue/Saturation Curves filter
- Levels filter
- Negative filter
- OpenEXR Tone Map filter
- Sepia filter
- Threshold filter
- Tint filter
-
- Intro to Distortion filters
- Black Hole filter
- Bulge filter
- Bump Map filter
- Disc Warp filter
- Droplet filter
- Earthquake filter
- Fisheye filter
- Flop filter
- Fun House filter
- Glass Block filter
- Glass Distortion
- Insect Eye filter
- Mirror filter
- Page Curl filter
- Poke filter
- Polar filter
- Refraction filter
- Ring Lens filter
- Ripple filter
- Scrape filter
- Sliced Scale filter
- Use the Sliced Scale filter
- Sphere filter
- Starburst filter
- Stripes filter
- Target filter
- Tiny Planet filter
- Twirl filter
- Underwater filter
- Wave filter
-
- Intro to Stylize filters
- Add Noise filter
- Bad Film filter
- Bad TV filter
- Circle Screen filter
- Circles filter
- Color Emboss filter
- Comic filter
- Crystallize filter
- Edges filter
- Extrude filter
- Fill filter
- Halftone filter
- Hatched Screen filter
- Highpass filter
- Indent filter
- Line Art filter
- Line Screen filter
- MinMax filter
- Noise Dissolve filter
- Pixellate filter
- Posterize filter
- Relief filter
- Slit Scan filter
- Slit Tunnel filter
- Texture Screen filter
- Vignette filter
- Wavy Screen filter
- About filters and color processing
- Publish filter controls to Final Cut Pro
- Using filters on alpha channels
- Filter performance
- Save custom filters
-
- Intro to 3D objects
- Add a 3D object
- Move and rotate a 3D object
- Reposition a 3D object’s anchor point
- Exchange a 3D object file
- 3D object intersection and layer order
- Using cameras and lights with 3D objects
- Save custom 3D objects
- Guidelines for working with 3D objects
- Working with imported 3D objects
-
- Intro to 360-degree video
- 360-degree projects
- Create 360-degree projects
- Add 360-degree video to a project
- Create a tiny planet effect
- Reorient 360-degree media
- Creating 360-degree templates for Final Cut Pro
- 360-degree-aware filters and generators
- Export and share 360-degree projects
- Guidelines for better 360-degree projects
-
- Intro to settings and shortcuts
-
- Intro to Keyboard shortcuts
- Use function keys
- General keyboard shortcuts
- Audio list keyboard shortcuts
-
- Tools keyboard shortcuts
- Transform tool keyboard shortcuts
- Select/Transform tool keyboard shortcuts
- Crop tool keyboard shortcuts
- Edit Points tool keyboard shortcuts
- Edit shape tools keyboard shortcuts
- Pan and Zoom tools keyboard shortcuts
- Shape tools keyboard shortcuts
- Bezier tool keyboard shortcuts
- B-Spline tool keyboard shortcuts
- Paint Stroke tool keyboard shortcuts
- Text tool keyboard shortcuts
- Shape mask tools keyboard shortcuts
- Bezier Mask tool keyboard shortcuts
- B-Spline Mask tool keyboard shortcuts
- Transport control keyboard shortcuts
- View option keyboard shortcuts
- HUD keyboard shortcuts
- Inspector keyboard shortcuts
- Keyframe Editor keyboard shortcuts
- Layers keyboard shortcuts
- Library keyboard shortcuts
- Media list keyboard shortcuts
- Timeline keyboard shortcuts
- Keyframing keyboard shortcuts
- Shape and Mask keyboard shortcuts
- 3D keyboard shortcuts
- Miscellaneous keyboard shortcuts
- Touch Bar shortcuts
- Move assets to another computer
- Work with GPUs
- Glossary
- Copyright

Publish controls to Final Cut Pro from Motion
The following tasks describe how to publish parameters, compound parameters, rig controls, and other template elements. Published parameters appear in the Final Cut Pro inspector.
Publish a parameter control
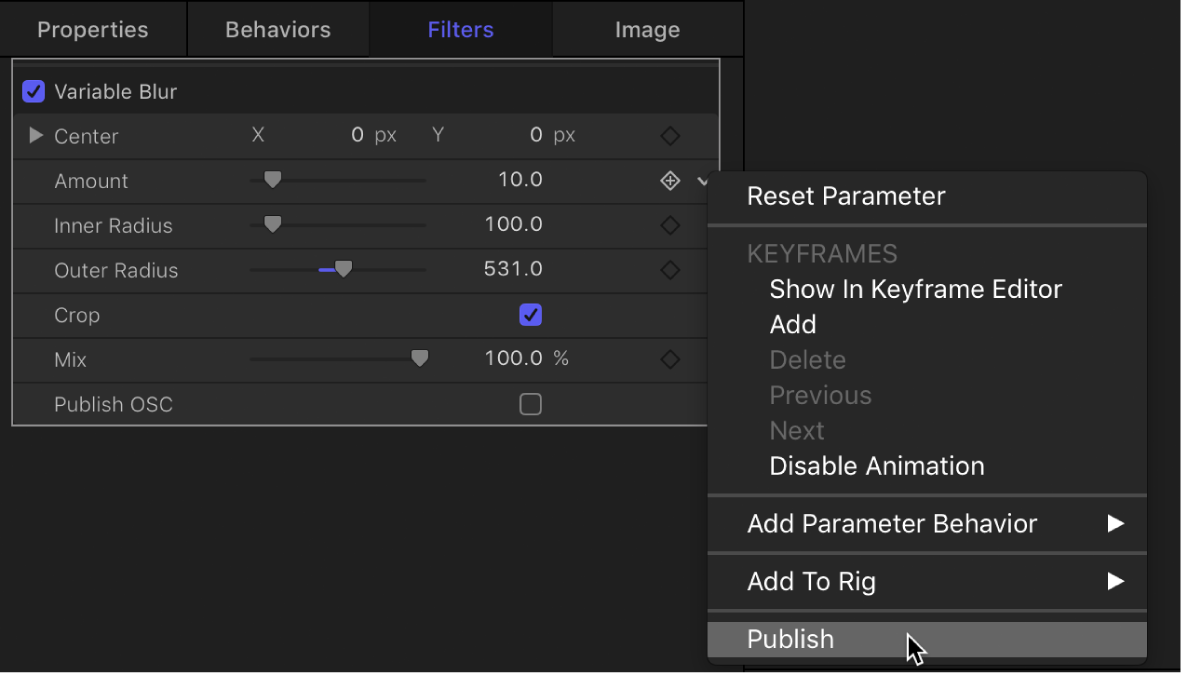
In Motion, in the effect, transition, title, or generator template, select the image layer, filter, or behavior containing the parameter to publish.
In the selected item’s Inspector, do one of the following:
Click the parameter’s Animation menu (the down arrow that appears when you place the pointer over the far-right side of the parameter row), then choose Publish.
Note: If the parameters you want to publish are not visible, place the pointer over the right side of the parameter group row and click Show.

Control-click the parameter’s name, then choose Publish from the shortcut menu.
Save the template.
When you apply the modified effect, transition, title, or generator to a clip in the Final Cut Pro timeline, the parameter control you published appears in the Final Cut Pro inspector, ready for adjustment.
Publish compound parameter controls (a parameter with nested subparameters)
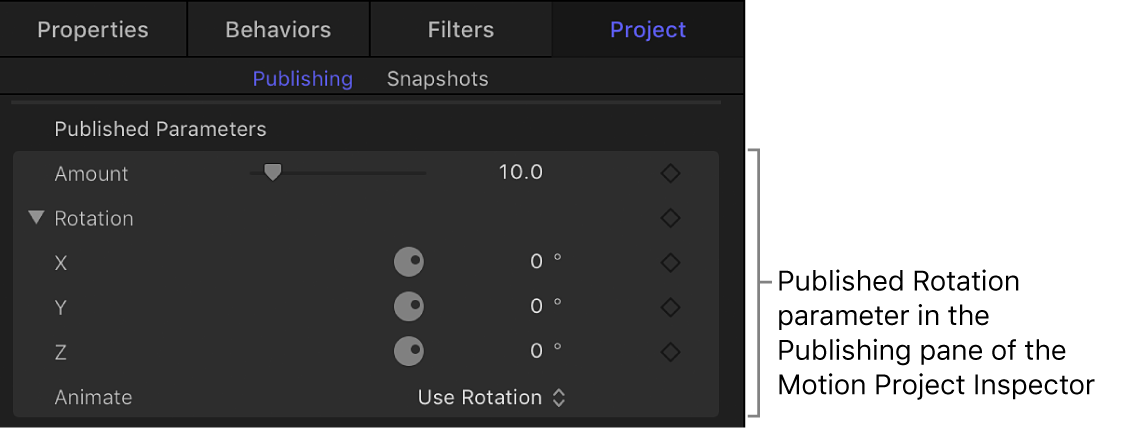
In the template project in Motion, select the image layer or effects object containing the compound parameter (such as Rotation) to publish.
Open the selected item’s Inspector.
To publish a compound parameter to Final Cut Pro in a collapsed state (its subparameters hidden by a disclosure triangle), make sure the parameter’s disclosure triangle is closed.
To publish a compound parameter in an expanded state (disclosure triangle open and its subparameters exposed), make sure the parameter’s disclosure triangle is open.
Do one of the following:
Control-click the parameter’s name, then choose Publish from the shortcut menu.
Click the parameter’s Animation menu (the down arrow that appears when you place the pointer over the right side of the parameter row), then choose Publish.
Save the template.
The parameter and its subparameter controls are published. When the modified effect is applied to a clip in Final Cut Pro, the compound parameter retains its state (collapsed or expanded) at the time of publishing. If the result is not what you expected, click the disclosure triangle in the Final Cut Pro inspector to expand or collapse the subparameters manually.

Note: Examples of parameters with subparameters include Scale (with X, Y, and Z values) and Shear (with X and Y values).
Publish subparameter controls of a compound parameter
You can also publish specific subparameters of a compound parameter. This is a good way to limit an editor’s control over effects parameters in a Final Cut Pro project.
In the template project in Motion, select the image layer or effect object containing the subparameter to publish.
In the item’s Inspector, click the compound parameter’s disclosure triangle to show its subparameters.
For each parameter to publish, do one of the following:
Click the parameter’s Animation menu (the down arrow that appears when you place the pointer over the right side of the parameter row), then choose Publish.
Control-click the parameter’s name, then choose Publish from the shortcut menu.
Save the template.
The subparameter control is published. When you apply the modified effect to a clip in Final Cut Pro, the subparameter appears in the Final Cut Pro inspector.
Publish an activation checkbox for a filter or behavior
Publishing a filter or behavior activation checkbox lets Final Cut Pro users quickly turn an effect on or off.
In the template project in Motion, select the filter or behavior whose activation checkbox you want to publish.
In the Behaviors or Filters Inspector, do one of the following:
In the heading row of the behavior or filter, click the Animation menu (the down arrow that appears when you place the pointer over the right side of the row), then choose Publish.
Control-click the behavior or filter name, then choose Publish from the shortcut menu.
Note: If you publish only the blue activation checkbox and no other parameters in the behavior or filter’s group of controls, only the checkbox is published.
Save the template.
When you apply the modified effect to a clip in Final Cut Pro, a checkbox with the name of the published filter or behavior appears in the Final Cut Pro inspector. Deselecting the checkbox disables the effect of that filter or behavior (including its constituent parameters).
Publish a rig control (widget)
In Motion, add a rig to the template, assigning specific parameters to the rig’s widget controls.
For more information about building rigs, creating widgets, and assigning parameters, see Intro to rigging in Motion.
Select the rig, then do one of the following in the Rig Inspector:
In the Checkbox, Pop-up, or Slider widgets, click the Animation menu (the down arrow that appears when you place the pointer over the right side of the widget’s parameter row), then choose Publish from the shortcut menu.
Control-click the Checkbox, Pop-up, or Slider parameter name, then choose Publish from the shortcut menu.
Save the template.
When you apply the modified effect, transition, title, or generator to a clip in the Final Cut Pro timeline, the rig control you published appears in the Final Cut Pro inspector.
Publish a gradient editor control
In the template project in Motion, select the image layer or effect object that contains the gradient editor to publish.
In the item’s Inspector, Control-click the Gradient parameter, then choose Publish from the shortcut menu.
Save the template.
When you apply the modified effect, transition, title, or generator to a clip in the Final Cut Pro timeline, the gradient editor control appears in the Final Cut Pro inspector.
Publish a filter’s onscreen controls
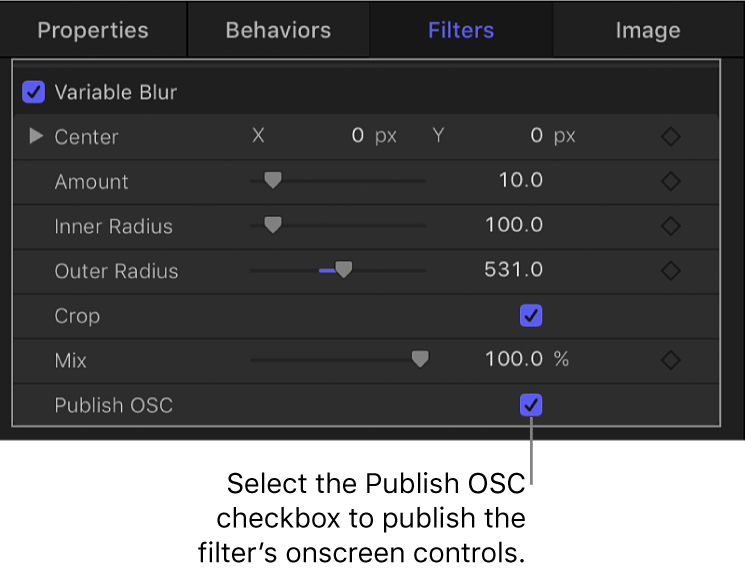
You can publish a filter’s onscreen controls so that Final Cut Pro users can make filter adjustments by dragging handles in the Final Cut Pro viewer.
In the template project in Motion, select the filter object.
In the Filters Inspector, select the Publish OSC checkbox.

Save the template.
When you apply the modified effect, transition, title, or generator to a clip in the Final Cut Pro timeline, the onscreen controls for the filter appear in the Final Cut Pro viewer.
Note: When you publish onscreen controls, their corresponding numeric controls in the Inspector are not published. You must publish Inspector parameter controls separately. See Publish a parameter control.
For more information about filter onscreen controls, see Adjust filters in the Motion canvas and Publish Motion filter controls to Final Cut Pro.
Download this guide: PDF