Motion User Guide
- Welcome
-
- Intro to basic compositing
-
- Intro to transforming layers
-
- Intro to transforming layers in the canvas
- Transform layer properties in the canvas
- Transform tools
- Change layer position, scale, or rotation
- Move a layer’s anchor point
- Add a drop shadow to a layer
- Distort or shear a layer
- Crop a layer
- Modify shape or mask points
- Transform text glyphs and other object attributes
- Align layers in the canvas
- Transform layers in the HUD
- Transform 2D layers in 3D space
-
- Intro to behaviors
- Behaviors versus keyframes
-
- Intro to behavior types
-
- Intro to Parameter behaviors
- Audio behavior
- Average behavior
- Clamp behavior
- Custom behavior
- Add a Custom behavior
- Exponential behavior
- Link behavior
- Logarithmic behavior
- MIDI behavior
- Add a MIDI behavior
- Negate behavior
- Oscillate behavior
- Create a decaying oscillation
- Overshoot behavior
- Quantize behavior
- Ramp behavior
- Randomize behavior
- Rate behavior
- Reverse behavior
- Stop behavior
- Track behavior
- Wriggle behavior
-
- Intro to Simulation behaviors
- Align to Motion behavior
- Attracted To behavior
- Attractor behavior
- Drag behavior
- Drift Attracted To behavior
- Drift Attractor behavior
- Edge Collision behavior
- Gravity behavior
- Orbit Around behavior
- Random Motion behavior
- Repel behavior
- Repel From behavior
- Rotational Drag behavior
- Spring behavior
- Vortex behavior
- Wind behavior
- Additional behaviors
-
- Intro to using generators
- Add a generator
-
- Intro to image generators
- Caustics generator
- Cellular generator
- Checkerboard generator
- Clouds generator
- Color Solid generator
- Concentric Polka Dots generator
- Concentric Shapes generator
- Gradient generator
- Grid generator
- Japanese Pattern generator
- Lens Flare generator
- Manga Lines generator
- Membrane generator
- Noise generator
- One Color Ray generator
- Op Art 1 generator
- Op Art 2 generator
- Op Art 3 generator
- Overlapping Circles generator
- Radial Bars generator
- Soft Gradient generator
- Spirals generator
- Spiral Drawing generator
- Use Spiral Drawing onscreen controls
- Star generator
- Stripes generator
- Sunburst generator
- Truchet Tiles generator
- Two Color Ray generator
- Save a modified generator
-
- Intro to filters
- Browse and preview filters
- Apply or remove filters
-
- Intro to filter types
-
- Intro to Color filters
- Brightness filter
- Channel Mixer filter
- Color Balance filter
- Example: Color-balance two layers
- Color Curves filter
- Use the Color Curves filter
- Color Reduce filter
- Color Wheels filter
- Use the Color Wheels filter
- Colorize filter
- Contrast filter
- Custom LUT filter
- Use the Custom LUT filter
- Gamma filter
- Gradient Colorize filter
- HDR Tools filter
- Hue/Saturation filter
- Hue/Saturation Curves filter
- Use the Hue/Saturation Curves filter
- Levels filter
- Negative filter
- OpenEXR Tone Map filter
- Sepia filter
- Threshold filter
- Tint filter
-
- Intro to Distortion filters
- Black Hole filter
- Bulge filter
- Bump Map filter
- Disc Warp filter
- Droplet filter
- Earthquake filter
- Fisheye filter
- Flop filter
- Fun House filter
- Glass Block filter
- Glass Distortion
- Insect Eye filter
- Mirror filter
- Page Curl filter
- Poke filter
- Polar filter
- Refraction filter
- Ring Lens filter
- Ripple filter
- Scrape filter
- Sphere filter
- Starburst filter
- Stripes filter
- Target filter
- Tiny Planet filter
- Twirl filter
- Underwater filter
- Wave filter
-
- Intro to Stylize filters
- Add Noise filter
- Bad Film filter
- Bad TV filter
- Circle Screen filter
- Circles filter
- Color Emboss filter
- Comic filter
- Crystallize filter
- Edges filter
- Extrude filter
- Fill filter
- Halftone filter
- Hatched Screen filter
- Highpass filter
- Indent filter
- Line Art filter
- Line Screen filter
- MinMax filter
- Noise Dissolve filter
- Pixellate filter
- Posterize filter
- Relief filter
- Slit Scan filter
- Slit Tunnel filter
- Texture Screen filter
- Vignette filter
- Wavy Screen filter
- Publish filter parameters to Final Cut Pro
- Using filters on alpha channels
- Filter performance
- Save custom filters
-
- Intro to 3D objects
- Add a 3D object
- Move and rotate a 3D object
- Reposition a 3D object’s anchor point
- Exchange a 3D object file
- 3D object intersection and layer order
- Using cameras and lights with 3D objects
- Save custom 3D objects
- Guidelines for working with 3D objects
- Working with imported 3D objects
-
- Intro to 360-degree video
- 360-degree projects
- Create 360-degree projects
- Add 360-degree video to a project
- Create a tiny planet effect
- Reorient 360-degree media
- Creating 360-degree templates for Final Cut Pro
- 360-degree-aware filters and generators
- Export and share 360-degree projects
- Guidelines for better 360-degree projects
-
- Intro to tracking
- How does motion tracking work?
- Motion tracking behavior types
- Analyze motion in a clip
- Stabilize a shaky clip
- Unstabilize a clip
- Use a range of frames for analysis
- Load existing tracking data
- Track shapes, masks, and paint strokes
- Track a filter’s position parameter
- Adjust onscreen trackers
- Save tracks to the Library
-
- Intro to preferences and shortcuts
-
- Intro to Keyboard shortcuts
- Use function keys
- General keyboard shortcuts
- Audio list keyboard shortcuts
-
- Tools keyboard shortcuts
- Transform tool keyboard shortcuts
- Select/Transform tool keyboard shortcuts
- Crop tool keyboard shortcuts
- Edit Points tool keyboard shortcuts
- Edit shape tools keyboard shortcuts
- Pan and Zoom tools keyboard shortcuts
- Shape tools keyboard shortcuts
- Bezier tool keyboard shortcuts
- B-Spline tool keyboard shortcuts
- Paint Stroke tool keyboard shortcuts
- Text tool keyboard shortcuts
- Shape mask tools keyboard shortcuts
- Bezier Mask tool keyboard shortcuts
- B-Spline Mask tool keyboard shortcuts
- Transport control keyboard shortcuts
- View option keyboard shortcuts
- HUD keyboard shortcuts
- Inspector keyboard shortcuts
- Keyframe Editor keyboard shortcuts
- Layers keyboard shortcuts
- Library keyboard shortcuts
- Media list keyboard shortcuts
- Timeline keyboard shortcuts
- Keyframing keyboard shortcuts
- Shape and Mask keyboard shortcuts
- 3D keyboard shortcuts
- Miscellaneous keyboard shortcuts
- Touch Bar shortcuts
- Move assets to another computer
- Work with GPUs
- Glossary
- Copyright

View 360° projects in Motion
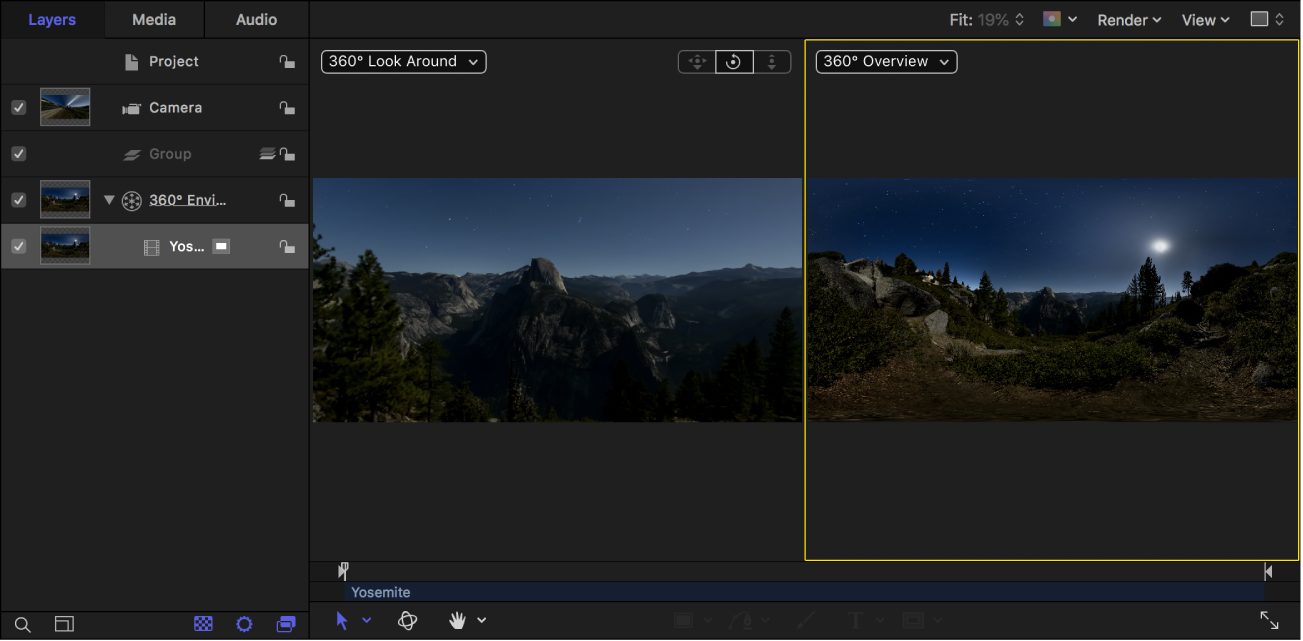
When you create a 360° project, Motion divides the canvas into side-by-side viewports, with the spherical projection of your 360° footage in the left viewport and the equirectangular overview in the right viewport.
You view and navigate 360° video by using the Orbit control in the canvas to pan and tilt the camera. To display the camera controls in the canvas, make sure Show 3D Overlays in the View menu in the canvas has a checkmark.
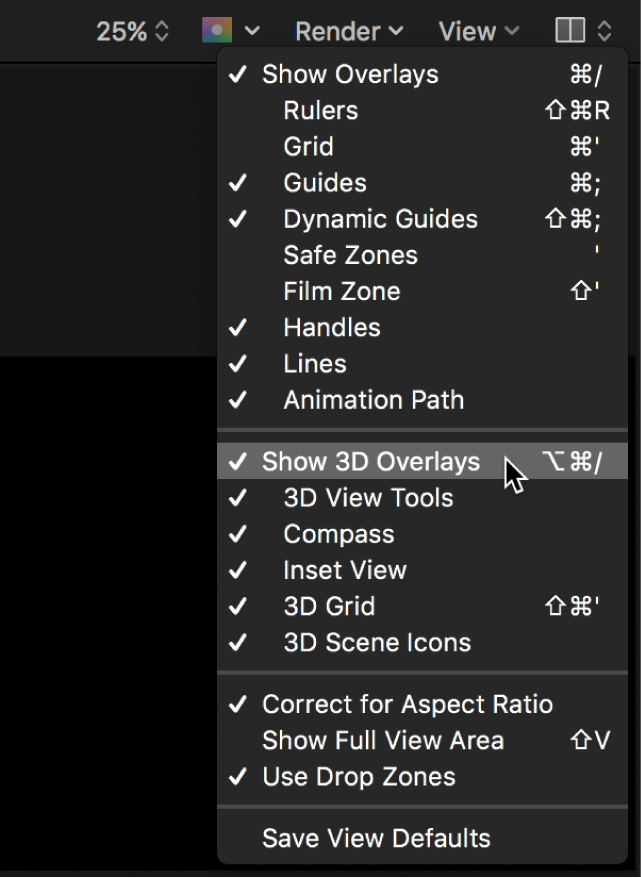
View and navigate spherical video in the canvas
In Motion, ensure that the Camera pop-up menu in the left viewport is set to 360° Look Around.
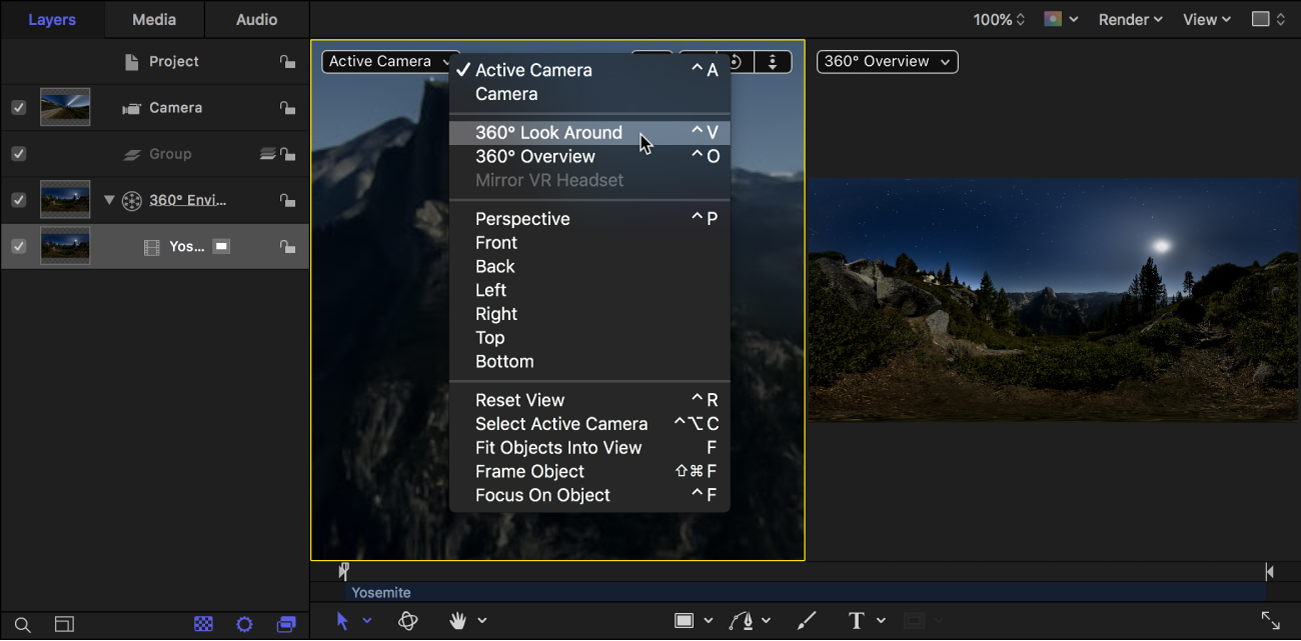
The left viewport displays a nondistorted portion of the spherical projection.
In the canvas, drag the Orbit control in any direction to pan and tilt the camera.
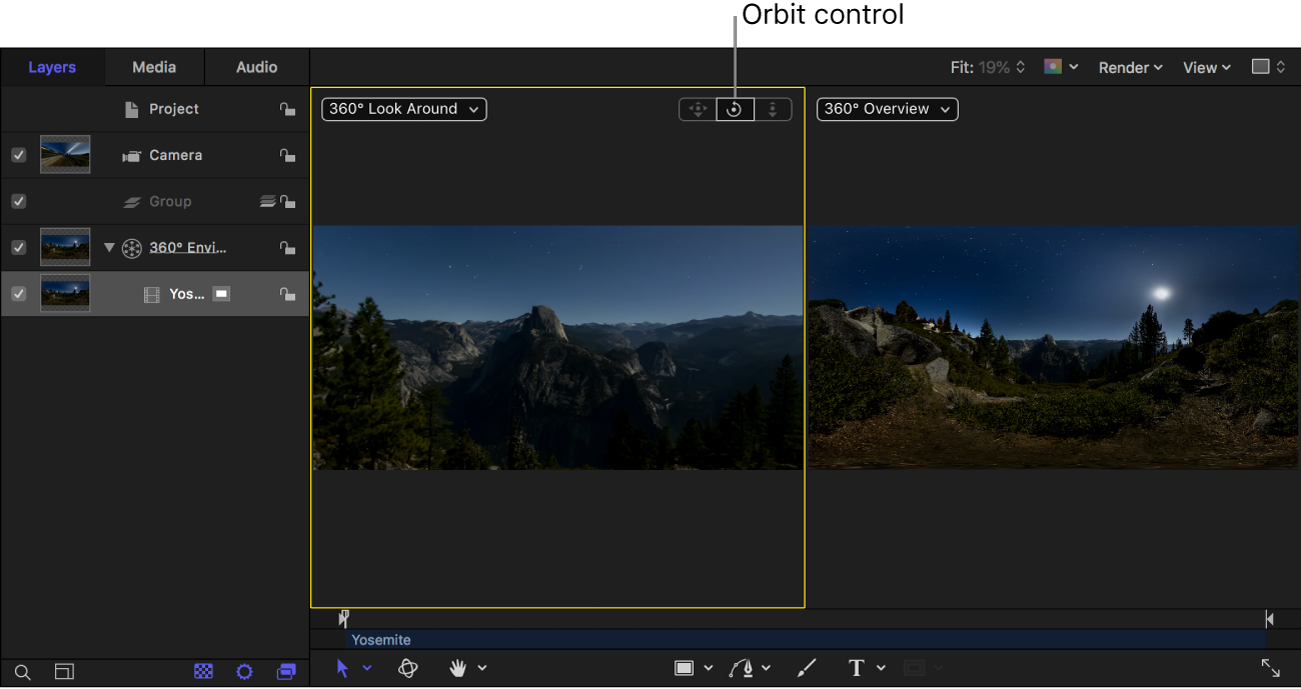
The view is rotated and other areas of the spherical projection become visible. Your media’s default orientation (what viewers will see in the VR headset) is not altered. (To alter the default orientation, see Reorient 360° media in Motion.)
You can also use the Orbit control to navigate 360° media during playback.
The spherical projection may appear sharper at the top and bottom. This is because you’re seeing only a portion of the 4K image at once, and the portion within your viewing angle may be closer to 1080p in resolution (or less). Additionally, spherical projections may create uneven pixel spacing.
View the equirectangular image
While the 360° Look Around camera shows you an interactive, “WYSIWYG” view of the 360° effect, the 360° Overview camera displays the equirectangular image in its raw form (distorted). It’s helpful to monitor this view as you make changes to the project.
In Motion, ensure that the Camera pop-up menu in the right viewport is set to 360° Overview.
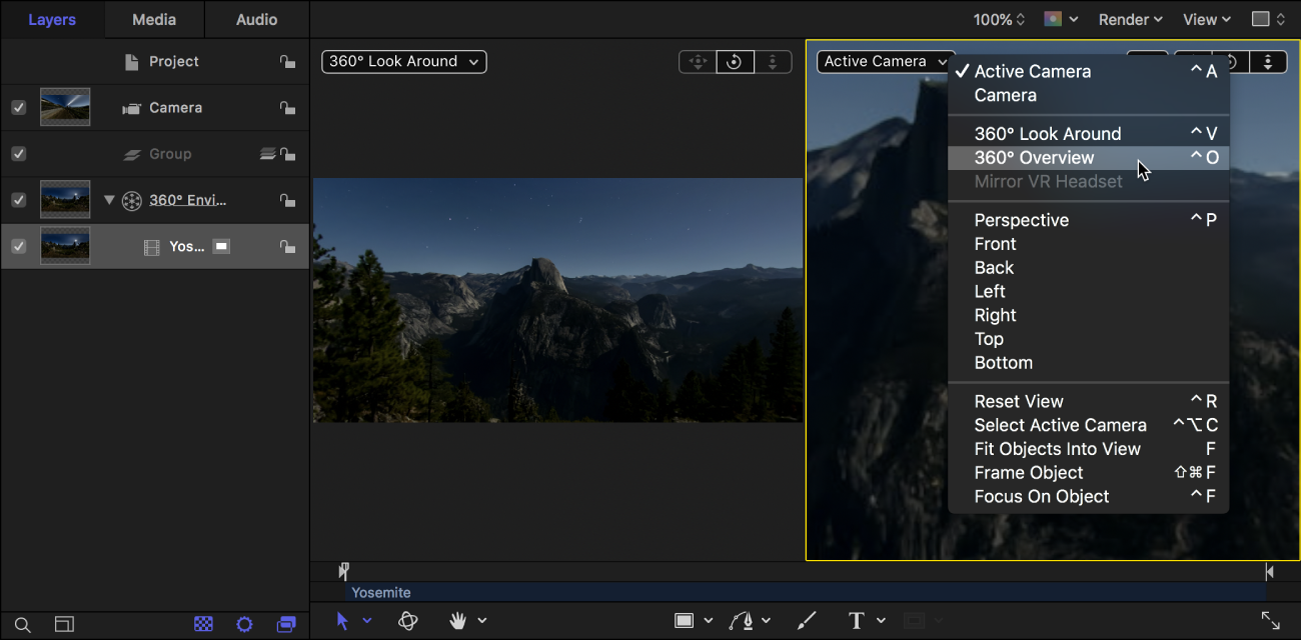
The right viewport displays the entire 360° scene as a flat, equirectangular image. This image represents what is rendered when you share your project.
Reset the view
After you pan the 360° Look Around view using the Orbit control, you can reset the view to its default orientation.
In the Motion canvas, do one of the following:
Click the Camera pop-up menu, then choose Reset View (or press Control-R).
Double-click the Orbit control.
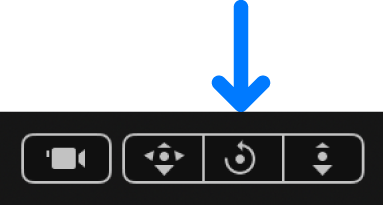
Choose View > 3D View > Reset View.
The footage returns to its default orientation.
Use the canvas rulers or grid as orientation guides
To help you keep track of the horizon line as you navigate the 360° video in 360° Look Around view, you can use the canvas rulers or grid as guides.
In Motion, do any of the following:
Choose Rulers from the View menu in the upper-left corner of the canvas.
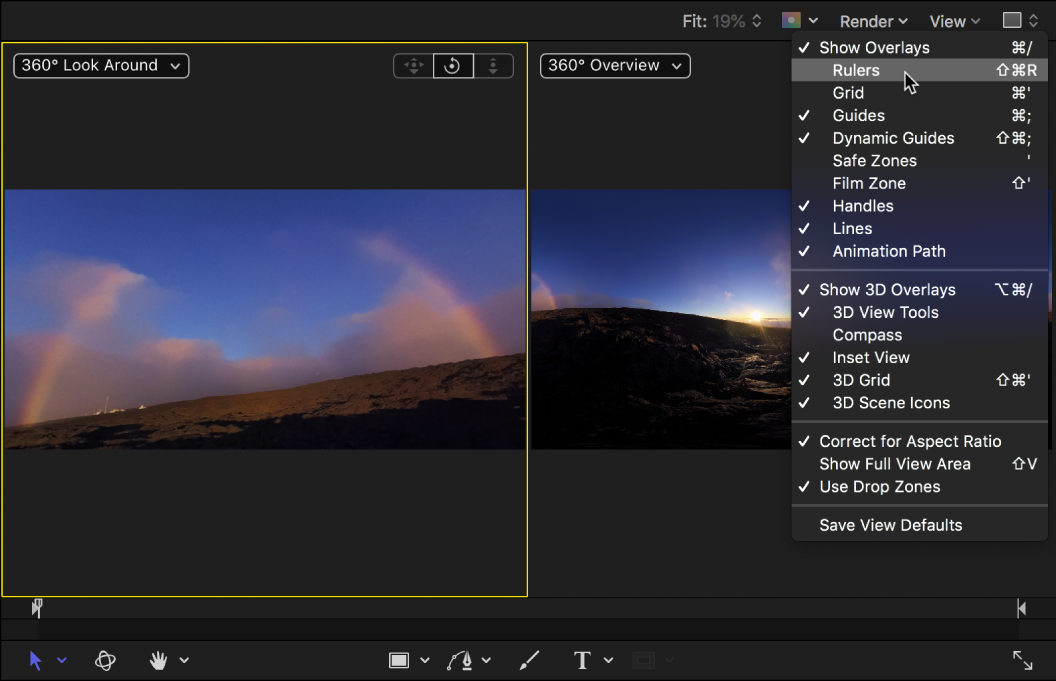
Choose Grid from the View menu in the upper-left corner of the canvas.
You can customize the grid settings in the Canvas pane of Motion Preferences (press Command-Comma to open Preferences).
Change the camera’s angle of view
When the camera is set to 360° Look Around view, you can zoom the 360° image.
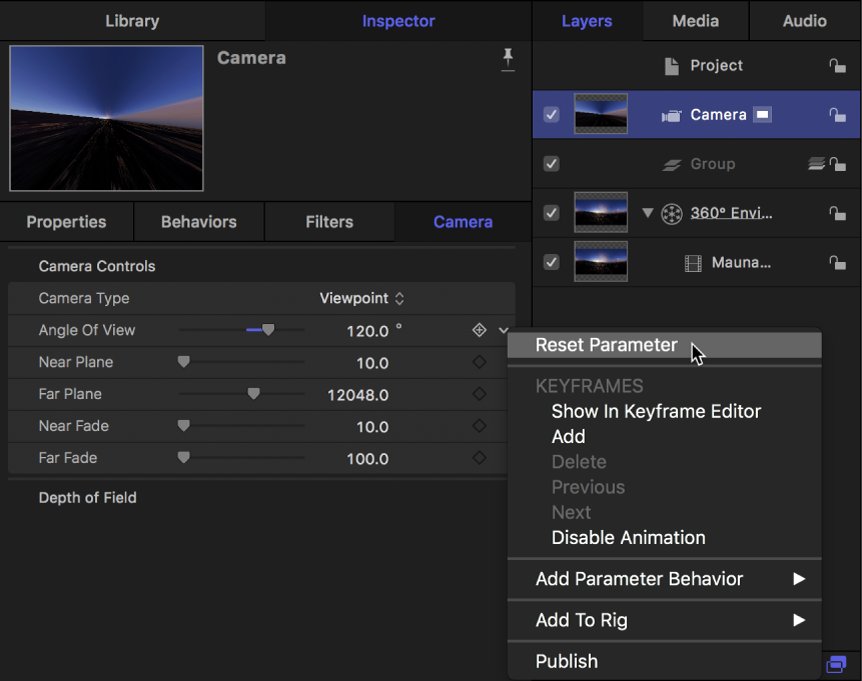
In the Layers list in Motion, select the camera.
In the Camera Inspector, adjust the Angle of View slider, dragging left to zoom in, or dragging right to zoom out.
If you zoom out too far, you’ll see the stretched edges of the footage in the viewport. This is normal and expected.
To reset the camera’s angle of view, Click the Animation menu (the down arrow that appears on the right when you move the pointer over the Angle of View parameter), then choose Reset Parameter.
Changing the camera’s angle of view affects only the view within the 360° Look Around viewport or Active Camera viewport—it does not affect the final output of your project. If you’re viewing your 360° video in a VR headset, the camera Angle of View setting is ignored. However, if you’re mirroring the VR headset’s image in the Motion canvas, the Angle of View setting affects the view in the canvas.