Motion User Guide
- Welcome
-
- Intro to basic compositing
-
- Intro to transforming layers
-
- Intro to transforming layers in the canvas
- Transform layer properties in the canvas
- Transform tools
- Change layer position, scale, or rotation
- Move a layer’s anchor point
- Add a drop shadow to a layer
- Distort or shear a layer
- Crop a layer
- Modify shape or mask points
- Transform text glyphs and other object attributes
- Align layers in the canvas
- Transform layers in the HUD
- Transform 2D layers in 3D space
-
- Intro to behaviors
- Behaviors versus keyframes
-
- Intro to behavior types
-
- Intro to Parameter behaviors
- Audio behavior
- Average behavior
- Clamp behavior
- Custom behavior
- Add a Custom behavior
- Exponential behavior
- Link behavior
- Logarithmic behavior
- MIDI behavior
- Add a MIDI behavior
- Negate behavior
- Oscillate behavior
- Create a decaying oscillation
- Overshoot behavior
- Quantize behavior
- Ramp behavior
- Randomize behavior
- Rate behavior
- Reverse behavior
- Stop behavior
- Track behavior
- Wriggle behavior
-
- Intro to Simulation behaviors
- Align to Motion behavior
- Attracted To behavior
- Attractor behavior
- Drag behavior
- Drift Attracted To behavior
- Drift Attractor behavior
- Edge Collision behavior
- Gravity behavior
- Orbit Around behavior
- Random Motion behavior
- Repel behavior
- Repel From behavior
- Rotational Drag behavior
- Spring behavior
- Vortex behavior
- Wind behavior
- Additional behaviors
-
- Intro to using generators
- Add a generator
-
- Intro to image generators
- Caustics generator
- Cellular generator
- Checkerboard generator
- Clouds generator
- Color Solid generator
- Concentric Polka Dots generator
- Concentric Shapes generator
- Gradient generator
- Grid generator
- Japanese Pattern generator
- Lens Flare generator
- Manga Lines generator
- Membrane generator
- Noise generator
- One Color Ray generator
- Op Art 1 generator
- Op Art 2 generator
- Op Art 3 generator
- Overlapping Circles generator
- Radial Bars generator
- Soft Gradient generator
- Spirals generator
- Spiral Drawing generator
- Use Spiral Drawing onscreen controls
- Star generator
- Stripes generator
- Sunburst generator
- Truchet Tiles generator
- Two Color Ray generator
- Save a modified generator
-
- Intro to filters
- Browse and preview filters
- Apply or remove filters
-
- Intro to filter types
-
- Intro to Color filters
- Brightness filter
- Channel Mixer filter
- Color Balance filter
- Example: Color-balance two layers
- Color Curves filter
- Use the Color Curves filter
- Color Reduce filter
- Color Wheels filter
- Use the Color Wheels filter
- Colorize filter
- Contrast filter
- Custom LUT filter
- Use the Custom LUT filter
- Gamma filter
- Gradient Colorize filter
- HDR Tools filter
- Hue/Saturation filter
- Hue/Saturation Curves filter
- Use the Hue/Saturation Curves filter
- Levels filter
- Negative filter
- OpenEXR Tone Map filter
- Sepia filter
- Threshold filter
- Tint filter
-
- Intro to Distortion filters
- Black Hole filter
- Bulge filter
- Bump Map filter
- Disc Warp filter
- Droplet filter
- Earthquake filter
- Fisheye filter
- Flop filter
- Fun House filter
- Glass Block filter
- Glass Distortion
- Insect Eye filter
- Mirror filter
- Page Curl filter
- Poke filter
- Polar filter
- Refraction filter
- Ring Lens filter
- Ripple filter
- Scrape filter
- Sliced Scale filter
- Use the Sliced Scale filter
- Sphere filter
- Starburst filter
- Stripes filter
- Target filter
- Tiny Planet filter
- Twirl filter
- Underwater filter
- Wave filter
-
- Intro to Stylize filters
- Add Noise filter
- Bad Film filter
- Bad TV filter
- Circle Screen filter
- Circles filter
- Color Emboss filter
- Comic filter
- Crystallize filter
- Edges filter
- Extrude filter
- Fill filter
- Halftone filter
- Hatched Screen filter
- Highpass filter
- Indent filter
- Line Art filter
- Line Screen filter
- MinMax filter
- Noise Dissolve filter
- Pixellate filter
- Posterize filter
- Relief filter
- Slit Scan filter
- Slit Tunnel filter
- Texture Screen filter
- Vignette filter
- Wavy Screen filter
- Publish filter parameters to Final Cut Pro
- Using filters on alpha channels
- Filter performance
- Save custom filters
-
- Intro to 3D objects
- Add a 3D object
- Move and rotate a 3D object
- Reposition a 3D object’s anchor point
- Exchange a 3D object file
- 3D object intersection and layer order
- Using cameras and lights with 3D objects
- Save custom 3D objects
- Guidelines for working with 3D objects
- Working with imported 3D objects
-
- Intro to 360-degree video
- 360-degree projects
- Create 360-degree projects
- Add 360-degree video to a project
- Create a tiny planet effect
- Reorient 360-degree media
- Creating 360-degree templates for Final Cut Pro
- 360-degree-aware filters and generators
- Export and share 360-degree projects
- Guidelines for better 360-degree projects
-
-
- Intro to preferences and shortcuts
-
- Intro to Keyboard shortcuts
- Use function keys
- General keyboard shortcuts
- Audio list keyboard shortcuts
-
- Tools keyboard shortcuts
- Transform tool keyboard shortcuts
- Select/Transform tool keyboard shortcuts
- Crop tool keyboard shortcuts
- Edit Points tool keyboard shortcuts
- Edit shape tools keyboard shortcuts
- Pan and Zoom tools keyboard shortcuts
- Shape tools keyboard shortcuts
- Bezier tool keyboard shortcuts
- B-Spline tool keyboard shortcuts
- Paint Stroke tool keyboard shortcuts
- Text tool keyboard shortcuts
- Shape mask tools keyboard shortcuts
- Bezier Mask tool keyboard shortcuts
- B-Spline Mask tool keyboard shortcuts
- Transport control keyboard shortcuts
- View option keyboard shortcuts
- HUD keyboard shortcuts
- Inspector keyboard shortcuts
- Keyframe Editor keyboard shortcuts
- Layers keyboard shortcuts
- Library keyboard shortcuts
- Media list keyboard shortcuts
- Timeline keyboard shortcuts
- Keyframing keyboard shortcuts
- Shape and Mask keyboard shortcuts
- 3D keyboard shortcuts
- Miscellaneous keyboard shortcuts
- Touch Bar shortcuts
- Move assets to another computer
- Work with GPUs
- Glossary
- Copyright

Use the Sliced Scale filter in Motion
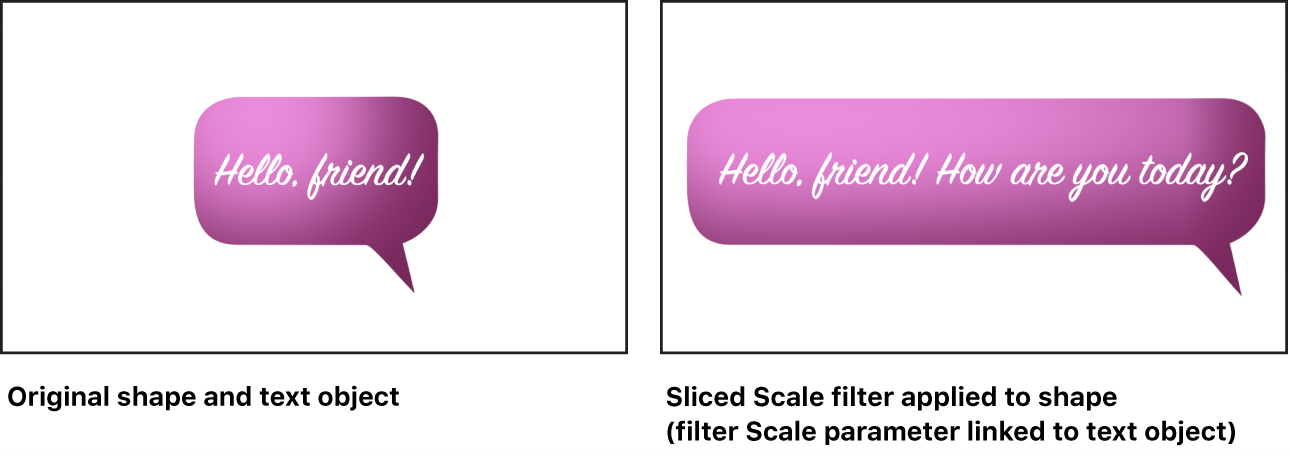
You can use the Sliced Scale filter to scale and tile an image or shape while protecting portions of the image from distortion. The filter is especially useful for creating Final Cut Pro templates that dynamically scale lower-third titles, arrows, rectangles, and other images with linked objects (using the Link parameter behavior). For example, you can scale a speech bubble to accommodate changes in text without affecting the shape of the bubble’s corners or tail, or scale a lower third without distorting its pattern.
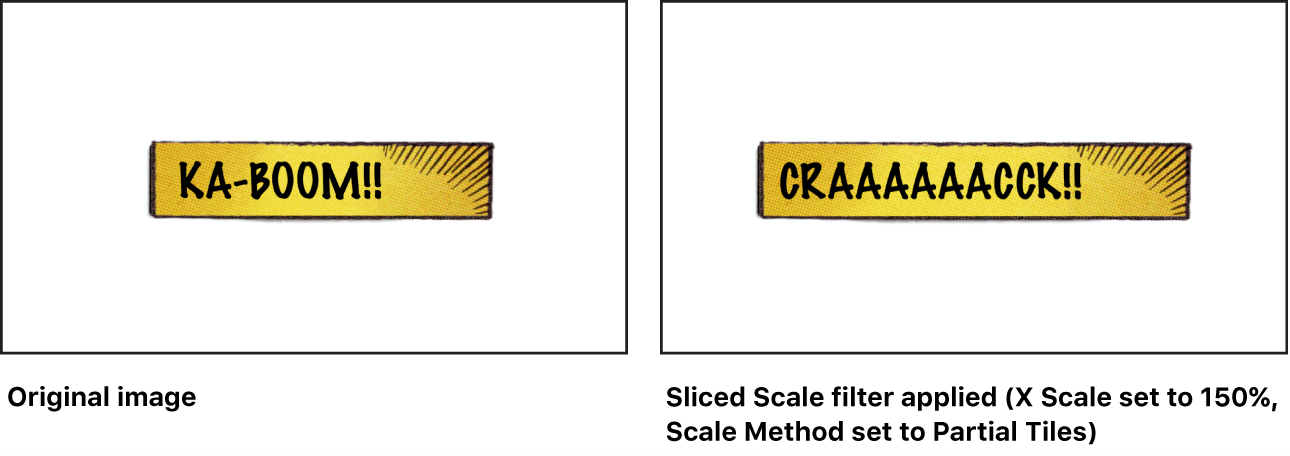
Scale a portion of an image without distorting its shape or pattern
In the Layers list in Motion, select the image or shape you want to scale, click Filters in the toolbar, then choose Distortion > Sliced Scale.
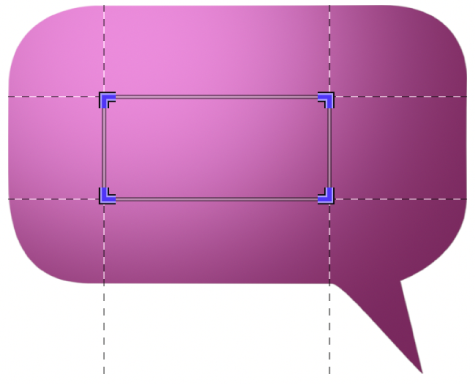
To define the center slice (which will be resized in step 3), select the Edit Slices checkbox, then do either of the following:
Define the slice in the canvas: To specify the size or aspect ratio of the center slice, drag a corner handle or dashed line. To reposition the center slice within the image, drag inside the slice.
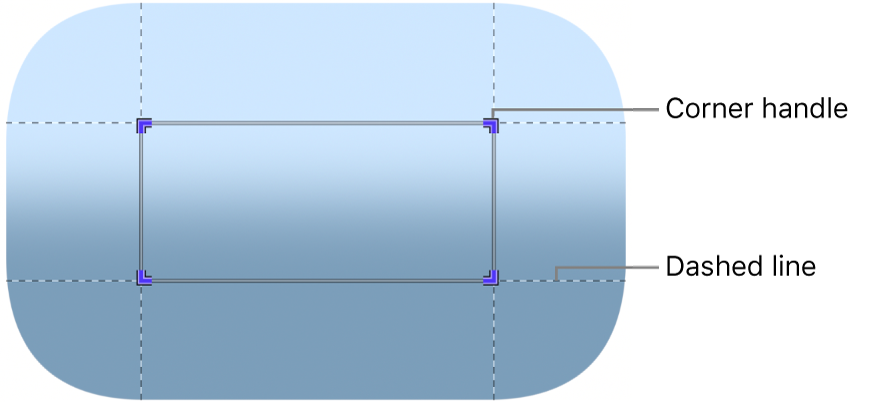
The center slice represents the stretchable area of the image that will be scaled.
Tip: Shift-drag a handle to proportionally adjust the slice, Option-drag a handle to adjust the slice around its center, or Option-Shift-drag a handle to adjust the slice proportionally around its center.
Define the slice in the Filters Inspector: To specify the size or aspect ratio of the center slice, drag the Slice Right Top or Slice Left Bottom value sliders.
To resize the center slice and the image proportionally, deselect the Edit Slices checkbox in the Filters Inspector, then do either of the following:
Resize in the canvas: Drag a scale handle.
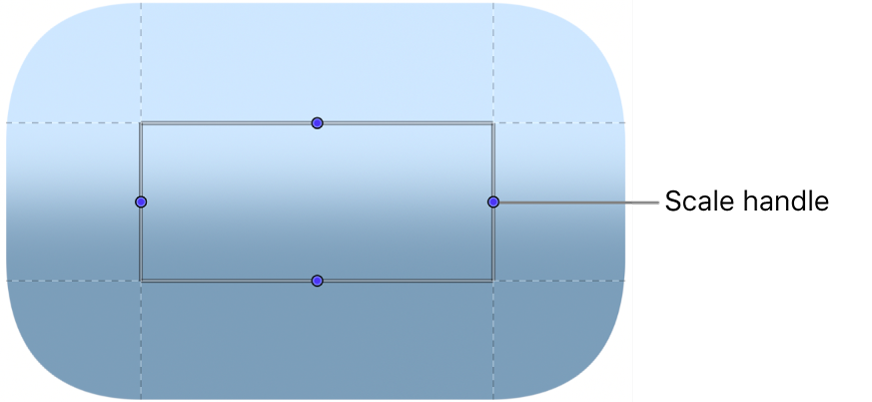
When you scale the center slice, the upper and lower slices scale horizontally, the left and right slices scale vertically, and the corner slices move to accommodate the scale change, preserving the intrinsic shape of the image.
Resize in the Filters Inspector: Drag the Scale slider. Click the disclosure triangle to reveal X and Y sliders to more precisely scale the slice.
Optional: If the image contains a pattern that should be repeated instead of stretched, do either of the following:
Tile an image with a small pattern or texture, such as a halftone dot pattern: Click the Scale Method pop-up menu, then choose Partial Tiles.
Tile an image with a large pattern or texture, such as an ornate picture frame: Click the Scale Method pop-up menu, then choose Whole Tiles.
Example: Dynamically scale a portion of a shape or image without distorting its shape or pattern
This advanced example uses the Sliced Scale filter, the Align To behavior, and the Link parameter behavior to create a shape that dynamically resizes based on text positioned within the shape. You use the Align To behavior to align the shape with the text, the Sliced Scale filter to slice the shape into nine slices, and the Link behavior to link the scale of the shape to the size of the text. Once linked, the shape resizes with any changes in the text—without changing its intrinsic shape.
This example assumes you’re working in a Final Cut title template, effect template, or generator template project that contains a shape or image (such as a speech bubble shape, a rectangle shape, or lower-third image) and a text object that’s positioned above the shape or image in the Layers list.
Once the template is applied to your Final Cut Pro project, the shape (or image) dynamically scales as you add, remove, or resize text in Final Cut Pro.
In the Layers list in Motion, select the shape, click Filters in the toolbar, then choose Distortion > Sliced Scale.
In the Filters Inspector, select the Edit Slices checkbox.
In the canvas, drag the corner handles to define the portion of the shape that dynamically scales when you make any changes to the text.
In this example, the center slice doesn’t overlap the rounded corners or tail of the speech bubble. When the slice is scaled, the shape of the speech bubble is preserved.
In the Filters Inspector, deselect the Edit Slices checkbox, move the pointer over the right side of the Scale parameter row, then click the down arrow and choose Add Parameter > Link.
The Link behavior lets you link the size of the shape to the size of the text object.
Drag the text object from the Layers list to the Source Object well in the Behaviors Inspector.
In the Behaviors Inspector, click the Compatible Parameters pop-up menu, then choose Object Attributes > Size > All.
The shape may temporarily appear distorted, but will be corrected in step 10.
In the Layers list in Motion, select the shape object, click Behaviors in the toolbar, then choose Basic Motion > Align To from the pop-up menu.
Drag the text object from the Layers list to the Object well in the Behaviors Inspector.
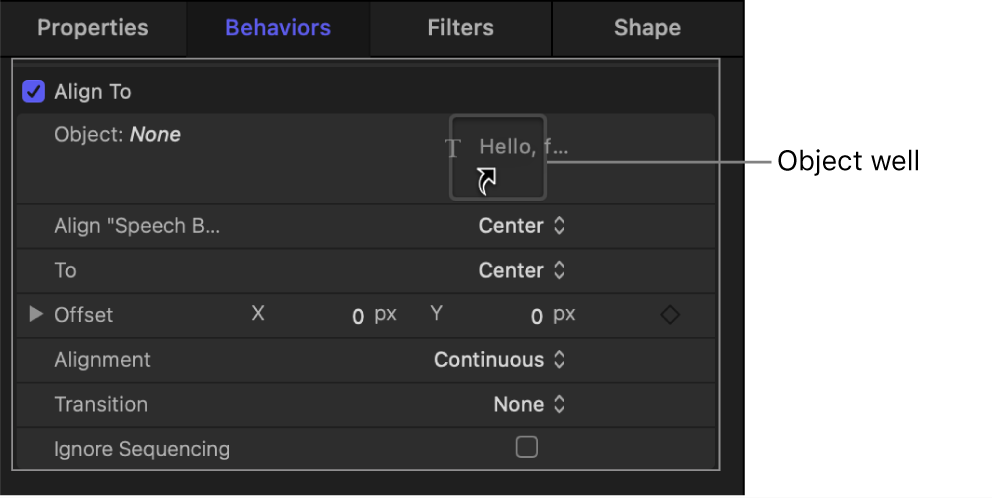
In the Behaviors Inspector, click the Align pop-up menu and choose an option, then click the To pop-up menu and choose an option to specify how the text aligns with the shape.
In the Layers list, select the Sliced Scale filter, click the Expand disclosure triangle in the Filters Inspector, then adjust the Left, Right, Top, and Bottom parameters until the text looks correctly positioned in the shape.
In the Layers list, select the text object, then modify the text in the canvas (or in the Text field at the bottom of the Format pane of the Text Inspector).
As you change the text, the shape dynamically scales with the text without distorting its original form.
Note: If the shape contains a pattern that becomes stretched when the slice is scaled, you can choose Partial Tiles or Whole Tiles in the Scale Method pop-up menu to tile the pattern. Unless the scale is large enough to trigger an additional tile, choosing Whole Tiles has no effect on the pattern.
In the Filters Inspector, choose which parameter controls are available in the title, effect, or generator template when it’s applied to a clip in Final Cut Pro, then save the project.
See Create an effect template in Motion, Create a title template in Motion, or Create a generator template in Motion.
Download this guide: Apple Books | PDF