Motion User Guide
- Welcome
-
- Intro to basic compositing
-
- Intro to transforming layers
-
- Intro to transforming layers in the canvas
- Transform layer properties in the canvas
- Transform tools
- Change layer position, scale, or rotation
- Move a layer’s anchor point
- Add a drop shadow to a layer
- Distort or shear a layer
- Crop a layer
- Modify shape or mask points
- Transform text glyphs and other object attributes
- Align layers in the canvas
- Transform layers in the HUD
- Transform 2D layers in 3D space
-
- Intro to behaviors
- Behaviors versus keyframes
-
- Intro to behavior types
-
- Intro to Parameter behaviors
- Audio behavior
- Average behavior
- Clamp behavior
- Custom behavior
- Add a Custom behavior
- Exponential behavior
- Link behavior
- Logarithmic behavior
- MIDI behavior
- Add a MIDI behavior
- Negate behavior
- Oscillate behavior
- Create a decaying oscillation
- Overshoot behavior
- Quantize behavior
- Ramp behavior
- Randomize behavior
- Rate behavior
- Reverse behavior
- Stop behavior
- Track behavior
- Wriggle behavior
-
- Intro to Simulation behaviors
- Align to Motion behavior
- Attracted To behavior
- Attractor behavior
- Drag behavior
- Drift Attracted To behavior
- Drift Attractor behavior
- Edge Collision behavior
- Gravity behavior
- Orbit Around behavior
- Random Motion behavior
- Repel behavior
- Repel From behavior
- Rotational Drag behavior
- Spring behavior
- Vortex behavior
- Wind behavior
- Additional behaviors
-
- Intro to using generators
- Add a generator
-
- Intro to image generators
- Caustics generator
- Cellular generator
- Checkerboard generator
- Clouds generator
- Color Solid generator
- Concentric Polka Dots generator
- Concentric Shapes generator
- Gradient generator
- Grid generator
- Japanese Pattern generator
- Lens Flare generator
- Manga Lines generator
- Membrane generator
- Noise generator
- One Color Ray generator
- Op Art 1 generator
- Op Art 2 generator
- Op Art 3 generator
- Overlapping Circles generator
- Radial Bars generator
- Soft Gradient generator
- Spirals generator
- Spiral Drawing generator
- Use Spiral Drawing onscreen controls
- Star generator
- Stripes generator
- Sunburst generator
- Truchet Tiles generator
- Two Color Ray generator
- Save a modified generator
-
- Intro to filters
- Browse and preview filters
- Apply or remove filters
-
- Intro to filter types
-
- Intro to Color filters
- Brightness filter
- Channel Mixer filter
- Color Balance filter
- Example: Color-balance two layers
- Color Curves filter
- Use the Color Curves filter
- Color Reduce filter
- Color Wheels filter
- Use the Color Wheels filter
- Colorize filter
- Contrast filter
- Custom LUT filter
- Use the Custom LUT filter
- Gamma filter
- Gradient Colorize filter
- HDR Tools filter
- Hue/Saturation filter
- Hue/Saturation Curves filter
- Use the Hue/Saturation Curves filter
- Levels filter
- Negative filter
- OpenEXR Tone Map filter
- Sepia filter
- Threshold filter
- Tint filter
-
- Intro to Distortion filters
- Black Hole filter
- Bulge filter
- Bump Map filter
- Disc Warp filter
- Droplet filter
- Earthquake filter
- Fisheye filter
- Flop filter
- Fun House filter
- Glass Block filter
- Glass Distortion
- Insect Eye filter
- Mirror filter
- Page Curl filter
- Poke filter
- Polar filter
- Refraction filter
- Ring Lens filter
- Ripple filter
- Scrape filter
- Sphere filter
- Starburst filter
- Stripes filter
- Target filter
- Tiny Planet filter
- Twirl filter
- Underwater filter
- Wave filter
-
- Intro to Stylize filters
- Add Noise filter
- Bad Film filter
- Bad TV filter
- Circle Screen filter
- Circles filter
- Color Emboss filter
- Comic filter
- Crystallize filter
- Edges filter
- Extrude filter
- Fill filter
- Halftone filter
- Hatched Screen filter
- Highpass filter
- Indent filter
- Line Art filter
- Line Screen filter
- MinMax filter
- Noise Dissolve filter
- Pixellate filter
- Posterize filter
- Relief filter
- Slit Scan filter
- Slit Tunnel filter
- Texture Screen filter
- Vignette filter
- Wavy Screen filter
- Publish filter parameters to Final Cut Pro
- Using filters on alpha channels
- Filter performance
- Save custom filters
-
- Intro to 3D objects
- Add a 3D object
- Move and rotate a 3D object
- Reposition a 3D object’s anchor point
- Exchange a 3D object file
- 3D object intersection and layer order
- Using cameras and lights with 3D objects
- Save custom 3D objects
- Guidelines for working with 3D objects
- Working with imported 3D objects
-
- Intro to 360-degree video
- 360-degree projects
- Create 360-degree projects
- Add 360-degree video to a project
- Create a tiny planet effect
- Reorient 360-degree media
- Creating 360-degree templates for Final Cut Pro
- 360-degree-aware filters and generators
- Export and share 360-degree projects
- Guidelines for better 360-degree projects
-
- Intro to tracking
- How does motion tracking work?
- Motion tracking behavior types
- Analyze motion in a clip
- Stabilize a shaky clip
- Unstabilize a clip
- Use a range of frames for analysis
- Load existing tracking data
- Track shapes, masks, and paint strokes
- Track a filter’s position parameter
- Adjust onscreen trackers
- Save tracks to the Library
-
- Intro to preferences and shortcuts
-
- Intro to Keyboard shortcuts
- Use function keys
- General keyboard shortcuts
- Audio list keyboard shortcuts
-
- Tools keyboard shortcuts
- Transform tool keyboard shortcuts
- Select/Transform tool keyboard shortcuts
- Crop tool keyboard shortcuts
- Edit Points tool keyboard shortcuts
- Edit shape tools keyboard shortcuts
- Pan and Zoom tools keyboard shortcuts
- Shape tools keyboard shortcuts
- Bezier tool keyboard shortcuts
- B-Spline tool keyboard shortcuts
- Paint Stroke tool keyboard shortcuts
- Text tool keyboard shortcuts
- Shape mask tools keyboard shortcuts
- Bezier Mask tool keyboard shortcuts
- B-Spline Mask tool keyboard shortcuts
- Transport control keyboard shortcuts
- View option keyboard shortcuts
- HUD keyboard shortcuts
- Inspector keyboard shortcuts
- Keyframe Editor keyboard shortcuts
- Layers keyboard shortcuts
- Library keyboard shortcuts
- Media list keyboard shortcuts
- Timeline keyboard shortcuts
- Keyframing keyboard shortcuts
- Shape and Mask keyboard shortcuts
- 3D keyboard shortcuts
- Miscellaneous keyboard shortcuts
- Touch Bar shortcuts
- Move assets to another computer
- Work with GPUs
- Glossary
- Copyright

Stabilize a shaky clip in Motion
Use the Stabilize tracking behavior to smooth shaky motion in a movie or image sequence. For a full description of Stabilize parameters, see Stabilize controls in Motion.
Using the Stabilize behavior, there are three ways to analyze a clip:
Use the behavior’s default advanced motion analysis technique that evaluates the entire frame of a clip to extract movement data without using onscreen trackers.
Use onscreen trackers that analyze a reference pattern (a small group of pixels) in the canvas. These are the same trackers used by the Match Move and Analyze Motion behaviors.
Use a combination of the advanced motion analysis and onscreen trackers.
Important: For information on using onscreen trackers with the Stabilize behavior, see Improve stabilization in Motion.
The Stabilize behavior is primarily useful for removing unwanted trembling from less-than-stable crane or jib arm moves, eliminating teetering from handheld walking shots, or reducing vibrations in automotive shots.
Note: Motion blur present in the image remains, even though the subject in the shot is smoothed or locked.
Stabilize a clip using the Stabilize behavior
In Motion, apply a Stabilize behavior to the video clip you want to stabilize.
Note: Unlike other behavior workflows, the Stabilize behavior’s automatic mode analyzes the entire clip from its first frame, rather than from the current playhead position. Additionally, onscreen track points are not created when using the default motion analysis in the Stabilize behavior.
In the Behaviors Inspector, set the options for the analysis:
Click the Method pop-up menu, then choose an option:
Stabilize: Locks down an image, removing problems such as camera shake. The resulting effect is similar to footage shot on a camera mounted to a stationary tripod.
Smooth: Eliminates camera jitter while maintaining the general motion of the camera.
Click the Borders pop-up menu, then choose an option:
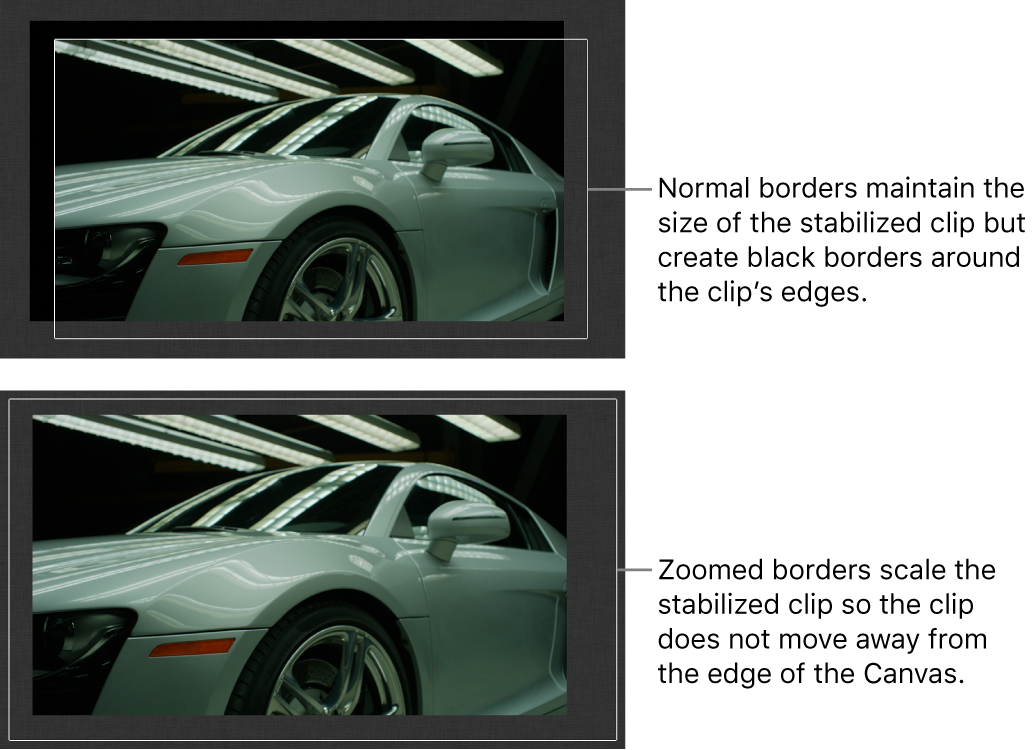
Normal: Maintains the size of the stabilized footage. Resulting transformations made to the stabilized image may cause moving black borders to appear around the edges of the clip. A very shaky clip results in large black borders.
Zoom: Expands the clip to the full size of the canvas, preventing black borders from appearing around the edges of the stabilized clip.

Note: For suggestions on correcting the black borders, see Remove borders from stabilized clips in Motion.
Click the Direction pop-up menu, then choose one of the following options:
Horizontal and Vertical: Applies the stabilize transformation to the X and Y dimensions.
Horizontal: Applies the stabilize transformation to the X dimension.
Vertical: Applies the stabilize transformation to the Y dimension.
Enable or disable the Adjust buttons, as follows:
Position: Enable this button to apply the analyzed position data to the clip. (The X and Y position changes in the footage are smoothed or stabilized.) To stabilize the X and Y position of the shot and leave scale or rotation changes intact, enable Position and disable Scale and Rotation.
Scale: Enable this button to apply any analyzed scale data to the clip. (Scale changes in the footage are smoothed or stabilized.) To stabilize or smooth changes in scale and leave position or rotation changes intact, enable Scale and disable Position and Rotation. (The Scale option is not related to the Zoom option in the Borders pop-up menu.)
Rotation: Enable this button to apply analyzed rotation data to the clip. (Changes in the rotation of the footage are smoothed or stabilized.) To stabilize or smooth changes in rotation in the shot and leave position or scale changes intact, enable Rotation and disable Position and Scale.
For the smoothest result, enable all three Adjust buttons (Position, Scale, and Rotation).
Note: You can change the Method, Borders, Direction, and Adjust parameters before or after the clip is analyzed.
In the Behaviors Inspector or HUD, click the Analyze button.
Note: The clip is stabilized according to defined parameters. Unlike Motion trackers, the default Stabilize analysis does not create keyframes in the Keyframe Editor. However, the stabilized object’s transformation can be converted to keyframes. See Advanced tracking strategies in Motion. When trackers are added to and analyzed with the Stabilize behavior, keyframes are created.
For more information on correcting problems associated with stabilization, see Improve stabilization in Motion.
Limit the area analyzed by the Stabilize behavior
When stabilizing a clip, you can define a specific region to be analyzed. During analysis, the area outside this region is ignored. Use this option for faster processing of a clip.
In the Layers list in Motion, select an applied Stabilize behavior.
In the Behaviors Inspector, select the Track Region checkbox.
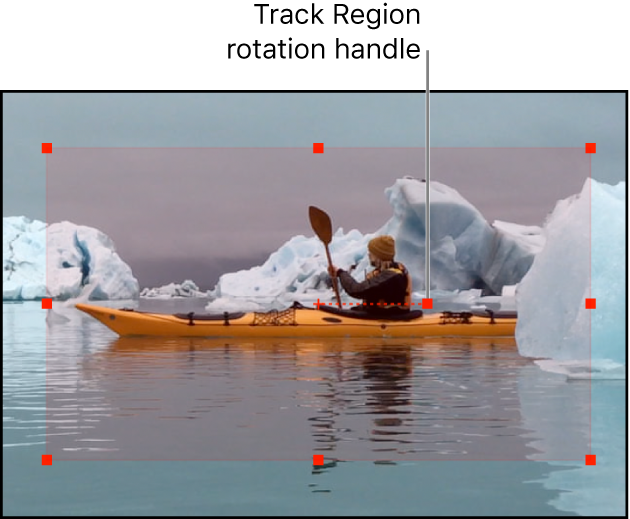
A transparent red overlay representing the track region appears in the canvas.
Do any of the following:
Change the position of track region: Drag in the region.
Resize the track region: Drag a handle on the bounding box of the region. The corner handles simultaneously resize width and height; the top and bottom center handles resize height; the left and right center handles resize width.
Resize the track region from its center: Press Option while dragging a handle.
Change the angle of the track region: Drag the rotation handle in the center of the track region.

After defining the track region, click the Analyze button in the Behaviors Inspector.
Because analysis takes place in the defined track region, the clip is analyzed more quickly.