Motion User Guide
- Welcome
- What’s new
-
- Intro to basic compositing
-
- Intro to transforming layers
-
- Intro to transforming layers in the canvas
- Transform layer properties in the canvas
- Transform tools
- Change layer position, scale, or rotation
- Move a layer’s anchor point
- Add a drop shadow to a layer
- Distort or shear a layer
- Crop a layer
- Modify shape or mask points
- Transform text glyphs and other object attributes
- Align layers in the canvas
- Transform layers in the HUD
- Transform 2D layers in 3D space
-
- Intro to behaviors
- Behaviors versus keyframes
-
- Intro to behavior types
-
- Intro to Parameter behaviors
- Audio behavior
- Average behavior
- Clamp behavior
- Custom behavior
- Add a Custom behavior
- Exponential behavior
- Link behavior
- Logarithmic behavior
- MIDI behavior
- Add a MIDI behavior
- Negate behavior
- Oscillate behavior
- Create a decaying oscillation
- Overshoot behavior
- Quantize behavior
- Ramp behavior
- Randomize behavior
- Rate behavior
- Reverse behavior
- Stop behavior
- Track behavior
- Wriggle behavior
-
- Intro to Simulation behaviors
- Align to Motion behavior
- Attracted To behavior
- Attractor behavior
- Drag behavior
- Drift Attracted To behavior
- Drift Attractor behavior
- Edge Collision behavior
- Gravity behavior
- Orbit Around behavior
- Random Motion behavior
- Repel behavior
- Repel From behavior
- Rotational Drag behavior
- Spring behavior
- Vortex behavior
- Wind behavior
- Additional behaviors
-
- Intro to using generators
- Add a generator
-
- Intro to image generators
- Caustics generator
- Cellular generator
- Checkerboard generator
- Clouds generator
- Color Solid generator
- Concentric Polka Dots generator
- Concentric Shapes generator
- Gradient generator
- Grid generator
- Japanese Pattern generator
- Lens Flare generator
- Manga Lines generator
- Membrane generator
- Noise generator
- One Color Ray generator
- Op Art 1 generator
- Op Art 2 generator
- Op Art 3 generator
- Overlapping Circles generator
- Radial Bars generator
- Soft Gradient generator
- Spirals generator
- Spiral Drawing generator
- Use Spiral Drawing onscreen controls
- Star generator
- Stripes generator
- Sunburst generator
- Truchet Tiles generator
- Two Color Ray generator
- Save a modified generator
-
- Intro to filters
- Browse and preview filters
- Apply or remove filters
-
- Intro to filter types
-
- Intro to Color filters
- Brightness filter
- Channel Mixer filter
- Color Balance filter
- Example: Color-balance two layers
- Color Curves filter
- Use the Color Curves filter
- Color Reduce filter
- Color Wheels filter
- Use the Color Wheels filter
- Colorize filter
- Contrast filter
- Custom LUT filter
- Use the Custom LUT filter
- Gamma filter
- Gradient Colorize filter
- HDR Tools filter
- Hue/Saturation filter
- Hue/Saturation Curves filter
- Use the Hue/Saturation Curves filter
- Levels filter
- Negative filter
- OpenEXR Tone Map filter
- Sepia filter
- Threshold filter
- Tint filter
-
- Intro to Distortion filters
- Black Hole filter
- Bulge filter
- Bump Map filter
- Disc Warp filter
- Droplet filter
- Earthquake filter
- Fisheye filter
- Flop filter
- Fun House filter
- Glass Block filter
- Glass Distortion
- Insect Eye filter
- Mirror filter
- Page Curl filter
- Poke filter
- Polar filter
- Refraction filter
- Ring Lens filter
- Ripple filter
- Scrape filter
- Sphere filter
- Starburst filter
- Stripes filter
- Target filter
- Tiny Planet filter
- Twirl filter
- Underwater filter
- Wave filter
-
- Intro to Stylize filters
- Add Noise filter
- Bad Film filter
- Bad TV filter
- Circle Screen filter
- Circles filter
- Color Emboss filter
- Comic filter
- Crystallize filter
- Edges filter
- Extrude filter
- Fill filter
- Halftone filter
- Hatched Screen filter
- Highpass filter
- Indent filter
- Line Art filter
- Line Screen filter
- MinMax filter
- Noise Dissolve filter
- Pixellate filter
- Posterize filter
- Relief filter
- Slit Scan filter
- Slit Tunnel filter
- Texture Screen filter
- Vignette filter
- Wavy Screen filter
- Publish filter parameters to Final Cut Pro
- Using filters on alpha channels
- Filter performance
- Save custom filters
-
- Intro to 360-degree video
- 360-degree projects
- Create 360-degree projects
- Add 360-degree video to a project
- Create a tiny planet effect
- Reorient 360-degree media
- Creating 360-degree templates for Final Cut Pro
- 360-degree-aware filters and generators
- Export and share 360-degree projects
- Guidelines for better 360-degree projects
-
- Intro to tracking
- How does motion tracking work?
- Motion tracking behavior types
- Analyze motion in a clip
- Stabilize a shaky clip
- Unstabilize a clip
- Use a range of frames for analysis
- Load existing tracking data
- Track shapes, masks, and paint strokes
- Track a filter’s position parameter
- Adjust onscreen trackers
- Save tracks to the Library
-
- Intro to preferences and shortcuts
-
- Intro to Keyboard shortcuts
- Use function keys
- General keyboard shortcuts
- Audio list keyboard shortcuts
-
- Tools keyboard shortcuts
- Transform tool keyboard shortcuts
- Select/Transform tool keyboard shortcuts
- Crop tool keyboard shortcuts
- Edit Points tool keyboard shortcuts
- Edit shape tools keyboard shortcuts
- Pan and Zoom tools keyboard shortcuts
- Shape tools keyboard shortcuts
- Bezier tool keyboard shortcuts
- B-Spline tool keyboard shortcuts
- Paint Stroke tool keyboard shortcuts
- Text tool keyboard shortcuts
- Shape mask tools keyboard shortcuts
- Bezier Mask tool keyboard shortcuts
- B-Spline Mask tool keyboard shortcuts
- Transport control keyboard shortcuts
- View option keyboard shortcuts
- HUD keyboard shortcuts
- Inspector keyboard shortcuts
- Keyframe Editor keyboard shortcuts
- Layers keyboard shortcuts
- Library keyboard shortcuts
- Media list keyboard shortcuts
- Timeline keyboard shortcuts
- Keyframing keyboard shortcuts
- Shape and Mask keyboard shortcuts
- 3D keyboard shortcuts
- Miscellaneous keyboard shortcuts
- Touch Bar shortcuts
- Move assets to another computer
- Work with GPUs
- Copyright

Camera pop-up menu in Motion
The Camera pop-up menu, located in the upper-left corner of the canvas, lists the active camera view. Choose from a list of scene cameras and reference cameras. This menu also contains several view-related commands.
Note: In a 360° video project, three additional camera views are available (360° Look Around, 360° Overview, and Mirror VR Headset). For more information, see Intro to 360° video in Motion.

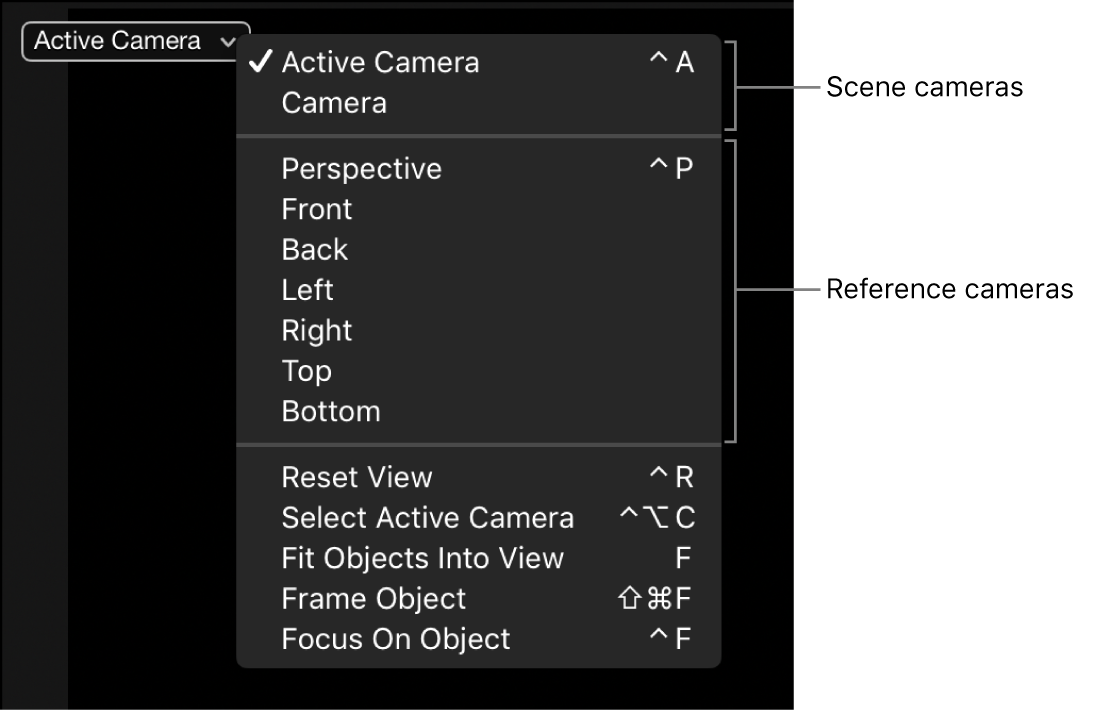
The Camera pop-up menu is divided into three sections:
The top section lets you select the active scene camera as well as any other scene cameras you’ve added to your project. For more information on scene cameras, see Cameras and views in Motion.
Active Camera/Camera: When you choose Active Camera from the pop-up menu, the topmost camera in the Layers list at the current playhead position (in the Timeline) becomes the active camera. The active camera is the camera through which you view your project in the canvas. It’s also the camera view that’s rendered when you export your project. If a project contains only one scene camera (as shown above), two items appear at the top of this pop-up menu: Active Camera and Camera, which represent the same camera.
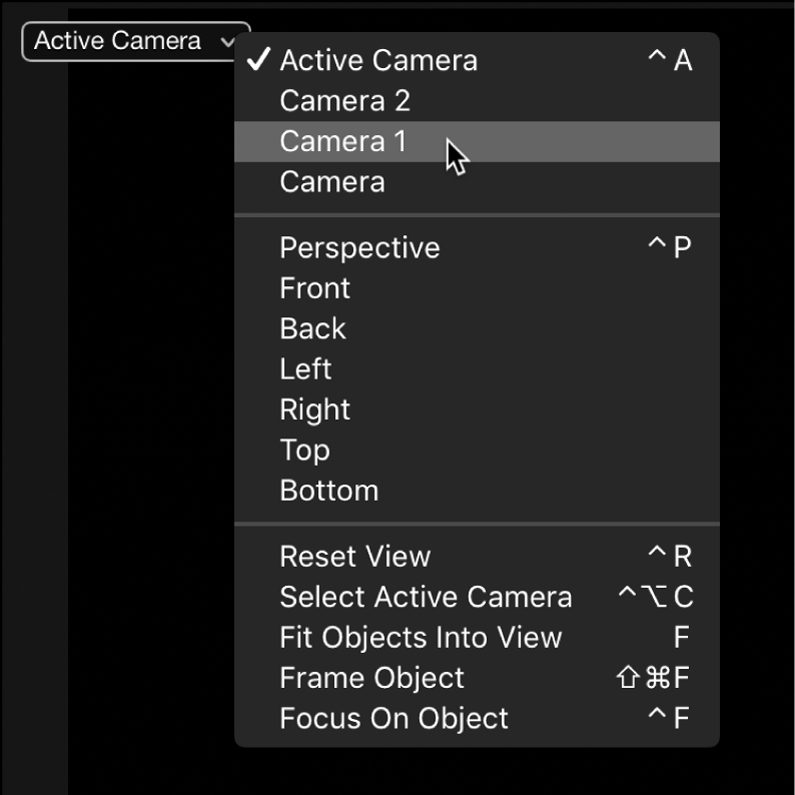
If a project contains more than one scene camera (as shown below), all scene cameras appear at the top of the Camera pop-up menu, under the Active Camera item. To make a different scene camera the active camera, choose a different camera from the top section of the pop-up menu. (Scene cameras listed in this section of the Camera pop-up menu appear in the same order as they do in the Layers list.)

For more information, see Work with multiple cameras in Motion.
The middle section of the Camera pop-up menu lets you choose a reference camera to help you see your composition from various angles. Choose any of the following to activate a reference camera view:
Perspective: Like a real-world camera, views the scene with perspective distortion. For example, layers farther away from the camera appear smaller than layers closer to the camera. The perspective view defaults to a view from the front center.
Front: This orthogonal camera looks straight down the Z axis and shows a perpendicular view from the front of the scene.
Back: This orthogonal camera looks straight down the Z axis and shows a perpendicular view from the back of the scene.
Left: This orthogonal camera looks straight down the X axis and shows a perpendicular view from the left of the scene.
Right: This orthogonal camera looks straight down the X axis and shows a perpendicular view from the right of the scene.
Top: This orthogonal camera looks straight down the Y axis and shows a perpendicular view from the top of the scene.
Bottom: This orthogonal camera looks straight down the Y axis and shows a perpendicular view from the bottom of the scene.
Note: The orthogonal camera views (Front, Back, Left, Right, Top, and Bottom) ignore perspective.
The reference camera views cannot be exported. However, you can still animate a scene camera when a reference camera view is selected.
Because objects (except 3D text) are 2D (flat), they may not be visible in the canvas when you choose an orthogonal camera view (Front, Back, Left, Right, Top, and Bottom). This is because orthogonal views are at right angles (perpendicular) to 2D elements in your project. When you select an object that’s invisible to an orthogonal reference camera, a thin white line represents the object in the canvas. For more information, see Display 3D scene icons in Motion.
Note: Layers in 360° environments are not visible in orthogonal camera views.
The bottom section of the Camera pop-up menu allows access to five frequently used commands:
Reset View: Resets the camera view to its default orientation. (Control-R)
Select Active Camera: Selects the active camera in the project—the topmost camera in the Layers list that is visible at the current frame (when there are multiple cameras existing at the same frame in time). (Control-Option-C)
Fit Objects Into View: Reframes the current camera to fit the selected objects into the canvas. (F)
Frame Object: Frames the selected objects in the active view. If no objects are selected, Frame Object resets the reference camera to view all objects in the scene. (Shift-Command-F)
Focus On Object: Used when a camera has depth of field turned on. Adjusts the camera’s Focus Offset to the selected object. (Control-F)
After you choose a camera view (scene camera or reference camera), use the 3D view tools to pan, orbit, or dolly the camera.