Motion User Guide
- Welcome
- What’s new
-
- Intro to basic compositing
-
- Intro to transforming layers
-
- Intro to transforming layers in the canvas
- Transform layer properties in the canvas
- Transform tools
- Change layer position, scale, or rotation
- Move a layer’s anchor point
- Add a drop shadow to a layer
- Distort or shear a layer
- Crop a layer
- Modify shape or mask points
- Transform text glyphs and other object attributes
- Align layers in the canvas
- Transform layers in the HUD
- Transform 2D layers in 3D space
-
- Intro to behaviors
- Behaviors versus keyframes
-
- Intro to behavior types
-
- Intro to Parameter behaviors
- Audio behavior
- Average behavior
- Clamp behavior
- Custom behavior
- Add a Custom behavior
- Exponential behavior
- Link behavior
- Logarithmic behavior
- MIDI behavior
- Add a MIDI behavior
- Negate behavior
- Oscillate behavior
- Create a decaying oscillation
- Overshoot behavior
- Quantize behavior
- Ramp behavior
- Randomize behavior
- Rate behavior
- Reverse behavior
- Stop behavior
- Track behavior
- Wriggle behavior
-
- Intro to Simulation behaviors
- Align to Motion behavior
- Attracted To behavior
- Attractor behavior
- Drag behavior
- Drift Attracted To behavior
- Drift Attractor behavior
- Edge Collision behavior
- Gravity behavior
- Orbit Around behavior
- Random Motion behavior
- Repel behavior
- Repel From behavior
- Rotational Drag behavior
- Spring behavior
- Vortex behavior
- Wind behavior
- Additional behaviors
-
- Intro to using generators
- Add a generator
-
- Intro to image generators
- Caustics generator
- Cellular generator
- Checkerboard generator
- Clouds generator
- Color Solid generator
- Concentric Polka Dots generator
- Concentric Shapes generator
- Gradient generator
- Grid generator
- Japanese Pattern generator
- Lens Flare generator
- Manga Lines generator
- Membrane generator
- Noise generator
- One Color Ray generator
- Op Art 1 generator
- Op Art 2 generator
- Op Art 3 generator
- Overlapping Circles generator
- Radial Bars generator
- Soft Gradient generator
- Spirals generator
- Spiral Drawing generator
- Use Spiral Drawing onscreen controls
- Star generator
- Stripes generator
- Sunburst generator
- Truchet Tiles generator
- Two Color Ray generator
- Save a modified generator
-
- Intro to filters
- Browse and preview filters
- Apply or remove filters
-
- Intro to filter types
-
- Intro to Color filters
- Brightness filter
- Channel Mixer filter
- Color Balance filter
- Example: Color-balance two layers
- Color Curves filter
- Use the Color Curves filter
- Color Reduce filter
- Color Wheels filter
- Use the Color Wheels filter
- Colorize filter
- Contrast filter
- Custom LUT filter
- Use the Custom LUT filter
- Gamma filter
- Gradient Colorize filter
- HDR Tools filter
- Hue/Saturation filter
- Hue/Saturation Curves filter
- Use the Hue/Saturation Curves filter
- Levels filter
- Negative filter
- OpenEXR Tone Map filter
- Sepia filter
- Threshold filter
- Tint filter
-
- Intro to Distortion filters
- Black Hole filter
- Bulge filter
- Bump Map filter
- Disc Warp filter
- Droplet filter
- Earthquake filter
- Fisheye filter
- Flop filter
- Fun House filter
- Glass Block filter
- Glass Distortion
- Insect Eye filter
- Mirror filter
- Page Curl filter
- Poke filter
- Polar filter
- Refraction filter
- Ring Lens filter
- Ripple filter
- Scrape filter
- Sphere filter
- Starburst filter
- Stripes filter
- Target filter
- Tiny Planet filter
- Twirl filter
- Underwater filter
- Wave filter
-
- Intro to Stylize filters
- Add Noise filter
- Bad Film filter
- Bad TV filter
- Circle Screen filter
- Circles filter
- Color Emboss filter
- Comic filter
- Crystallize filter
- Edges filter
- Extrude filter
- Fill filter
- Halftone filter
- Hatched Screen filter
- Highpass filter
- Indent filter
- Line Art filter
- Line Screen filter
- MinMax filter
- Noise Dissolve filter
- Pixellate filter
- Posterize filter
- Relief filter
- Slit Scan filter
- Slit Tunnel filter
- Texture Screen filter
- Vignette filter
- Wavy Screen filter
- Publish filter parameters to Final Cut Pro
- Using filters on alpha channels
- Filter performance
- Save custom filters
-
- Intro to 360-degree video
- 360-degree projects
- Create 360-degree projects
- Add 360-degree video to a project
- Create a tiny planet effect
- Reorient 360-degree media
- Creating 360-degree templates for Final Cut Pro
- 360-degree-aware filters and generators
- Export and share 360-degree projects
- Guidelines for better 360-degree projects
-
- Intro to tracking
- How does motion tracking work?
- Motion tracking behavior types
- Analyze motion in a clip
- Stabilize a shaky clip
- Unstabilize a clip
- Use a range of frames for analysis
- Load existing tracking data
- Track shapes, masks, and paint strokes
- Track a filter’s position parameter
- Adjust onscreen trackers
- Save tracks to the Library
-
- Intro to preferences and shortcuts
-
- Intro to Keyboard shortcuts
- Use function keys
- General keyboard shortcuts
- Audio list keyboard shortcuts
-
- Tools keyboard shortcuts
- Transform tool keyboard shortcuts
- Select/Transform tool keyboard shortcuts
- Crop tool keyboard shortcuts
- Edit Points tool keyboard shortcuts
- Edit shape tools keyboard shortcuts
- Pan and Zoom tools keyboard shortcuts
- Shape tools keyboard shortcuts
- Bezier tool keyboard shortcuts
- B-Spline tool keyboard shortcuts
- Paint Stroke tool keyboard shortcuts
- Text tool keyboard shortcuts
- Shape mask tools keyboard shortcuts
- Bezier Mask tool keyboard shortcuts
- B-Spline Mask tool keyboard shortcuts
- Transport control keyboard shortcuts
- View option keyboard shortcuts
- HUD keyboard shortcuts
- Inspector keyboard shortcuts
- Keyframe Editor keyboard shortcuts
- Layers keyboard shortcuts
- Library keyboard shortcuts
- Media list keyboard shortcuts
- Timeline keyboard shortcuts
- Keyframing keyboard shortcuts
- Shape and Mask keyboard shortcuts
- 3D keyboard shortcuts
- Miscellaneous keyboard shortcuts
- Touch Bar shortcuts
- Move assets to another computer
- Work with GPUs
- Copyright

3D shadow controls in Motion
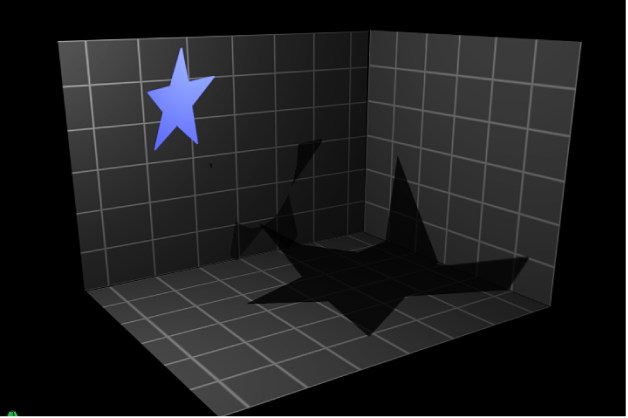
Shadows are controlled by adjusting settings in two places:
Shadows section in the Light Inspector: Use these parameter controls to set the shadow properties of point lights and spot lights.
Shadows section in the Properties Inspector: Use these parameter controls to set the casting and receiving properties of layers.
Note: 2D groups at the root level of the project (not nested in other groups) do not have lighting or shadow controls. To enable shadows on such a group, convert it to 3D or embed it in another 3D group.
Shadows controls in the Light Inspector
Shadows: A checkbox to turn on Shadows controls. The Shadows checkbox lets you set some lights to cast shadows, and others not to cast shadows.
Selecting this checkbox causes the light to cast shadows on objects in front of it if the objects also have shadow controls enabled. Deselecting it prevents the light from generating shadows, regardless of settings of individual objects.
Opacity: A slider to control the apparent opacity of the shadow.
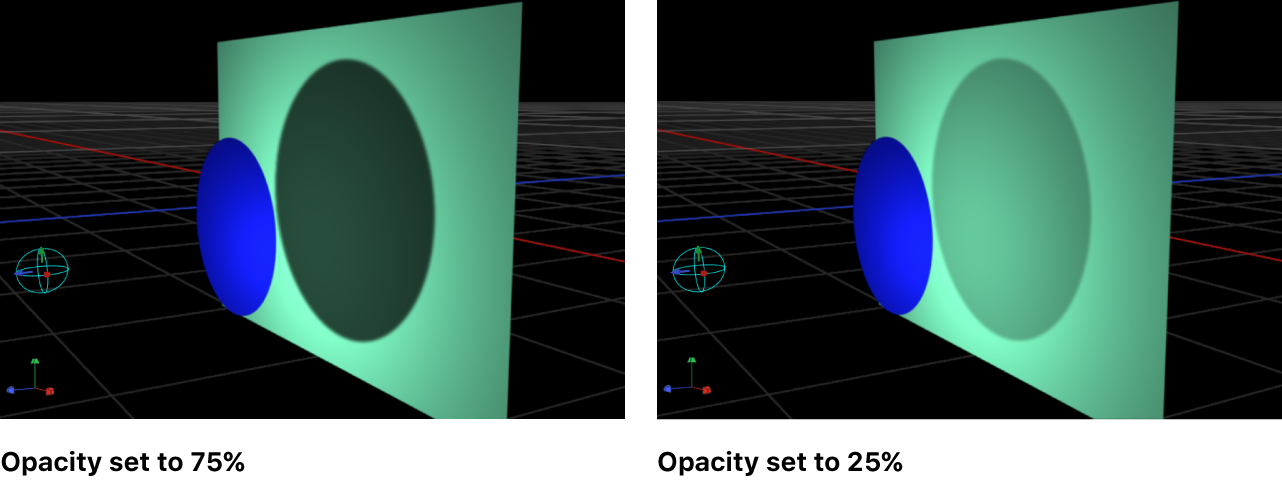
Softness: A slider to specify how blurry a shadow will appear.
Note: The appearance of a shadow depends on the rendering quality of the object casting it. Because a shadow may be larger than the original object, you may see some jagged edges or aliasing on the shadow. If you see such artifacts, check how your image looks when the project is set to Best quality, rather than Draft or Normal. For more information about canvas display quality, see Custom canvas view options in Motion.
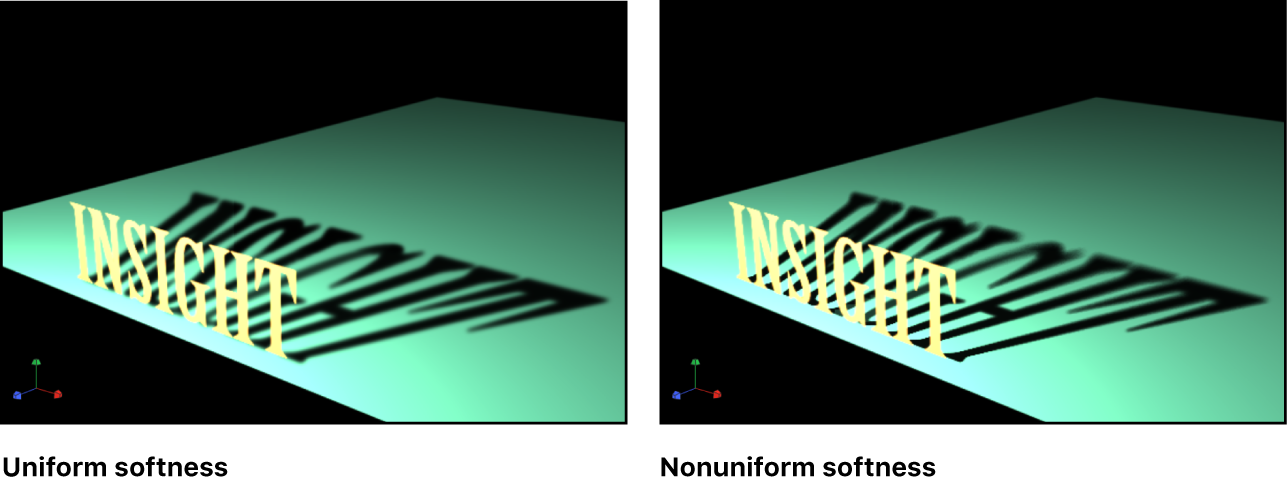
Uniform Softness: A checkbox to constrain the results of the softness slider to a uniform amount of blur on the shadow regardless of distance between the light, the object casting the shadow, and the object receiving the shadow.
By deselecting the checkbox, you enable nonuniform softness, so that when objects are farther from each other, more blur is applied.
Note: Enabling nonuniform softness can impact playback performance.
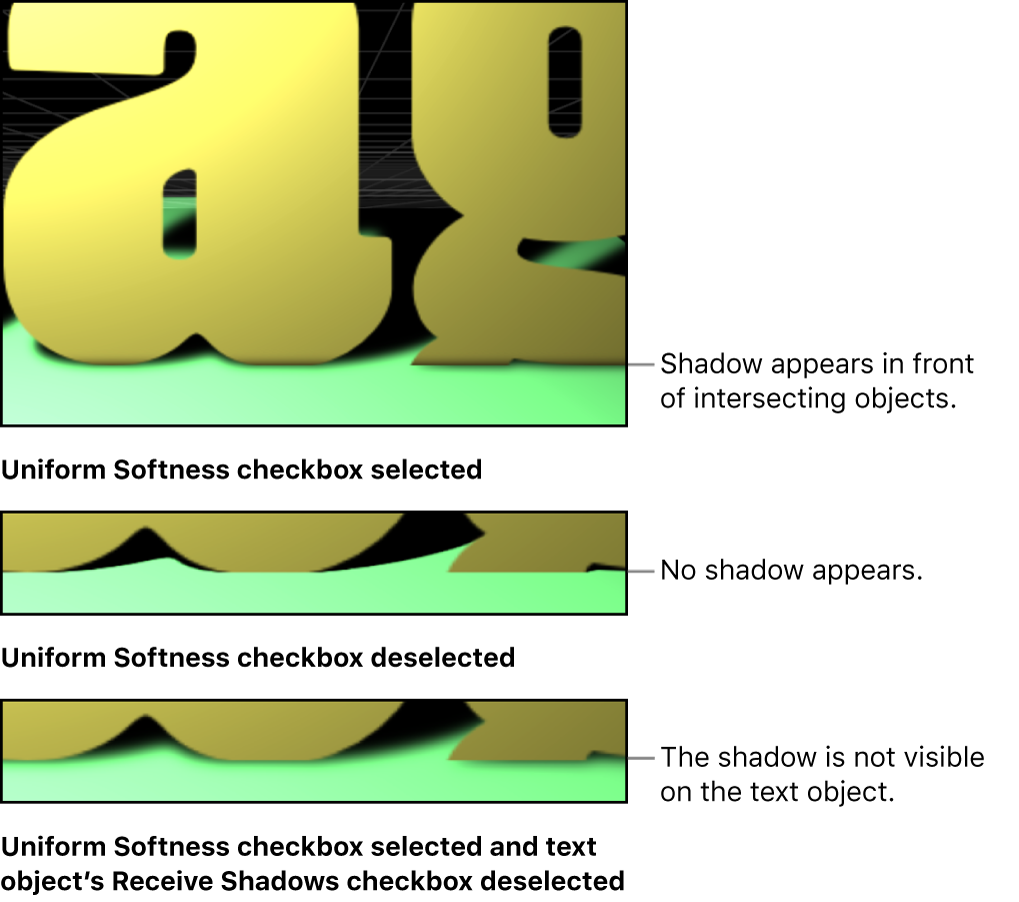
Note: Intersecting objects reveal an unnatural effect of using uniform softness. Because an equal amount of blur is applied to the entire shadow, the blur appears to spill out in front of the intersecting object, creating a strange appearance. This effect can be eliminated in either of two ways: by deselecting the Uniform Softness checkbox or by setting the object to not receive shadows (by deselecting the Receive Shadows checkbox in the Properties Inspector).
Color: Standard color controls to set the color of the shadow. Although semitransparent objects cast lighter shadows than opaque objects, you cannot create light transmission effects wherein a semitransparent object projects some of its own color onto another object, as stained glass does. For more information on using the color controls, see Use basic color controls in Motion.
Note: When Shadows are enabled for point lights, spot lights, and directional lights, Motion uses the multiply compositing mode to blend shadows with the objects upon which they’re cast. This means that the result is a darkening effect, regardless of the color of the shadow. If you select a shadow color lighter than the background upon which it is cast, the shadow may not be visible. So, for example, when Shadows are enabled for a light, it’s not possible to cast a white shadow on a dark surface. To override this effect, you must disable the Shadows parameter for the light. For more details, see Shadows without lights in Motion.
Shadows controls in the Properties Inspector
Every layer in a 3D group has Shadows controls in its Properties Inspector. This includes shapes, video clips, particles, and so on. Lights, Cameras, and 2D groups at the root level of the project (not nested in another group) do not have Shadows controls.
Cast Shadows: A checkbox to set whether a layer casts a shadow if it lies between a light source and another layer.
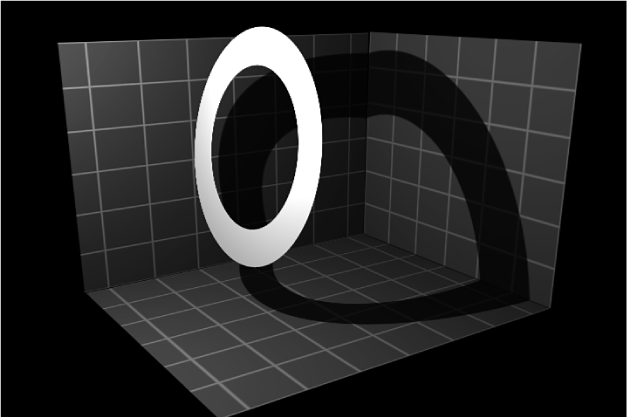
Receive Shadows: A checkbox to control whether other layers cast shadows on the currently selected layer. The following image depicts an object (the white ring) with the Receive Shadow checkbox selected and the Casts Shadow checkbox deselected.
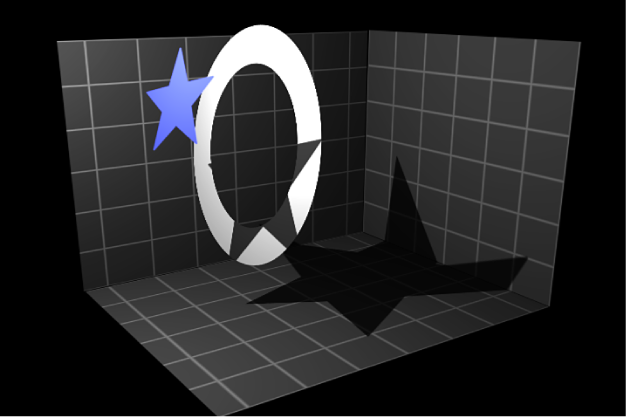
Shadows Only: A checkbox that allows an object to block light and cast a shadow, while the object itself does not appear in the scene.
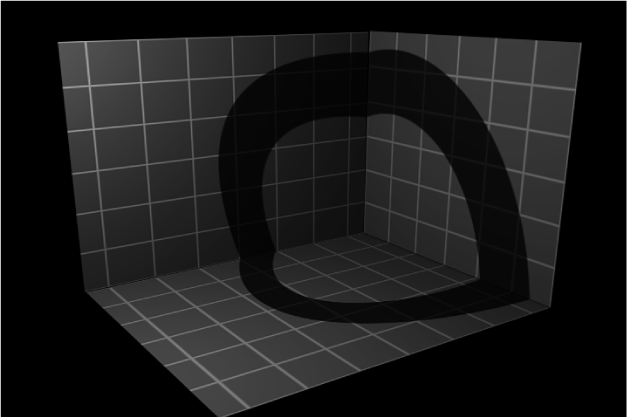
You can select both Receive Shadows and Shadows Only, which makes the object invisible except for the regions where a shadow is cast upon it.
