Motion User Guide
- Welcome
- What’s new
-
- Intro to basic compositing
-
- Intro to transforming layers
-
- Intro to transforming layers in the canvas
- Transform layer properties in the canvas
- Transform tools
- Change layer position, scale, or rotation
- Move a layer’s anchor point
- Add a drop shadow to a layer
- Distort or shear a layer
- Crop a layer
- Modify shape or mask points
- Transform text glyphs and other object attributes
- Align layers in the canvas
- Transform layers in the HUD
- Transform 2D layers in 3D space
-
- Intro to behaviors
- Behaviors versus keyframes
-
- Intro to behavior types
-
- Intro to Parameter behaviors
- Audio behavior
- Average behavior
- Clamp behavior
- Custom behavior
- Add a Custom behavior
- Exponential behavior
- Link behavior
- Logarithmic behavior
- MIDI behavior
- Add a MIDI behavior
- Negate behavior
- Oscillate behavior
- Create a decaying oscillation
- Overshoot behavior
- Quantize behavior
- Ramp behavior
- Randomize behavior
- Rate behavior
- Reverse behavior
- Stop behavior
- Track behavior
- Wriggle behavior
-
- Intro to Simulation behaviors
- Align to Motion behavior
- Attracted To behavior
- Attractor behavior
- Drag behavior
- Drift Attracted To behavior
- Drift Attractor behavior
- Edge Collision behavior
- Gravity behavior
- Orbit Around behavior
- Random Motion behavior
- Repel behavior
- Repel From behavior
- Rotational Drag behavior
- Spring behavior
- Vortex behavior
- Wind behavior
- Additional behaviors
-
- Intro to using generators
- Add a generator
-
- Intro to image generators
- Caustics generator
- Cellular generator
- Checkerboard generator
- Clouds generator
- Color Solid generator
- Concentric Polka Dots generator
- Concentric Shapes generator
- Gradient generator
- Grid generator
- Japanese Pattern generator
- Lens Flare generator
- Manga Lines generator
- Membrane generator
- Noise generator
- One Color Ray generator
- Op Art 1 generator
- Op Art 2 generator
- Op Art 3 generator
- Overlapping Circles generator
- Radial Bars generator
- Soft Gradient generator
- Spirals generator
- Spiral Drawing generator
- Use Spiral Drawing onscreen controls
- Star generator
- Stripes generator
- Sunburst generator
- Truchet Tiles generator
- Two Color Ray generator
- Save a modified generator
-
- Intro to filters
- Browse and preview filters
- Apply or remove filters
-
- Intro to filter types
-
- Intro to Color filters
- Brightness filter
- Channel Mixer filter
- Color Balance filter
- Example: Color-balance two layers
- Color Curves filter
- Use the Color Curves filter
- Color Reduce filter
- Color Wheels filter
- Use the Color Wheels filter
- Colorize filter
- Contrast filter
- Custom LUT filter
- Use the Custom LUT filter
- Gamma filter
- Gradient Colorize filter
- HDR Tools filter
- Hue/Saturation filter
- Hue/Saturation Curves filter
- Use the Hue/Saturation Curves filter
- Levels filter
- Negative filter
- OpenEXR Tone Map filter
- Sepia filter
- Threshold filter
- Tint filter
-
- Intro to Distortion filters
- Black Hole filter
- Bulge filter
- Bump Map filter
- Disc Warp filter
- Droplet filter
- Earthquake filter
- Fisheye filter
- Flop filter
- Fun House filter
- Glass Block filter
- Glass Distortion
- Insect Eye filter
- Mirror filter
- Page Curl filter
- Poke filter
- Polar filter
- Refraction filter
- Ring Lens filter
- Ripple filter
- Scrape filter
- Sphere filter
- Starburst filter
- Stripes filter
- Target filter
- Tiny Planet filter
- Twirl filter
- Underwater filter
- Wave filter
-
- Intro to Stylize filters
- Add Noise filter
- Bad Film filter
- Bad TV filter
- Circle Screen filter
- Circles filter
- Color Emboss filter
- Comic filter
- Crystallize filter
- Edges filter
- Extrude filter
- Fill filter
- Halftone filter
- Hatched Screen filter
- Highpass filter
- Indent filter
- Line Art filter
- Line Screen filter
- MinMax filter
- Noise Dissolve filter
- Pixellate filter
- Posterize filter
- Relief filter
- Slit Scan filter
- Slit Tunnel filter
- Texture Screen filter
- Vignette filter
- Wavy Screen filter
- Publish filter parameters to Final Cut Pro
- Using filters on alpha channels
- Filter performance
- Save custom filters
-
- Intro to 360-degree video
- 360-degree projects
- Create 360-degree projects
- Add 360-degree video to a project
- Create a tiny planet effect
- Reorient 360-degree media
- Creating 360-degree templates for Final Cut Pro
- 360-degree-aware filters and generators
- Export and share 360-degree projects
- Guidelines for better 360-degree projects
-
- Intro to tracking
- How does motion tracking work?
- Motion tracking behavior types
- Analyze motion in a clip
- Stabilize a shaky clip
- Unstabilize a clip
- Use a range of frames for analysis
- Load existing tracking data
- Track shapes, masks, and paint strokes
- Track a filter’s position parameter
- Adjust onscreen trackers
- Save tracks to the Library
-
- Intro to preferences and shortcuts
-
- Intro to Keyboard shortcuts
- Use function keys
- General keyboard shortcuts
- Audio list keyboard shortcuts
-
- Tools keyboard shortcuts
- Transform tool keyboard shortcuts
- Select/Transform tool keyboard shortcuts
- Crop tool keyboard shortcuts
- Edit Points tool keyboard shortcuts
- Edit shape tools keyboard shortcuts
- Pan and Zoom tools keyboard shortcuts
- Shape tools keyboard shortcuts
- Bezier tool keyboard shortcuts
- B-Spline tool keyboard shortcuts
- Paint Stroke tool keyboard shortcuts
- Text tool keyboard shortcuts
- Shape mask tools keyboard shortcuts
- Bezier Mask tool keyboard shortcuts
- B-Spline Mask tool keyboard shortcuts
- Transport control keyboard shortcuts
- View option keyboard shortcuts
- HUD keyboard shortcuts
- Inspector keyboard shortcuts
- Keyframe Editor keyboard shortcuts
- Layers keyboard shortcuts
- Library keyboard shortcuts
- Media list keyboard shortcuts
- Timeline keyboard shortcuts
- Keyframing keyboard shortcuts
- Shape and Mask keyboard shortcuts
- 3D keyboard shortcuts
- Miscellaneous keyboard shortcuts
- Touch Bar shortcuts
- Move assets to another computer
- Work with GPUs
- Copyright

Apply or remove filters in Motion
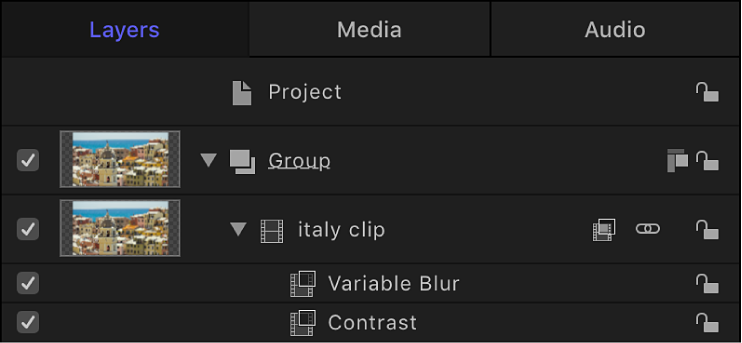
Filters are applied to image layers (still images, video clips, shapes, and so on) or groups in the canvas, Layers list, or Timeline. An applied filter appears in the Layers list nested underneath its target layer or group. When applied to a group, a filter affects all layers inside the group.
Important: Some filters can cause a group to be rasterized. When a group is rasterized, it’s converted into a bitmap image. In 2D groups, the application of any filter causes rasterization. In 3D groups, the application of specific filters causes rasterization. For more information on rasterization, see How rasterization affects filters in Motion.
Apply a filter
In Motion, do one of the following:
Drag a filter from the Library stack to a layer or group in the Layers list, Timeline, or canvas.
Select a layer or group in the Layers list, Timeline, or canvas, then select a filter from the Library stack and click Apply in the preview area.
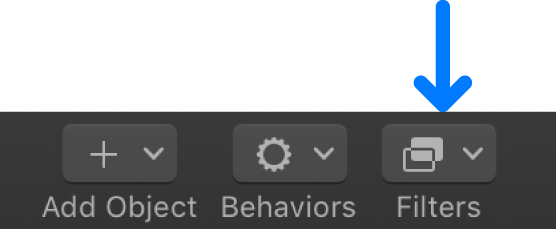
Select a layer or group in the Layers list, Timeline, or canvas, then click Filters in the toolbar and choose a category and filter type.

The filter is applied to an image layer or to a group.
Note: Although you can apply a filter from the Library to another effects object in the Layers list (a behavior or another filter), the filter affects the parent image layer (or all layers in a group, if the filter was applied to a group), not the effects object.
Apply multiple filters to a layer
When you apply multiple filters to a layer, they have a cumulative effect. In the Layers list and Timeline, multiple filters appear nested under the layer or group they’re applied to.

In Motion, do one of the following:
Select an image layer or group in the Layers list, Timeline, or canvas; select multiple filters in the Library; then click Apply.
Tip: Shift-click to select multiple contiguous filters. Command-click to select multiple noncontiguous filters.
Select multiple filters in the Library, then drag them onto an image layer or group in the Layers list, Timeline, or canvas.
The filters are applied to the image layer in the order they’re selected. For example, if you select Echo, Brightness, and Bevel, in that order, then apply them to a layer, their stacking order in the Layers list is Bevel above Brightness above Echo. The stacking order of filters determines the result of the composite effect.
Copy and paste a filter to another layer or group
In the Layers list or Timeline in Motion, select a filter.
Choose Edit > Copy (or press Command-C) to copy the behavior to the Clipboard.
In the Layers list or Timeline, select the target layer or group.
Choose Edit > Paste (or press Command-V).
The copied filter is applied to the selected layer or group, with all its parameter settings intact.
Remove a filter from the Layers list or Timeline
In the Layers list or Timeline in Motion, select a filter that’s been applied to a layer or group, then do one of the following:
Choose Edit> Delete (or press Delete).
Choose Edit> Cut (or press Command-X).
Control-click the filter and choose Cut or Delete from the shortcut menu.
The filter is removed from the project.
Remove a filter from the Filters Inspector
In Motion, select a filter in the Filters Inspector and do one of the following:
Choose Edit> Delete (or press Delete).
Choose Edit> Cut (or press Command-X).
Apply a filter to a cropped image
In Motion, cropping is always applied after a filter is applied. To apply a crop before a filter, do one of the following:
Select an image or video clip in the Media list (in the Project pane), crop the image using the Crop sliders in the Media Inspector, then apply the filter to the layer in the Layers list.
In the Layers list, select the cropped layer, choose Object> Group (or press Shift-Command-G), then apply the filter to the layer.
For more information about cropping, see Crop a layer in Motion.