
Sequence Text behavior controls in Motion
The Sequence Text behavior has the following parameter controls in the Behaviors Inspector:
Parameter selection controls
Parameter (Add and Remove): Two pop-up menus to add the text format and style parameters you want to animate in the sequence, or to remove them. After you use the Add pop-up menu to add a parameter to the sequence, that parameter’s controls appear above the Add and Remove pop-up menus. The Add pop-up menu items include:
Format: Opens a submenu containing the following format parameters for sequencing: Position, Opacity, Scale, Rotation, Tracking, Baseline, Slant, and Character Offset. Except for Character Offset, these parameters are also found in the Format pane of the Text Inspector. (For more information on text format parameters, see Display the text Format pane in Motion.)
Choose the Character Offset option to offset characters alphabetically or numerically. The amount of the offset is determined by the value set in the Character Offset slider. For example, if you begin with the text ABC, then set the Character Offset slider to 3, the text at the beginning of the sequence becomes DEF. In the following examples, Character Offset and Position are sequenced; the Character Offset slider is set to 3. The words move in sequence from the character offset value to form the original words, “offset 123.”

Choosing Character Offset also activates the Character Set pop-up menu, where you can choose Preserve Case & Digits to ensure that offset characters respect the case and number of the original text. For example, with this option selected, an uppercase letter remains uppercase as other letters cycle through its position.
3D: Opens a submenu containing the following 3D text-specific format parameters for sequencing: Extrusion Depth, Front Edge Size, and Back Edge Size. These parameters are also found in the Appearance pane of the Text Inspector when the 3D activation checkbox is selected. See 3D Text controls in Motion.
Face: Opens a submenu (available for 2D text) containing the following face parameters for sequencing: Color, Opacity, Blur, and Four Corner. For more information on text face parameters, see Text Face controls in Motion.
Outline: Opens a submenu (available for 2D text) containing the following outline parameters for sequencing: Color, Opacity, Blur, Width, Layer Order, and Four Corner. For more information on text outline parameters, see Text Outline controls in Motion.
Glow: Opens a submenu containing the following glow parameters for sequencing: Color, Opacity, Blur, Radius, Scale, Offset, Layer Order, and Four Corner. For more information on text glow parameters, see Text Glow controls in Motion.
Note: The Glow parameter cannot be adjusted or sequenced with 3D text.
Drop Shadow: Opens a submenu containing the following drop shadow parameters for sequencing: Color, Opacity, Blur, Scale, Distance, Angle, and Four Corner. For more information on text drop shadow parameters, see Text Drop Shadow controls in Motion.
Note: The Drop Shadow parameter cannot be adjusted or sequenced with 3D text.
[3D text material] (name varies depending on applied material): Opens a submenu containing the materials and material layers applied to the 3D text object for sequencing. For more information on 3D text materials, see Intro to 3D text surface materials in Motion.
Sequencing controls
Adjust these controls to set how the sequencing occurs. Specify the direction, scope, and speed of the sequencing action, and what happens when the sequencing action reaches the end of your text object.
Sequencing: A pop-up menu to set how the sequence animation moves through the text unit. (A text unit can be a character, word, line, or an entire text object, as set in the Animate pop-up menu, described below.) There are five items in the Sequencing pop-up menu:
To: Animation begins at the original parameter value and moves to the value set in the sequence behavior. For example, if the original opacity value is 100% and opacity is set to 0% in the Sequence Text parameters, the text unit begins completely opaque and becomes completely transparent.
From: Animation moves from the value set in the sequence behavior to the original parameter value. For example, if the original opacity value is 100% and opacity is set to 0% in the Sequence Text parameters, the text unit begins completely transparent and becomes completely opaque. This is the opposite of the To option in the Sequencing pop-up menu.
Through: The sequence goes through a full animation cycle starting at the original value of the parameter, moving to the value set in the sequence behavior, then returning to the original value of the parameter. For example, if the original opacity value is 100%, and opacity is set to 0% in the Sequence Text parameters, the text unit begins completely opaque, becomes transparent, and then becomes completely opaque again.
Through Inverted: The sequence goes through an inverted animation cycle starting from the value set in the sequence behavior, moving to the original value, then returning to the value set in the sequence behavior. For example, if the original opacity value is 100% and opacity is set to 0% in the Sequence Text parameters, the text unit begins completely transparent, becomes opaque, and then becomes completely transparent. This is the opposite of the Through Sequencing option.
From Keyframes: Lets you keyframe how the animation moves through the values set in the Sequence Text parameters. When From Keyframes is selected from the Sequencing pop-up menu, the Minimum and Maximum parameters in the Variance controls (see description below) are replaced with the Amount parameter, and the Fix pop-up menu appears. See Add keyframes to a Sequence Text behavior in Motion.
Animate: A pop-up menu to specify how animation is sequenced. There are six options:
Character: Sequences the animation by single characters of text (including spaces).
Character (without spaces): Like the Character setting, sequences single characters of text, but does not treat spaces as characters (spaces are ignored).
Word: Sequences the animation by word.
Line: Sequences the animation by lines of text.
All: Sequences the animation through the entire text object.
Custom: Lets you customize the size of the sequenced text unit.
Start: A slider (available when Animate is set to Custom) to define the starting point of the selection to be sequenced.
End: A slider (available when Animate is set to Custom) to define the ending point of the selection to be sequenced.
Select: Controls to set the range of characters affected by the animation defined in the Animate pop-up menu. Click the disclosure triangle to reveal the controls:
Range: A pop-up menu (used in combination with the Start Index and End Index parameters, described below) to specify the range of text sequenced by All (the default setting), Character, Character in Word, Character in Line, Word, Word in Line, or Line.
Start Index: A slider to set the beginning of the range for the sequence animation.
In a simple example, if Animate is set to Character for a multiline text object, the sequence moves through the characters one at a time, line by line. If the Range parameter is then set to Character in Line and Start Index set to 1, the first character of each line is not animated, but the remaining characters are animated (as long as the End Index parameter is set to the number of characters in the longest line of text).
End Index: A slider to set the end of the range for the sequence animation.
Invert: A checkbox that, when selected, transposes the animation. In a simple example, the first character of each word in a line of text fades in. When Invert is selected, the first character of each word is fully visible, and the rest of the characters fade in.
Reverse: A checkbox that, when selected, reverses the animation. In a simple example, the first character of each word in a line of text fades in. When Reverse is selected, the last character of each word fades in.
Spread: A slider to control the amount of falloff at the beginning and end of the sequencing. To create a softer transition between each text unit, increase the Spread value. See Fine-tune a Sequence Text behavior in Motion.
Direction: A pop-up menu to set the direction of the sequencing. There are five options:
Forwards: Sequences in the direction of the letters (typically left to right).
Backwards: Sequences in the reverse direction (typically right to left).
Center to Ends: Sequences from the center of the text outwards.
Ends to Center: Sequences from the outer edges of the text inwards.
Random: Randomizes the direction of the sequencing.
Random Seed: Controls (available when Direction is set to Random) to change the current “randomness” (seed number) of the direction of the sequence. Type a new number in the text field or click the button to the right of the seed value.
Speed: A pop-up menu to set whether the rate of the sequence remains constant or changes. There are seven options:
Constant: The sequence animation moves from one end of the text to the other at a constant rate. The sequence moves in the direction specified in the Direction pop-up menu.
Ease In: The sequence animation begins slowly and increases to normal speed as it moves through the text.
Ease Out: The sequence animation begins at normal speed and slows toward the end of the text.
Ease Both: The sequence animation begins slowly, increases to normal speed as it moves toward the middle of the duration of the text, then slows as it reaches the end of the text.
Accelerate: The rate of the sequence animation increases as it moves through the text.
Decelerate: The rate of the sequence animation decreases as it moves though the text.
Custom: Lets you keyframe how the selection (the animation) moves through the text.
Custom Speed: A slider (available when Speed is set to Custom) to keyframe the completion of the sequencing by defining the location of the text where the animation is in effect.
Loops: A slider to set the number of times the animation sequences through the text over its duration.
Apply Speed: A pop-up menu to control the speed of the sequencing over multiple loops. There are three options:
Once Per Loop: The setting chosen in the Speed pop-up menu is applied one time for each loop. For example, if Speed is set to Accelerate, the rate of the sequence animation increases as it moves through the text for every loop.
Over Entire Duration: The setting chosen in the Speed pop-up menu is applied one time for the length of the behavior. For example, if Speed is set to Accelerate, the rate of the sequence animation increases as it moves through the text over the entire duration of the behavior, regardless of the number of loops.
Per Object: The setting chosen in the Speed pop-up menu is applied one time for each object for every loop. For example, if Speed is set to Accelerate, the rate of the sequence animation increases as it moves through each text object for every loop.
Start Offset: A slider to offset the start of the effect of the sequence behavior. By default, the sequence animation is in effect from the beginning of the behavior. For example, to start the sequencing 60 frames in from the start of the text object (or project), drag the Start Offset slider to 60 or enter 60 in the adjacent value slider. Using this slider to start the effect, rather than trimming the start of the behavior in the Timeline, freezes the start of the effect (in this example) until frame 61. Trimming the start of the behavior resets the text to its original settings.
End Condition: A pop-up menu to specify how the animation is applied to the end of the sequence animation. There are three options:
Hold: Completes the sequence animation cycle one time, then starts it over from the beginning (after the last text unit in the sequence completes its animation).
Wrap: Treats the sequence animation as a continuous loop so the spread wraps from the last text unit in the sequence to the first text unit.
Ping-Pong: Completes the sequence animation cycle forward, then completes the animation backward, then forward, and so on.
End Offset: A slider to offset the end of the effect of the sequence behavior. By default, the sequence animation is in effect until the end of the behavior. For example, to stop the sequencing 60 frames from the end of the text object (or project), drag the End Offset slider to 60 or enter 60 in the adjacent value slider. Using this slider to stop the effect, rather than trimming the end of the behavior in the Timeline, freezes the end of the effect for the remaining duration of the object. Trimming the end of the behavior resets the text to its original settings.
Variance controls
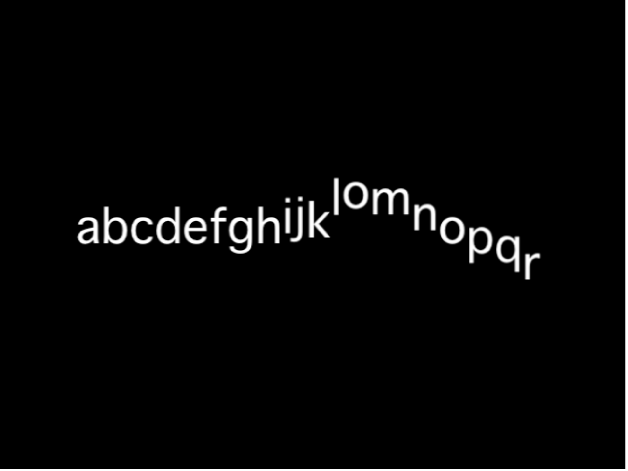
Adjust these controls to randomize the attributes assigned to sequence through the text. For example, if you add variance to a scale sequence, the text scale is randomized rather than moving from the original Scale value to the Scale value defined in the sequence behavior. These sliders control the frequency of the randomness. When sequencing is set to To, From, Through, or Through Inverted, it’s useful to see how the Variance numbers affect the randomness. The following image shows a sequence animation in which the Y Position is offset. When a low variance value (frequency) is applied, the randomness is very smooth along the line of text—like the text is riding a very slow and smooth wave.
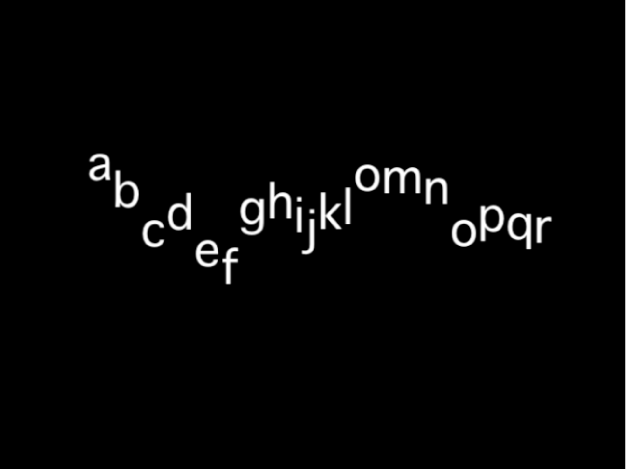
As the variance is increased, the randomness increases across the line of text. Because the text is riding on very short and frequent waves, the letters are offset in the Y axis with more randomness.
When From Keyframes is chosen from the Sequencing pop-up menu, the same principle applies, so a low variance value causes the text to offset from its animation with a smooth path, while a high variance causes more randomness.
Note: Because the Variance parameters are sensitive, low values are necessary for smooth animation results.
Variance: A slider to fluctuate the values of the attributes assigned to sequence through the text. For example, if you add variance to an opacity sequence, the text opacity is randomized rather than moving strictly from the original Scale value to the Scale value defined in the sequence behavior.
Minimum: A slider to define the lower boundary of the variance for the sequenced parameter value. For example, if you set Minimum to 25% for a sequence animating text scale, the minimum size that the text unit will scale to is 25% of the Scale value set in the behavior.
Maximum: A slider to define the upper boundary of the variance for the sequenced parameter value. For example, if you set Maximum to 75% for a sequence animating text scale, the maximum size that the text unit scales to is 75% of the Scale value set in the behavior.
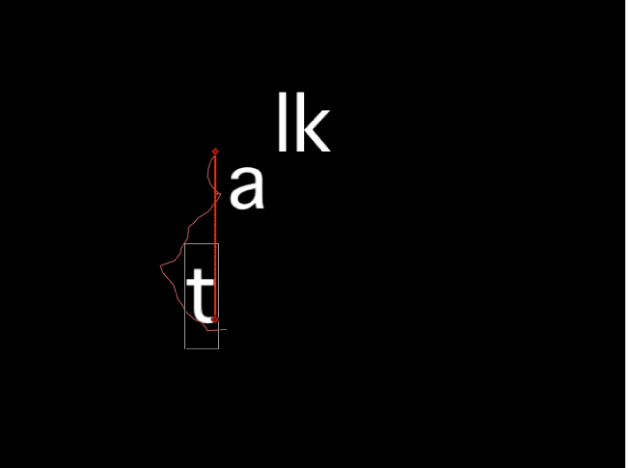
Amount: A slider (available when From Keyframes is chosen from the Sequencing pop-up menu) to define the maximum amount that the animated parameter can deviate from its animation value. For example, the following image shows a custom animation of a glyph in the positive Y direction. When Amount is set to 50, the glyph deviates no more than 50 pixels to the left or right of the animation path. The bold red line shows the animation path, and the thinner red line displays the randomized path.
Noisiness: A slider to add an additional overlay of random variance. Higher Noisiness values result in more erratic variations in the affected parameter.
Seed: Click the button to the right of the 0 to create an initial seed for creating randomness in the Variance parameters. To change the randomness results after you click the button, click the button again or enter a value in the field.
Fix: A pop-up menu (available when Sequencing is set to From Keyframes) to fix the values defined in the behavior to the start, end, or start and end of the behavior. There’s also an option to not fix the values. Variance must be greater than 0 for this parameter to have any effect. There are four menu options:
Start Point: When variance is applied, the values defined in the Sequence Text behavior (above the Add and Remove pop-up menus in the Behaviors Inspector) at the start and end of the behavior are fixed to the first frame of the behavior. In the following images, the text position is sequenced. Fix is set to Start Point.

End Point: When variance is applied, the values defined in the Sequence Text behavior (above the Add and Remove pop-up menus) at the start and end of the behavior are fixed to the last frame of the behavior. In the following images, the text position is sequenced. Fix is set to End Point.

Both: When variance is applied, the values defined in the Sequence Text behavior (above the Add and Remove pop-up menus) at the start and end of the behavior are fixed to the first and last frames of the behavior.
Neither: When variance is applied, the values defined in the Sequence Text behavior (above the Add and Remove pop-up menus) at the start and end of the behavior are not fixed to the first or last frames of the behavior. In the following images, the text position is sequenced. Fix is set to Neither.

Attribute: A pop-up menu to sequence the warping of attributes. There are five options:
Transform Glyph: Displays the glyph onscreen controls, allowing for the selection of characters of a text object for direct manipulation. For more information about sequencing using the glyph onscreen tools, see Add keyframes to a Sequence Text behavior in Motion.
Face: Displays onscreen controls that allow you to modify the shape, size, and position of the face (color fill) of text characters.
Outline: Displays onscreen controls that allow you to modify the shape, size, and position of the outline of text characters.
Glow: Displays onscreen controls that allow you to modify the shape, size, and position of the glow of text characters.
Drop Shadow: Displays onscreen controls that allow you to modify the shape, size, and position of the drop shadow of text characters.
For more information about sequencing the warping of text attributes, see Sequence the distortion of 2D text in Motion.
Position Type: A pop-up menu to specify whether an attribute is offset from the text uniformly or based on the size of text characters. There are two options:
Absolute: When offsetting attributes, such as glows, shadows, and so on from text objects, choose Absolute to create an even offset regardless of the size of the text characters. In the following image, the yellow glow is uniformly offset from the white text because Absolute is chosen from the Position Type pop-up menu.
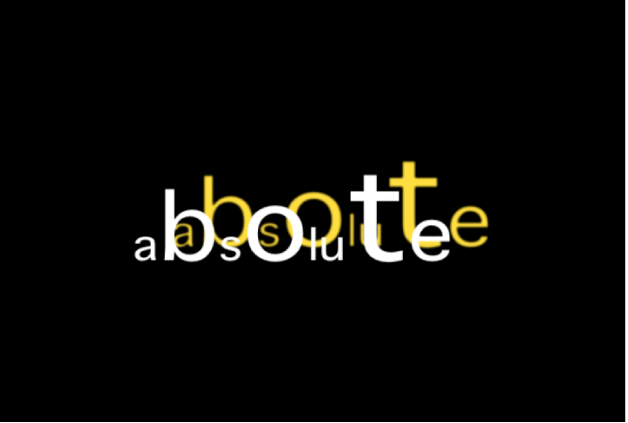
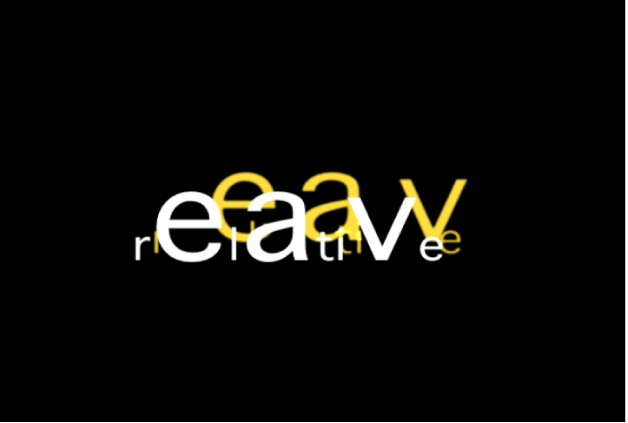
Relative: When offsetting attributes, such as glows, shadows, and so on from text objects, choose Relative to create an offset based on the size of the text characters. In the following image, the yellow glow is offset from the white text based on the size of the text characters because Relative is chosen from the Position Type pop-up menu.
Download this guide: PDF