Motion User Guide
- Welcome
- What’s new
-
- Intro to basic compositing
-
- Intro to transforming layers
-
- Intro to transforming layers in the canvas
- Transform layer properties in the canvas
- Transform tools
- Change layer position, scale, or rotation
- Move a layer’s anchor point
- Add a drop shadow to a layer
- Distort or shear a layer
- Crop a layer
- Modify shape or mask points
- Transform text glyphs and other object attributes
- Align layers in the canvas
- Transform layers in the HUD
- Transform 2D layers in 3D space
-
- Intro to behaviors
- Behaviors versus keyframes
-
- Intro to behavior types
-
- Intro to Parameter behaviors
- Audio behavior
- Average behavior
- Clamp behavior
- Custom behavior
- Add a Custom behavior
- Exponential behavior
- Link behavior
- Logarithmic behavior
- MIDI behavior
- Add a MIDI behavior
- Negate behavior
- Oscillate behavior
- Create a decaying oscillation
- Overshoot behavior
- Quantize behavior
- Ramp behavior
- Randomize behavior
- Rate behavior
- Reverse behavior
- Stop behavior
- Track behavior
- Wriggle behavior
-
- Intro to Simulation behaviors
- Align to Motion behavior
- Attracted To behavior
- Attractor behavior
- Drag behavior
- Drift Attracted To behavior
- Drift Attractor behavior
- Edge Collision behavior
- Gravity behavior
- Orbit Around behavior
- Random Motion behavior
- Repel behavior
- Repel From behavior
- Rotational Drag behavior
- Spring behavior
- Vortex behavior
- Wind behavior
- Additional behaviors
-
- Intro to using generators
- Add a generator
-
- Intro to image generators
- Caustics generator
- Cellular generator
- Checkerboard generator
- Clouds generator
- Color Solid generator
- Concentric Polka Dots generator
- Concentric Shapes generator
- Gradient generator
- Grid generator
- Japanese Pattern generator
- Lens Flare generator
- Manga Lines generator
- Membrane generator
- Noise generator
- One Color Ray generator
- Op Art 1 generator
- Op Art 2 generator
- Op Art 3 generator
- Overlapping Circles generator
- Radial Bars generator
- Soft Gradient generator
- Spirals generator
- Spiral Drawing generator
- Use Spiral Drawing onscreen controls
- Star generator
- Stripes generator
- Sunburst generator
- Truchet Tiles generator
- Two Color Ray generator
- Save a modified generator
-
- Intro to filters
- Browse and preview filters
- Apply or remove filters
-
- Intro to filter types
-
- Intro to Color filters
- Brightness filter
- Channel Mixer filter
- Color Balance filter
- Example: Color-balance two layers
- Color Curves filter
- Use the Color Curves filter
- Color Reduce filter
- Color Wheels filter
- Use the Color Wheels filter
- Colorize filter
- Contrast filter
- Custom LUT filter
- Use the Custom LUT filter
- Gamma filter
- Gradient Colorize filter
- HDR Tools filter
- Hue/Saturation filter
- Hue/Saturation Curves filter
- Use the Hue/Saturation Curves filter
- Levels filter
- Negative filter
- OpenEXR Tone Map filter
- Sepia filter
- Threshold filter
- Tint filter
-
- Intro to Distortion filters
- Black Hole filter
- Bulge filter
- Bump Map filter
- Disc Warp filter
- Droplet filter
- Earthquake filter
- Fisheye filter
- Flop filter
- Fun House filter
- Glass Block filter
- Glass Distortion
- Insect Eye filter
- Mirror filter
- Page Curl filter
- Poke filter
- Polar filter
- Refraction filter
- Ring Lens filter
- Ripple filter
- Scrape filter
- Sphere filter
- Starburst filter
- Stripes filter
- Target filter
- Tiny Planet filter
- Twirl filter
- Underwater filter
- Wave filter
-
- Intro to Stylize filters
- Add Noise filter
- Bad Film filter
- Bad TV filter
- Circle Screen filter
- Circles filter
- Color Emboss filter
- Comic filter
- Crystallize filter
- Edges filter
- Extrude filter
- Fill filter
- Halftone filter
- Hatched Screen filter
- Highpass filter
- Indent filter
- Line Art filter
- Line Screen filter
- MinMax filter
- Noise Dissolve filter
- Pixellate filter
- Posterize filter
- Relief filter
- Slit Scan filter
- Slit Tunnel filter
- Texture Screen filter
- Vignette filter
- Wavy Screen filter
- Publish filter parameters to Final Cut Pro
- Using filters on alpha channels
- Filter performance
- Save custom filters
-
- Intro to 360-degree video
- 360-degree projects
- Create 360-degree projects
- Add 360-degree video to a project
- Create a tiny planet effect
- Reorient 360-degree media
- Creating 360-degree templates for Final Cut Pro
- 360-degree-aware filters and generators
- Export and share 360-degree projects
- Guidelines for better 360-degree projects
-
- Intro to tracking
- How does motion tracking work?
- Motion tracking behavior types
- Analyze motion in a clip
- Stabilize a shaky clip
- Unstabilize a clip
- Use a range of frames for analysis
- Load existing tracking data
- Track shapes, masks, and paint strokes
- Track a filter’s position parameter
- Adjust onscreen trackers
- Save tracks to the Library
-
- Intro to preferences and shortcuts
-
- Intro to Keyboard shortcuts
- Use function keys
- General keyboard shortcuts
- Audio list keyboard shortcuts
-
- Tools keyboard shortcuts
- Transform tool keyboard shortcuts
- Select/Transform tool keyboard shortcuts
- Crop tool keyboard shortcuts
- Edit Points tool keyboard shortcuts
- Edit shape tools keyboard shortcuts
- Pan and Zoom tools keyboard shortcuts
- Shape tools keyboard shortcuts
- Bezier tool keyboard shortcuts
- B-Spline tool keyboard shortcuts
- Paint Stroke tool keyboard shortcuts
- Text tool keyboard shortcuts
- Shape mask tools keyboard shortcuts
- Bezier Mask tool keyboard shortcuts
- B-Spline Mask tool keyboard shortcuts
- Transport control keyboard shortcuts
- View option keyboard shortcuts
- HUD keyboard shortcuts
- Inspector keyboard shortcuts
- Keyframe Editor keyboard shortcuts
- Layers keyboard shortcuts
- Library keyboard shortcuts
- Media list keyboard shortcuts
- Timeline keyboard shortcuts
- Keyframing keyboard shortcuts
- Shape and Mask keyboard shortcuts
- 3D keyboard shortcuts
- Miscellaneous keyboard shortcuts
- Touch Bar shortcuts
- Move assets to another computer
- Work with GPUs
- Copyright

Text Format controls in Motion
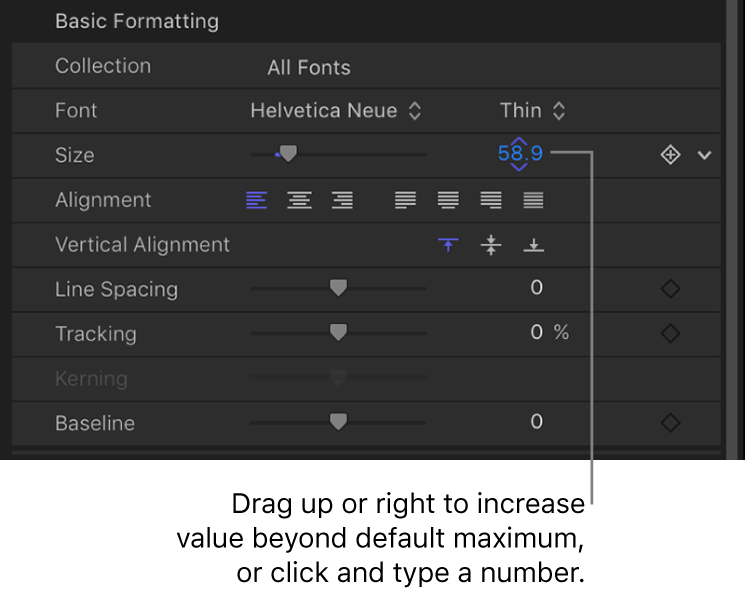
The parameter controls in the Format pane of the Text Inspector allow for common text adjustments.
Basic Formatting controls
Preset: A pop-up menu at the top of the Format pane used to apply preset text styles from the Library. You can also use this pop-up menu to save format settings (and appearance settings from the Appearance pane) of text in your project. The default menu item is Normal—which means that no presets are applied).
For more information on applying and saving text styles, see Use preset text styles in Motion.
Collection: A pop-up menu to filter the font categories available in the Font pop-up menu. When set to All Fonts, every font installed on your macOS system appears in the Font pop-up menu.
Font: A pop-up menu to choose a font for selected text.
Typeface: An unlabeled pop-up menu (to the right of the Font pop-up menu) to choose a type style, such as Regular, Bold, Condensed, and so on. The available typefaces are specific to the font family selected in the Font pop-up menu.
Size: A slider to set the point size of the text. The slider is constrained to a maximum of 288 points. To create larger text, drag to the right over the numeric value, or click the value, type a new number, then press Return.

Note: You can also scale text in the canvas using onscreen controls, but doing so scales text as an object independently of type point size.
Alignment: Buttons to set the alignment and justification of text.
Vertical Alignment: Buttons to set the vertical alignment of text.
Line Spacing: A slider to set the distance between each line of text (leading) in point-size increments.
Tip: To modify the spacing for individual lines of text when hard returns are present, select text with the Text tool, then adjust the Line Spacing slider. Spacing is modified on the line that includes the selected text.
Tracking: A slider to set the spacing between text characters, applying a uniform value between each character.
Kerning: A slider to adjust spacing between text characters.
Baseline: A slider to adjust the baseline of text characters (an invisible horizontal line defining the bottom alignment of characters).
Advanced Formatting controls
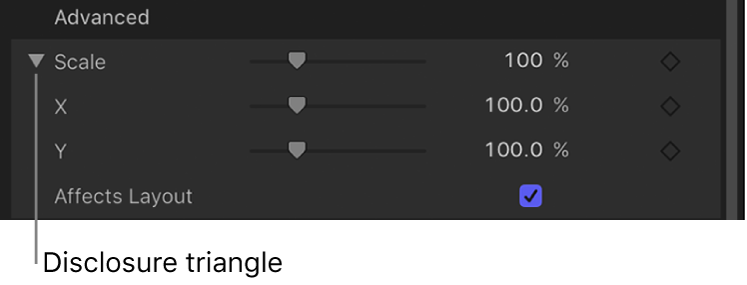
Scale: A slider to resize text characters proportionally. To scale in only X or Y space, click the disclosure triangle to set separate X and Y scale values.

Affects Layout: A checkbox (available when the Scale parameter is disclosed) to set how scaling affects text. For example, when Affects Layout is deselected and text is on an open spline path (and Wrap Around is deselected in the Layout pane), increasing the Scale parameter causes text characters to bunch up along the length of the path. When Affects Layout is selected, increasing scale extends text characters beyond the path; decreasing scale bunches up characters toward their set alignment (left, right, or center).

Offset: Value sliders to offset text from its original position (anchor point). Click the disclosure triangle to access separate X, Y, and Z position values.
Rotation: A dial to rotate text characters in Z space. Click the disclosure triangle to access separate X, Y, and Z rotation controls and also the Animate pop-up menu.
Animate: A pop-up menu (available when the Rotation parameter is disclosed) to change the interpolation for animated 3D rotation channels. There are two menu options:
Use Rotation: The default interpolation method, whereby text characters rotate from their start rotation to their final rotation. Depending on the animation, the characters may twist before reaching their final orientation (the last keyframed value). For example, if the X, Y, and Z Rotation parameters are animated from 0 degrees to 180 degrees in a project, the text characters rotate on all axes before reaching their final orientation.
Use Orientation: This method provides smoother interpolation but does not allow multiple revolutions; interpolates between the text characters’ start orientation (first keyframe) and their end orientation (second keyframe).
For more information about the Animate parameter, see Properties Inspector controls in Motion.
Note: You must keyframe the Rotation parameter for the Animate parameter options have an effect.
Slant: A slider to simulate italics by adding a slant value to text characters.
Monospace: A checkbox that, when selected, applies a fixed amount of space between each text character.
All Caps: A checkbox to make text characters uppercase.
All Caps Size: A slider (available when the All Caps checkbox is selected) to set the size of uppercase characters based on a percentage of the font point size.
Editable in FCP: A checkbox that, when selected, allows editing of text strings, text size, and text tracking in templates published to Final Cut Pro X.
For more information on publishing to Final Cut Pro, see Intro to Final Cut Pro templates in Motion.
Text editor
Text: A text field (the darker shaded area) to add and edit text in your project from the Inspector. For more information, see Add text in Motion.