Motion User Guide
- Welcome
-
- Intro to basic compositing
-
- Intro to transforming layers
-
- Intro to transforming layers in the canvas
- Transform layer properties in the canvas
- Transform tools
- Change layer position, scale, or rotation
- Move a layer’s anchor point
- Add a drop shadow to a layer
- Distort or shear a layer
- Crop a layer
- Modify shape or mask points
- Transform text glyphs and other object attributes
- Align layers in the canvas
- Transform layers in the HUD
- Transform 2D layers in 3D space
-
- Intro to behaviors
- Behaviors versus keyframes
-
- Intro to behavior types
-
- Intro to Parameter behaviors
- Audio behavior
- Average behavior
- Clamp behavior
- Custom behavior
- Add a Custom behavior
- Exponential behavior
- Link behavior
- Logarithmic behavior
- MIDI behavior
- Add a MIDI behavior
- Negate behavior
- Oscillate behavior
- Create a decaying oscillation
- Overshoot behavior
- Quantize behavior
- Ramp behavior
- Randomize behavior
- Rate behavior
- Reverse behavior
- Stop behavior
- Track behavior
- Wriggle behavior
-
- Intro to Simulation behaviors
- Align to Motion behavior
- Attracted To behavior
- Attractor behavior
- Drag behavior
- Drift Attracted To behavior
- Drift Attractor behavior
- Edge Collision behavior
- Gravity behavior
- Orbit Around behavior
- Random Motion behavior
- Repel behavior
- Repel From behavior
- Rotational Drag behavior
- Spring behavior
- Vortex behavior
- Wind behavior
- Additional behaviors
-
- Intro to using generators
- Add a generator
-
- Intro to image generators
- Caustics generator
- Cellular generator
- Checkerboard generator
- Clouds generator
- Color Solid generator
- Concentric Polka Dots generator
- Concentric Shapes generator
- Gradient generator
- Grid generator
- Japanese Pattern generator
- Lens Flare generator
- Manga Lines generator
- Membrane generator
- Noise generator
- One Color Ray generator
- Op Art 1 generator
- Op Art 2 generator
- Op Art 3 generator
- Overlapping Circles generator
- Radial Bars generator
- Soft Gradient generator
- Spirals generator
- Spiral Drawing generator
- Use Spiral Drawing onscreen controls
- Star generator
- Stripes generator
- Sunburst generator
- Truchet Tiles generator
- Two Color Ray generator
- Save a modified generator
-
- Intro to filters
- Browse and preview filters
- Apply or remove filters
-
- Intro to filter types
-
- Intro to Color filters
- Brightness filter
- Channel Mixer filter
- Color Balance filter
- Example: Color-balance two layers
- Color Curves filter
- Use the Color Curves filter
- Color Reduce filter
- Color Wheels filter
- Use the Color Wheels filter
- Colorize filter
- Contrast filter
- Custom LUT filter
- Use the Custom LUT filter
- Gamma filter
- Gradient Colorize filter
- HDR Tools filter
- Hue/Saturation filter
- Hue/Saturation Curves filter
- Use the Hue/Saturation Curves filter
- Levels filter
- Negative filter
- OpenEXR Tone Map filter
- Sepia filter
- Threshold filter
- Tint filter
-
- Intro to Distortion filters
- Black Hole filter
- Bulge filter
- Bump Map filter
- Disc Warp filter
- Droplet filter
- Earthquake filter
- Fisheye filter
- Flop filter
- Fun House filter
- Glass Block filter
- Glass Distortion
- Insect Eye filter
- Mirror filter
- Page Curl filter
- Poke filter
- Polar filter
- Refraction filter
- Ring Lens filter
- Ripple filter
- Scrape filter
- Sliced Scale filter
- Use the Sliced Scale filter
- Sphere filter
- Starburst filter
- Stripes filter
- Target filter
- Tiny Planet filter
- Twirl filter
- Underwater filter
- Wave filter
-
- Intro to Stylize filters
- Add Noise filter
- Bad Film filter
- Bad TV filter
- Circle Screen filter
- Circles filter
- Color Emboss filter
- Comic filter
- Crystallize filter
- Edges filter
- Extrude filter
- Fill filter
- Halftone filter
- Hatched Screen filter
- Highpass filter
- Indent filter
- Line Art filter
- Line Screen filter
- MinMax filter
- Noise Dissolve filter
- Pixellate filter
- Posterize filter
- Relief filter
- Slit Scan filter
- Slit Tunnel filter
- Texture Screen filter
- Vignette filter
- Wavy Screen filter
- Publish filter parameters to Final Cut Pro
- Using filters on alpha channels
- Filter performance
- Save custom filters
-
- Intro to 3D objects
- Add a 3D object
- Move and rotate a 3D object
- Reposition a 3D object’s anchor point
- Exchange a 3D object file
- 3D object intersection and layer order
- Using cameras and lights with 3D objects
- Save custom 3D objects
- Guidelines for working with 3D objects
- Working with imported 3D objects
-
- Intro to 360-degree video
- 360-degree projects
- Create 360-degree projects
- Add 360-degree video to a project
- Create a tiny planet effect
- Reorient 360-degree media
- Creating 360-degree templates for Final Cut Pro
- 360-degree-aware filters and generators
- Export and share 360-degree projects
- Guidelines for better 360-degree projects
-
-
- Intro to preferences and shortcuts
-
- Intro to Keyboard shortcuts
- Use function keys
- General keyboard shortcuts
- Audio list keyboard shortcuts
-
- Tools keyboard shortcuts
- Transform tool keyboard shortcuts
- Select/Transform tool keyboard shortcuts
- Crop tool keyboard shortcuts
- Edit Points tool keyboard shortcuts
- Edit shape tools keyboard shortcuts
- Pan and Zoom tools keyboard shortcuts
- Shape tools keyboard shortcuts
- Bezier tool keyboard shortcuts
- B-Spline tool keyboard shortcuts
- Paint Stroke tool keyboard shortcuts
- Text tool keyboard shortcuts
- Shape mask tools keyboard shortcuts
- Bezier Mask tool keyboard shortcuts
- B-Spline Mask tool keyboard shortcuts
- Transport control keyboard shortcuts
- View option keyboard shortcuts
- HUD keyboard shortcuts
- Inspector keyboard shortcuts
- Keyframe Editor keyboard shortcuts
- Layers keyboard shortcuts
- Library keyboard shortcuts
- Media list keyboard shortcuts
- Timeline keyboard shortcuts
- Keyframing keyboard shortcuts
- Shape and Mask keyboard shortcuts
- 3D keyboard shortcuts
- Miscellaneous keyboard shortcuts
- Touch Bar shortcuts
- Move assets to another computer
- Work with GPUs
- Glossary
- Copyright

Throw behavior in Motion
The Throw behavior is the simplest way to set an object in motion. Controls let you adjust the speed and direction of a single force that’s exerted on the object at the first frame of the behavior. After this initial force is applied, the object continues drifting in a straight line at the same speed, for the duration of the Throw behavior.
A simple example of using the Throw behavior is to send a series of offscreen objects moving across the screen. When used in conjunction with other behaviors such as Grow/Shrink and Fade In/Fade Out, you can create sophisticated moving elements without keyframing a single parameter.
The Throw behavior is also useful when you’re moving an object through a simulation. For example, you might move the object past other objects that have Attractor or Repel behaviors applied to them. Because the Throw behavior only applies a single force to move the target object at the initial frame of the behavior, any other behaviors that interact with the target object have potentially greater influence over its motion.
Important: The Throw behavior does not apply a continuous force, nor can you create changes in direction or speed, because Throw cannot be keyframed. To create keyframed changes in direction or speed, use the Wind behavior. To create a more complex animation path, use the Motion Path behavior.
Adjust this behavior using the controls in the Behaviors Inspector:
Affect Subobjects: A checkbox, available when this behavior is applied to an object that contains multiple child objects, such as a group, a particle emitter, a replicator, or a text layer. When this checkbox is selected, all objects enclosed in the parent object are affected individually. When this checkbox is deselected, all objects enclosed in the parent object are affected by the behavior together.
Increment: A pop-up menu that sets how the behavior’s effect progresses over its duration in the Timeline. There are two choices:
Continuous Rate: Sets the speed of the object at a steady number of pixels per second, specified in the Throw Velocity parameter.
Note: When the canvas displays a nonsquare pixel image, the vertical rate is in pixels per second, and the horizontal rate is the perceptual equivalent.
Ramp to Final Value: Moves the object from its original position to the specified distance (in pixels) in the Throw Distance parameter.
Throw Velocity/Throw Distance: A slider that sets either velocity or distance, depending on the setting in the Increment pop-up menu. When Increment is set to Continuous Rate, the Throw Velocity slider sets a continuous speed for the object to move in X, Y, or Z space. When Increment is set to Ramp to Final Value, the Throw Distance slider sets a total distance (in pixels) for the object to travel in X, Y, and Z space over its duration. The standard slider is limited to 100 pixels. Use the value slider to enter values greater than 100.
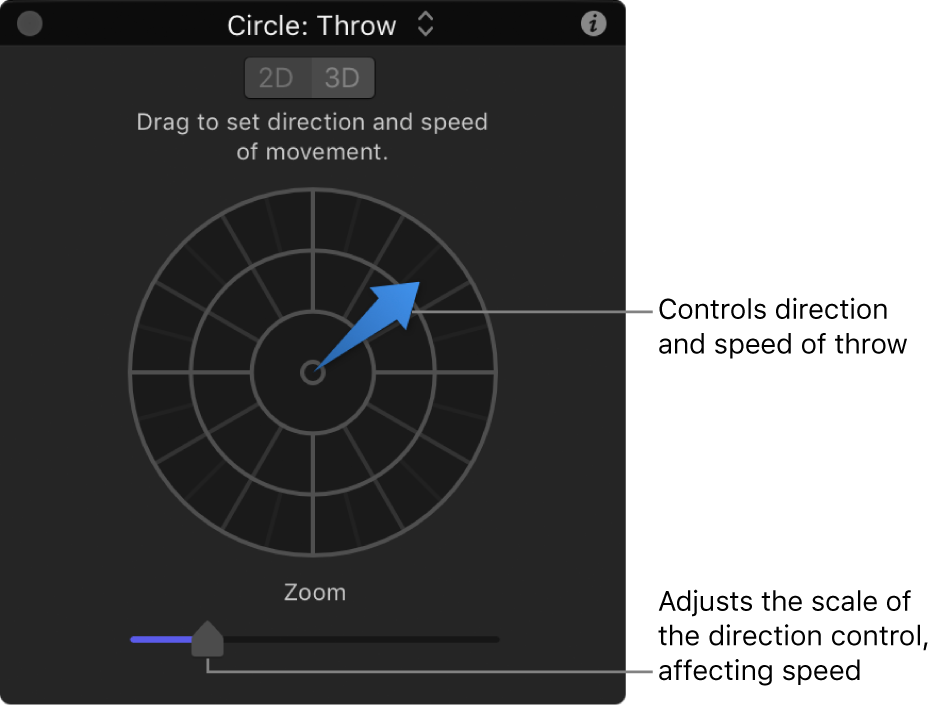
The 2D HUD lets you specify the direction and speed of the Throw behavior by dragging an arrow in a circular region. The direction of the arrow defines the direction of movement in X and Y space, and the length of the arrow defines speed (velocity). A slider adjusts the scale of the HUD control, increasing or decreasing the effect of the direction/speed control.

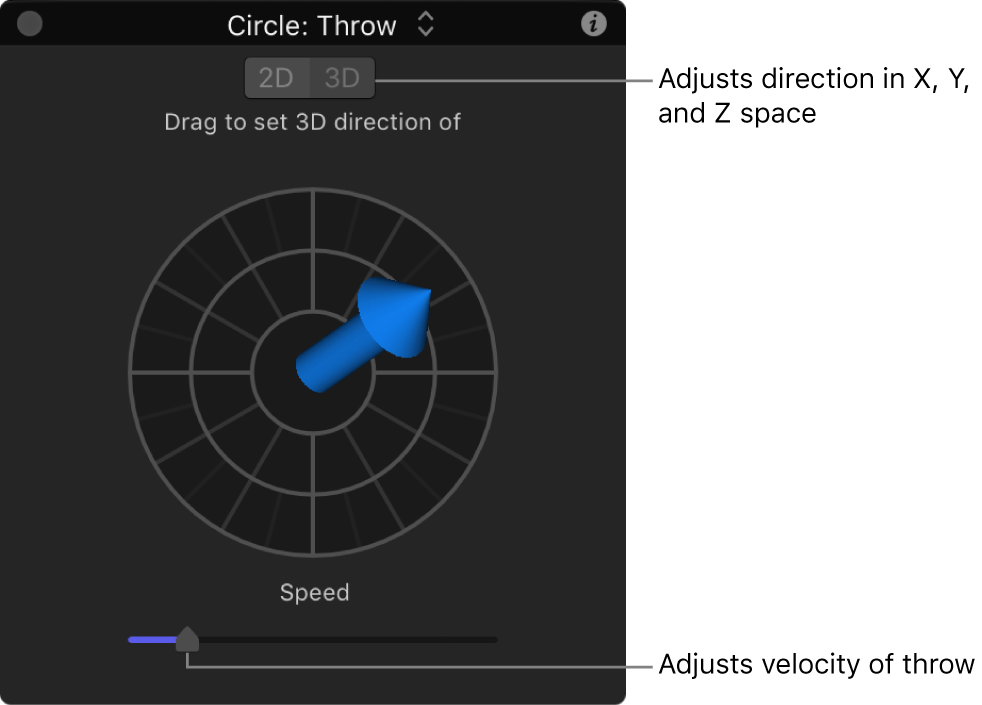
When you click the 3D button, additional 3D controls become available. The center arrow now defines the direction the object is thrown in 3D space (X, Y, and Z axes). The Speed slider lets you increase or decrease the velocity of the thrown object.

In the 2D and 3D Throw HUDs, press the Shift key while dragging the arrow to constrain it to 45-degree angles. In the 2D HUD, press the Command key to change the arrow’s direction without affecting its length.
Note: The maximum speed you can define with the HUD is not the maximum possible speed. Higher values can be entered into the Throw Velocity/Throw Distance parameter in the Behaviors Inspector.
Download this guide: Apple Books | PDF