Motion User Guide
- Welcome
- What’s new
-
- Intro to basic compositing
-
- Intro to transforming layers
-
- Intro to transforming layers in the canvas
- Transform layer properties in the canvas
- Transform tools
- Change layer position, scale, or rotation
- Move a layer’s anchor point
- Add a drop shadow to a layer
- Distort or shear a layer
- Crop a layer
- Modify shape or mask points
- Transform text glyphs and other object attributes
- Align layers in the canvas
- Transform layers in the HUD
- Transform 2D layers in 3D space
-
- Intro to behaviors
- Behaviors versus keyframes
-
- Intro to behavior types
-
- Intro to Parameter behaviors
- Audio behavior
- Average behavior
- Clamp behavior
- Custom behavior
- Add a Custom behavior
- Exponential behavior
- Link behavior
- Logarithmic behavior
- MIDI behavior
- Add a MIDI behavior
- Negate behavior
- Oscillate behavior
- Create a decaying oscillation
- Overshoot behavior
- Quantize behavior
- Ramp behavior
- Randomize behavior
- Rate behavior
- Reverse behavior
- Stop behavior
- Track behavior
- Wriggle behavior
-
- Intro to Simulation behaviors
- Align to Motion behavior
- Attracted To behavior
- Attractor behavior
- Drag behavior
- Drift Attracted To behavior
- Drift Attractor behavior
- Edge Collision behavior
- Gravity behavior
- Orbit Around behavior
- Random Motion behavior
- Repel behavior
- Repel From behavior
- Rotational Drag behavior
- Spring behavior
- Vortex behavior
- Wind behavior
- Additional behaviors
-
- Intro to using generators
- Add a generator
-
- Intro to image generators
- Caustics generator
- Cellular generator
- Checkerboard generator
- Clouds generator
- Color Solid generator
- Concentric Polka Dots generator
- Concentric Shapes generator
- Gradient generator
- Grid generator
- Japanese Pattern generator
- Lens Flare generator
- Manga Lines generator
- Membrane generator
- Noise generator
- One Color Ray generator
- Op Art 1 generator
- Op Art 2 generator
- Op Art 3 generator
- Overlapping Circles generator
- Radial Bars generator
- Soft Gradient generator
- Spirals generator
- Spiral Drawing generator
- Use Spiral Drawing onscreen controls
- Star generator
- Stripes generator
- Sunburst generator
- Truchet Tiles generator
- Two Color Ray generator
- Save a modified generator
-
- Intro to filters
- Browse and preview filters
- Apply or remove filters
-
- Intro to filter types
-
- Intro to Color filters
- Brightness filter
- Channel Mixer filter
- Color Adjustments filter
- Color Balance filter
- Example: Color-balance two layers
- Color Curves filter
- Use the Color Curves filter
- Color Reduce filter
- Color Wheels filter
- Use the Color Wheels filter
- Colorize filter
- Contrast filter
- Custom LUT filter
- Use the Custom LUT filter
- Gamma filter
- Gradient Colorize filter
- HDR Tools filter
- Hue/Saturation filter
- Hue/Saturation Curves filter
- Use the Hue/Saturation Curves filter
- Levels filter
- Negative filter
- OpenEXR Tone Map filter
- Sepia filter
- Threshold filter
- Tint filter
-
- Intro to Distortion filters
- Black Hole filter
- Bulge filter
- Bump Map filter
- Disc Warp filter
- Droplet filter
- Earthquake filter
- Fisheye filter
- Flop filter
- Fun House filter
- Glass Block filter
- Glass Distortion
- Insect Eye filter
- Mirror filter
- Page Curl filter
- Poke filter
- Polar filter
- Refraction filter
- Ring Lens filter
- Ripple filter
- Scrape filter
- Sliced Scale filter
- Use the Sliced Scale filter
- Sphere filter
- Starburst filter
- Stripes filter
- Target filter
- Tiny Planet filter
- Twirl filter
- Underwater filter
- Wave filter
-
- Intro to Stylize filters
- Add Noise filter
- Bad Film filter
- Bad TV filter
- Circle Screen filter
- Circles filter
- Color Emboss filter
- Comic filter
- Crystallize filter
- Edges filter
- Extrude filter
- Fill filter
- Halftone filter
- Hatched Screen filter
- Highpass filter
- Indent filter
- Line Art filter
- Line Screen filter
- MinMax filter
- Noise Dissolve filter
- Pixellate filter
- Posterize filter
- Relief filter
- Slit Scan filter
- Slit Tunnel filter
- Texture Screen filter
- Vignette filter
- Wavy Screen filter
- About filters and color processing
- Publish filter controls to Final Cut Pro
- Using filters on alpha channels
- Filter performance
- Save custom filters
-
- Intro to 3D objects
- Add a 3D object
- Move and rotate a 3D object
- Reposition a 3D object’s anchor point
- Exchange a 3D object file
- 3D object intersection and layer order
- Using cameras and lights with 3D objects
- Save custom 3D objects
- Guidelines for working with 3D objects
- Working with imported 3D objects
-
- Intro to 360-degree video
- 360-degree projects
- Create 360-degree projects
- Add 360-degree video to a project
- Create a tiny planet effect
- Reorient 360-degree media
- Creating 360-degree templates for Final Cut Pro
- 360-degree-aware filters and generators
- Export and share 360-degree projects
- Guidelines for better 360-degree projects
-
- Intro to settings and shortcuts
-
- Intro to Keyboard shortcuts
- Use function keys
- General keyboard shortcuts
- Audio list keyboard shortcuts
-
- Tools keyboard shortcuts
- Transform tool keyboard shortcuts
- Select/Transform tool keyboard shortcuts
- Crop tool keyboard shortcuts
- Edit Points tool keyboard shortcuts
- Edit shape tools keyboard shortcuts
- Pan and Zoom tools keyboard shortcuts
- Shape tools keyboard shortcuts
- Bezier tool keyboard shortcuts
- B-Spline tool keyboard shortcuts
- Paint Stroke tool keyboard shortcuts
- Text tool keyboard shortcuts
- Shape mask tools keyboard shortcuts
- Bezier Mask tool keyboard shortcuts
- B-Spline Mask tool keyboard shortcuts
- Transport control keyboard shortcuts
- View option keyboard shortcuts
- HUD keyboard shortcuts
- Inspector keyboard shortcuts
- Keyframe Editor keyboard shortcuts
- Layers keyboard shortcuts
- Library keyboard shortcuts
- Media list keyboard shortcuts
- Timeline keyboard shortcuts
- Keyframing keyboard shortcuts
- Shape and Mask keyboard shortcuts
- 3D keyboard shortcuts
- Miscellaneous keyboard shortcuts
- Touch Bar shortcuts
- Move assets to another computer
- Work with GPUs
- Glossary
- Copyright

Drag to the Timeline track area in Motion
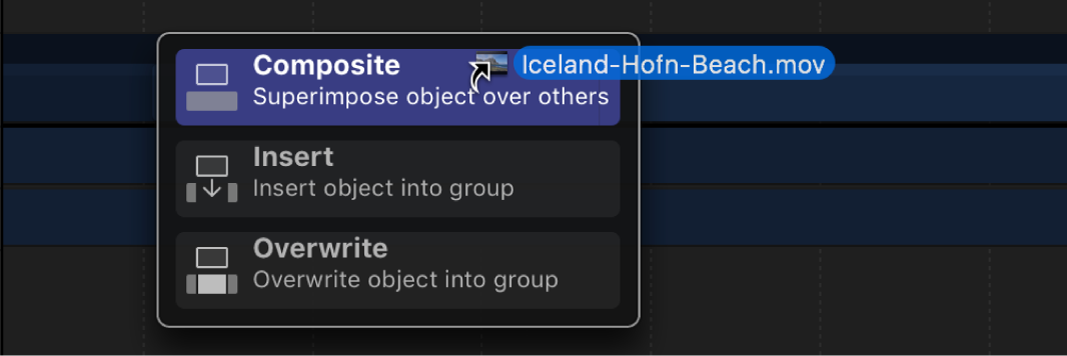
When you drag a media item into the Timeline track area, a drop menu appears with options for how the new layer should be incorporated. Depending on where in the track area you drop the item, the menu displays different options: Composite, Insert, Overwrite, or Exchange.
You can also drag effects objects (behaviors, filters, and so on) from the Library into the Timeline track area. However, because effects objects (such as filters) are applied to media layers, they can’t be added as standalone objects.
Note: If you release the mouse button before the drop menu appears, the item is added as a composite edit—above the other tracks in the Timeline and on top of other layers in the canvas.
Add a layer to a new Timeline track
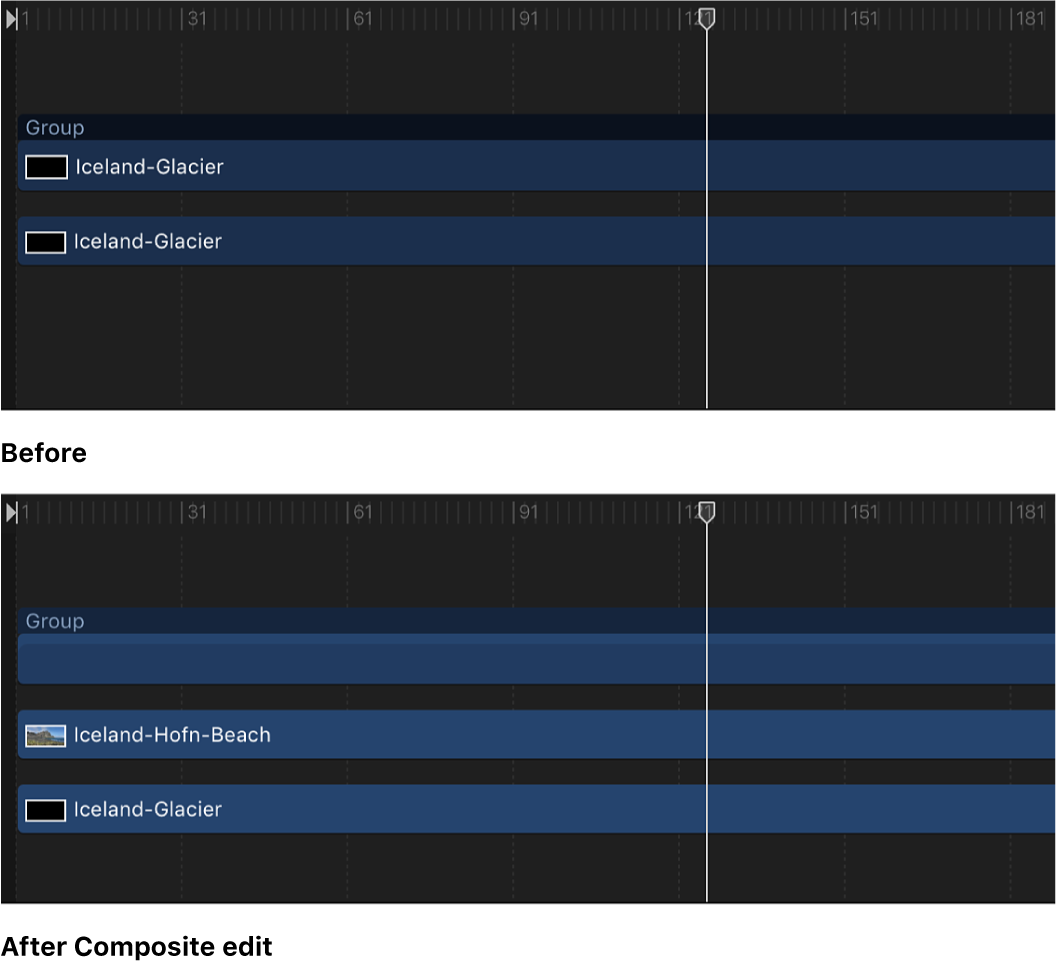
To add a layer to a new Timeline track without modifying any other layer in your project, use the Composite edit. The Composite edit places the layer in the track above the one you drag to.
In Motion, do one of the following:
In the toolbar, click Import, then drag a media file from the dialog that appears to the Timeline track area.
Drag a media item from the Library or Media list to the Timeline layers list to the Timeline track area.
As you drag, a tooltip appears at the pointer, indicating the current frame number.
When you reach the frame where you want the new layer to start, position the pointer over the layer you want as a background, and continue holding down the mouse button until the drop menu appears.
Choose Composite from the drop menu.
The new layer is composited into the project above the layer you dragged to.
Insert a layer, splitting an existing layer
To insert a layer into a new Timeline track and split an existing layer at the insertion point, moving it forward in time to make room for the new layer, use the Insert command. For example, if you insert a 100-frame movie into a group containing an existing layer, the new movie is added to the Timeline at the frame where you drop it, pushing the remaining frames of the original movie out 100 frames.
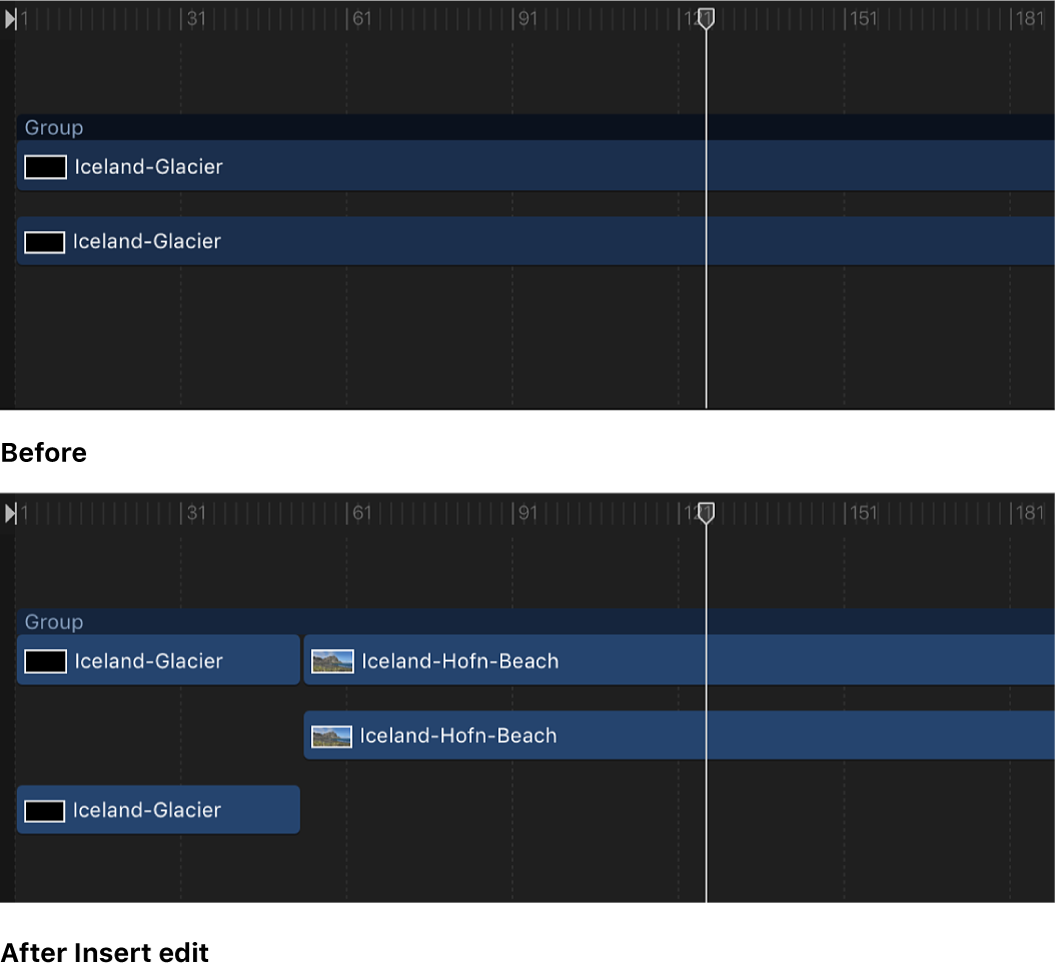
If you insert a new item midway through an existing layer, the existing layer is split into two layers, each on its own track.
In Motion, do one of the following:
In the toolbar, click Import, then drag a media file from the dialog that appears to an existing bar in the Timeline track area.
Drag a media item from the Library or Media list to an existing bar in the Timeline track area.
As you drag, a tooltip appears at the pointer, indicating the current frame number.
Continue dragging to the frame where you want the new layer to start, holding down the mouse button until the drop menu appears.
Choose Insert from the drop menu.
The new layer is inserted into the track, breaking the original bar into two, and pushing the frames after the insertion farther out in time.
Replace an existing layer with a new layer
To replace an existing layer with a new layer in the Timeline, use the Overwrite command.
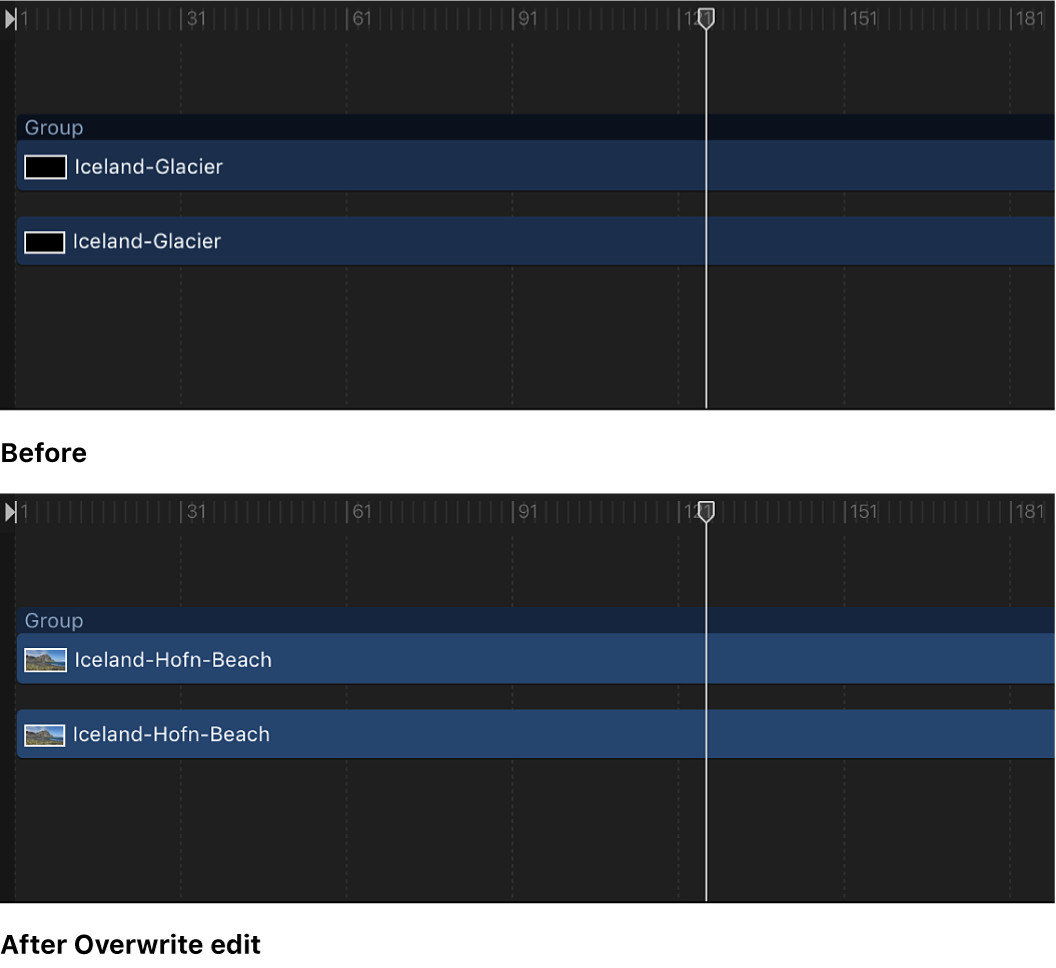
If the new layer is shorter than the one currently in the group, the Overwrite option splits the duration of the existing layer and deletes only the frames where the new layer appears.
In Motion, do one of the following:
In the toolbar, click Import, then drag a media file from the dialog that appears onto a bar in the Timeline track area.
Drag a media item from the Library or Media list onto a bar in the Timeline track area.
As you drag, a tooltip appears at the pointer, indicating the current frame number.
Drag to the frame where you want the new layer to start, holding down the mouse button until the drop menu appears.
Choose Overwrite from the drop menu.
The frames of the new layer replace the frames of the original layer. If the original layer contained more frames than the new one, the old layer is split into two layers and the additional frames remain.
Replace an existing layer with a layer of the same duration
To replace an existing layer with a layer of the same duration, use the Exchange command. The Exchange command is a variant of the Overwrite option, but instead of dropping the entire duration of the new layer into the project, the duration of the existing layer is used. For example, if you drag a 30-second clip over a 5-second clip, choosing Exchange swaps the existing 5 seconds with the first 5 seconds of the longer clip. If you exchange a longer clip with a shorter one—for example, swapping a 10-second clip with one that lasts only 5 seconds—the first 5 seconds are replaced, and the final 5 seconds of the original remain.
The exchange edit transfers any filters, behaviors, and keyframes from the original layer onto the new layer.
Note: You cannot use the Exchange command with audio files.
In Motion, do one of the following:
In the toolbar, click Import, then drag a media file from the dialog that appears onto a bar in the Timeline track area.
Drag a media item from the Library or Media list onto a bar in the Timeline track area.
As you drag, a tooltip appears at the pointer, indicating the current frame number.
Drag to the frame where you want the new layer to start, holding down the mouse button until the drop menu appears.
Choose Exchange from the drop menu.
The old layer is replaced by the new layer.
Add multiple layers
When you drag more than one item to the Timeline, the new layers appear in their own tracks above any existing layers. This is equivalent to performing a composite edit with a single object. A drop menu lets you choose whether the additional layers should be stacked up as a composite, or whether they should appear one after another (sequentially).
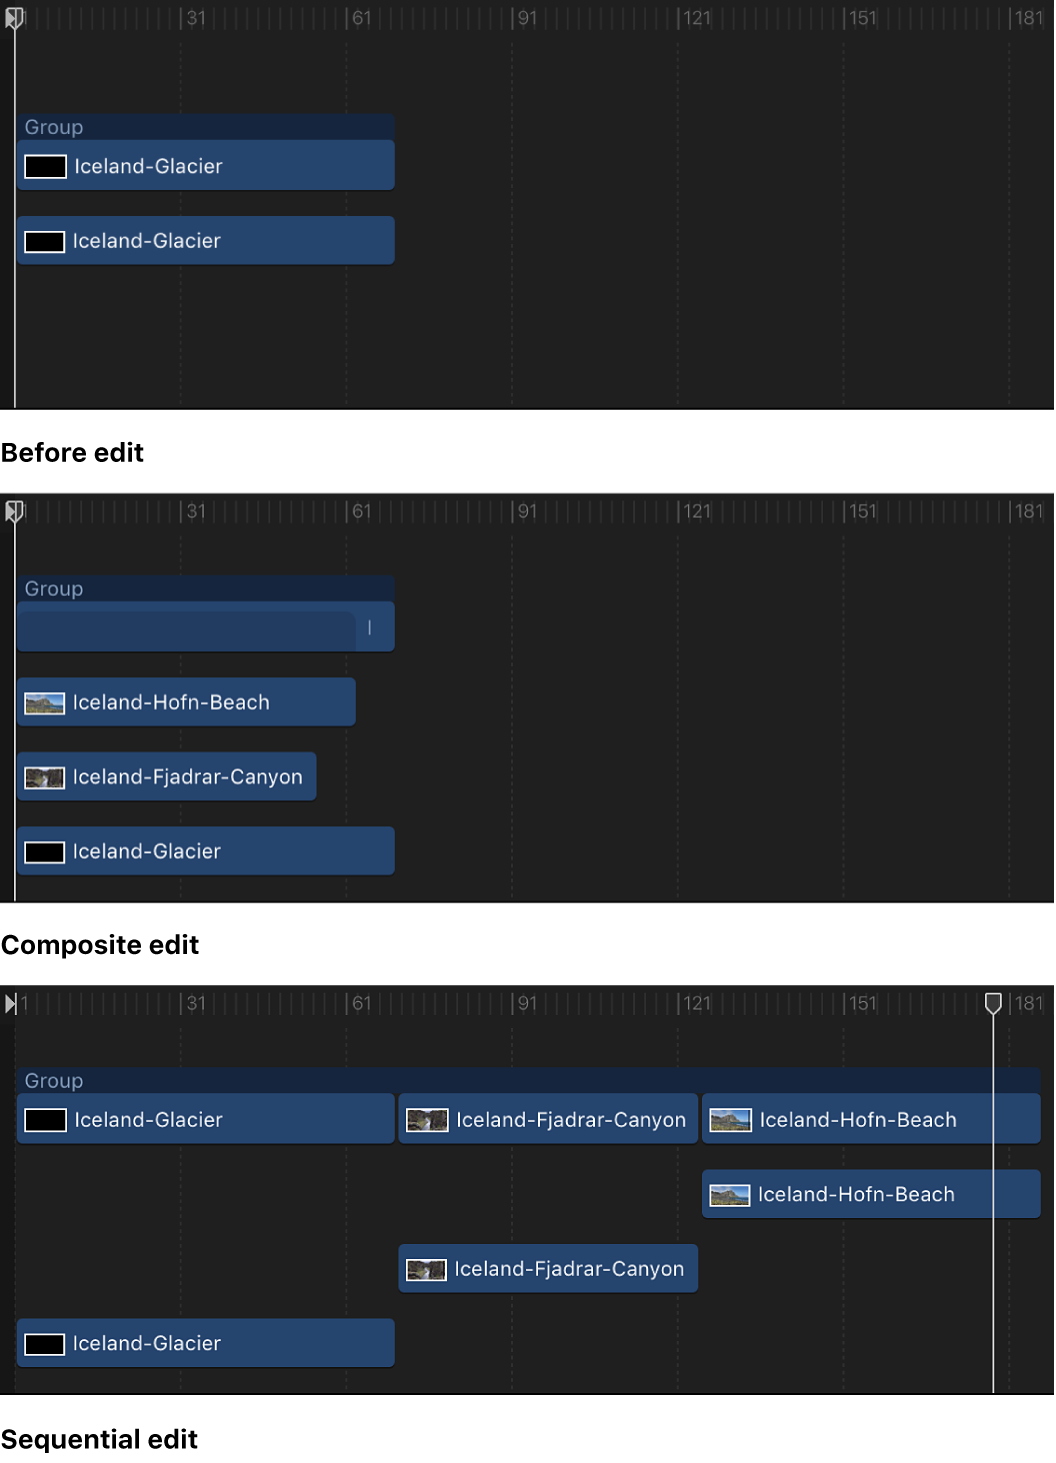
In Motion, do one of the following:
In the toolbar, click Import, then in the dialog that appears, Shift-click or Command-Click to select multiple items, and drag them to the Timeline track area.
In the Library or Media list, Shift-click or Command-click to select multiple items, then drag them to the Timeline track area.
Drag to the frame where you want the new layers to start, holding down the mouse button until the drop menu appears.
Do any of the following:
Stack the layers at the same start point: Choose Composite from the drop menu.
Multiple layers are added to the project at the same point in time, each new layer on its own track.
Stack the layers in sequential order: Choose Sequential from the drop menu.
Multiple layers are added into the project, each in its own track, one after another in the Timeline.
If you release the mouse button in the Timeline track area before the drop menu appears, a composite edit is applied by default. Alternatively, you can drop the multiple layers into the Timeline layers list; doing so results in a composite edit.
Download this guide: PDF