
Types of blend modes in Motion
The following section describes how blend modes cause layers to combine to create different results. The blend modes are presented in the order in which they appear in the Blend Mode pop-up menu, arranged into groups of modes that create similar results.
Most of the examples in this section are created by combining the following two reference images:

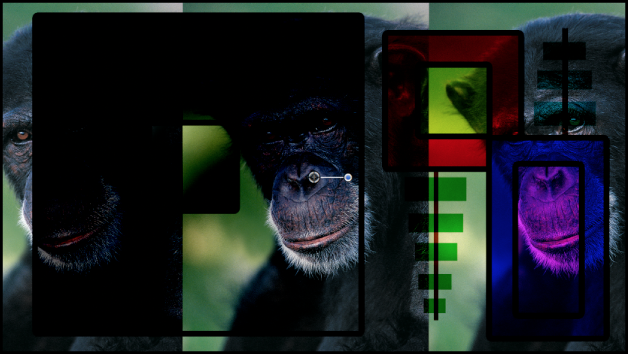
The resulting image illustrates how differently the color values from each image interact under each blend mode. When examining the results, pay attention to the white and black areas of the color squares, as well as to the highlights and shadows in the chimpanzee image. These show you how each blend mode treats the whites and blacks in an image. The other brighter and darker colors serve to illustrate each blend mode’s handling of overlapping midrange color values. The yellow, red, pink, and blue squares, in particular, all have very different color and luminance values that contrast sharply from example to example.
Important: Depending on the blend mode, layer and group ordering may or may not be important. Some blend modes behave differently depending on which image is on top.
Normal blend mode
The default blend mode for layers. In a layer set to Normal, any transparency is caused by the Opacity parameter or by an alpha channel.
Darkening blend modes
The following blend modes tend to create a result darker than either of the original images:
Subtract: Darkens all overlapping colors. Whites in the foreground image go black, while whites in the background image invert overlapping color values in the foreground image, creating a negative effect. Blacks in the foreground image become transparent, while blacks in the background image are preserved. Overlapping midrange color values are darkened based on the color of the background image. In areas where the background is lighter than the foreground, the background image is darkened. In areas where the background is darker than the foreground, the colors are inverted. The order of two layers affected by the Subtract blend mode is important.

Darken: Emphasizes the darkest parts of each overlapping image. Whites in either image allow the overlapping image to show through completely. Lighter midrange color values become increasingly translucent in favor of the overlapping image, while darker midrange color values below that threshold remain solid, retaining more detail. The order of two layers affected by the Darken blend mode does not matter.

The Darken blend mode is useful for using one image to texturize another selectively, based on its darker areas. You can also use Screen, Color Burn, and Linear Burn for variations on this effect.

Multiply: Like Darken, Multiply emphasizes the darkest parts of each overlapping image, except that midrange color values from both images are mixed together more evenly. Progressively lighter regions of overlapping images become increasingly translucent, allowing whichever image is darker to show through. Whites in either image allow the overlapping image to show through completely. Blacks from both images are preserved in the resulting image. The order of layers affected by the Multiply blend mode does not matter.
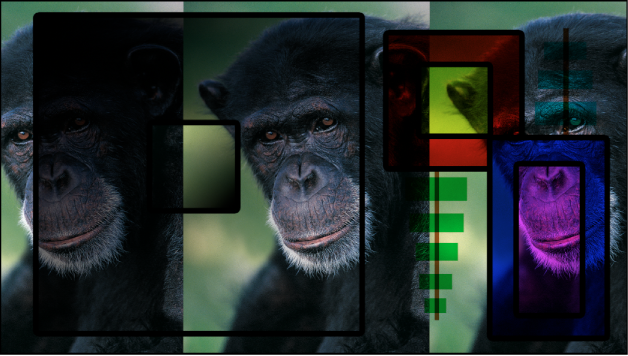
The Multiply blend mode is useful in situations where you want to knock out the white areas of a foreground image and blend the rest of the image with the colors in the background. For example, if you superimpose a scanned sheet of handwritten text over a background image using the Multiply blend mode, the resulting image becomes textured with the darker parts of the foreground.

Color Burn: Intensifies the dark areas in each image. Whites in the background image replace the foreground image, while whites in the foreground image become transparent. Midrange color values in the background image allow midrange color values in the foreground image to show through. Lighter midrange color values in the background image allow more of the foreground image to show through. Darker midrange values in all visible overlapping areas are then mixed together, resulting in intensified color effects. The order of two layers affected by the Color Burn blend mode is important.

Linear Burn: Similar to Multiply, except that darker overlapping midrange color values are intensified, as with Color Burn. Progressively lighter color values in overlapping images become increasingly translucent, allowing darker colors to show through. Whites in either image allow the overlapping image to show through completely. The order of two layers affected by the Linear Burn blend mode does not matter.
Lightening blend modes
The following blend modes tend to create a lighter result than either of the original images.
Add: Emphasizes the whites in each overlapping image and lightens all other overlapping colors. The color values in every overlapping pixel are added together. The result is that all overlapping midrange color values are lightened. Blacks from either image are transparent, while whites in either image are preserved. The order of two layers affected by the Add blend mode does not matter.
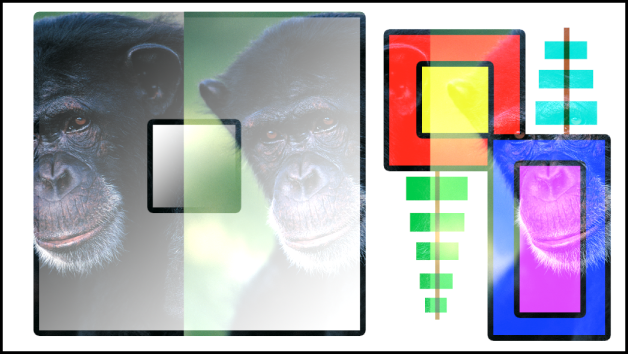
The Add blend mode is useful for using one image to selectively texturize another, based on its lighter areas such as highlights. You can also use Lighten, Screen, Color Dodge, and Linear Dodge to create variations of this effect.

Lighten: Emphasizes the lightest parts of each overlapping image. Every pixel in each image is compared, and the lightest pixel from either image is preserved, so the final image consists of a dithered combination of the lightest pixels from each image. Whites in both images show through in the resulting image. The order of two layers affected by the Lighten blend mode does not matter.
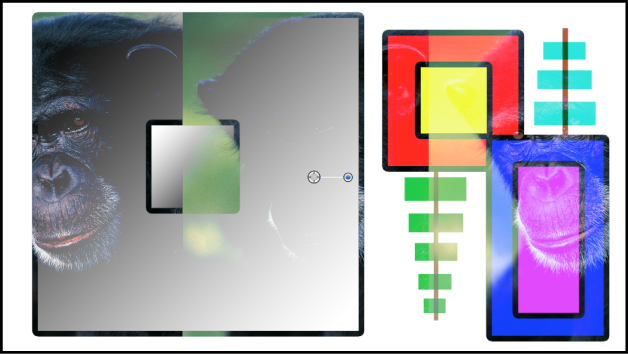
Screen: Like Lighten, Screen emphasizes the lightest parts of each overlapping image, except that the midrange color values of both images are mixed together more evenly. Blacks in either image allow the overlapping image to show through completely. Darker midrange values underneath a specific threshold allow more of the overlapping image to show. Whites from both images show through in the resulting image. The order of two layers affected by the Screen blend mode does not matter.

The Screen blend mode is useful for knocking out the blacks behind a foreground subject, instead of using a Luma Key. It’s mainly useful when you want the rest of the foreground subject to be mixed with the background image, based on its brightness. It’s good for glow and lighting effects and for simulating reflections. You can also use the Add, Lighten, and Color Dodge blend modes to create variations of this effect.

Color Dodge: Preserves whites in either the foreground or background image. Blacks in the background image replace the foreground image, while blacks in the foreground image become transparent. Midrange color values in the background image allow midrange color values in the foreground image to show through. Darker values in the background image allow more of the foreground image to show through. All overlapping midrange color values are mixed together, resulting in interesting color mixes. Reversing the two overlapping images results in subtle differences in how the overlapping midrange color values are mixed together.

Linear Dodge: Similar to Screen, except that lighter midrange color values in overlapping regions become intensified. Blacks in either image allow the overlapping image to show through completely. Whites from both images show through in the resulting image. The order of two layers affected by the Linear Dodge blend mode does not matter.
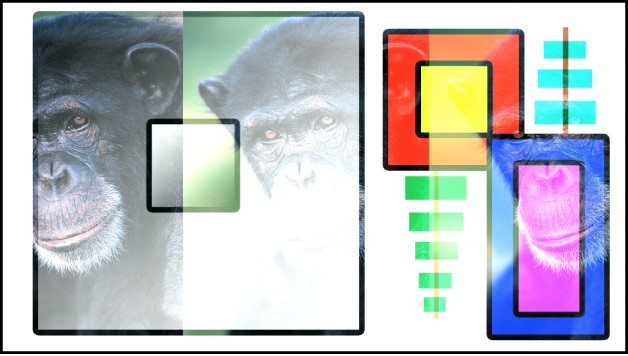
Complex blend modes
The following blend modes create results by applying a combination of effects, based on the original images. Each mode can create a variety of results depending on the specific values of the images being mixed together. Some of these modes are designed to simulate the effect of shining a light through the top layer, effectively projecting upon the layers beneath it.
Overlay: Causes whites and blacks in the foreground image to become translucent and interact with the color values of the background image, causing intensified contrast. Whites and blacks in the background image replace the foreground image. Overlapping midrange values are mixed together differently depending on the brightness of the background color values. Lighter background midrange values are mixed by screening. Darker background midrange values are mixed by multiplying. The visible result is that darker color values in the background image intensify the foreground image, while lighter color values in the background image wash out overlapping areas in the foreground image. The order of two layers affected by the Overlay blend mode is important.

The Overlay blend mode is useful for combining areas of vivid color in two images.

Soft Light: Similar to the Overlay blend mode, makes whites and blacks in the foreground image translucent. However, the translucent whites and blacks continue to interact with the color values of the background image. Whites and blacks in the background image replace the foreground image. All overlapping midrange color values are mixed together, creating a more even tinting effect than the Overlay blend mode. The order of two layers affected by the Soft Light blend mode is important.

The Soft Light blend mode is useful for softly tinting a background image by mixing it with the colors in a foreground image.

Hard Light: Causes whites and blacks in the foreground image to block the background image. Whites and blacks in the background image interact with overlapping midrange color values in the foreground image. Overlapping midrange color values are mixed together differently depending on the brightness of the background color values. Lighter background midrange values are mixed by screening. Darker background midrange values are mixed together by multiplying. The visible result is that darker color values in the background image intensify the foreground image, while lighter color values in the background image wash out overlapping areas in the foreground image. The order of two layers affected by the Hard Light blend mode is important.

Vivid Light: Similar to the Hard Light blend mode, with two exceptions: Vivid Light mixes midrange color values together more intensely, and preserves whites and blacks from either overlapping image in the end result. (Dithering can cause overlapping areas of solid white and solid black.) Overlapping midrange color values are mixed together differently depending on the brightness of the background color values. Lighter midrange values become washed out, while the contrast of darker midrange color values is increased. The overall effect is more pronounced than with the Hard Light blend mode. Reversing the two overlapping images results in subtle differences in how the overlapping midrange color values are mixed together.

Linear Light: Similar to the Hard Light blend mode, except that overlapping midrange color values are mixed together with higher contrast. Whites and blacks in the foreground image block the background image. Whites and blacks in the background image interact with overlapping midrange color values in the foreground image. Overlapping midrange color values are mixed together. Lighter background colors brighten the foreground image, while darker colors darken it. The order of two layers affected by the Linear Light blend mode is important.

Pin Light: Similar to the Hard Light blend mode, except that overlapping midrange color values are mixed together differently based on their color value. Whites and blacks in the foreground image block the background image. Whites and blacks in the background image interact with overlapping midrange color values in the foreground image. The methods used by the Pin Light blend mode to mix two images are somewhat complex. Overlapping midrange color values are treated differently depending on which of the four regions of the luminance chart they fall into:
Lighter and darker areas of the foreground image falling close to the whites and blacks are preserved.
Areas of the foreground image falling near the center of the midrange are tinted by the background color.
Darker areas of the foreground image between the blacks and center of the midrange are lightened.
Lighter areas of the foreground image between the whites and the center of the midrange are darkened.
The result might appear alternately tinted or solarized, depending on the lightness or darkness of the overlapping values. This blend mode lends itself to more abstract effects. The order of two layers affected by the Pin Light blend mode is important.

Hard Mix: Similar to the Hard Light blend mode, except that the saturation of overlapping midrange color values is intensified, resulting in extremely high-contrast images. Whites and blacks are preserved. Although the order of two layers doesn’t affect the overall look of two images blended using the Hard Mix blend mode, there might be subtle differences.
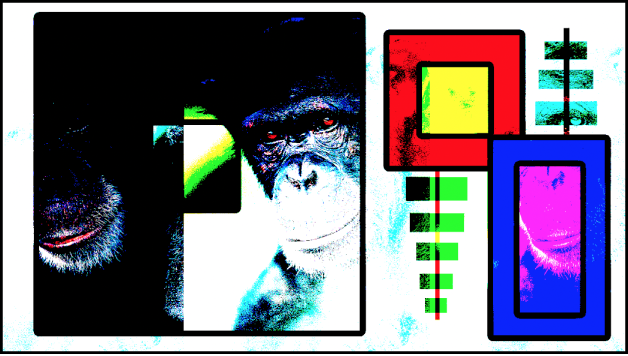
Inversion blend modes
The following two blend modes create results that often appear to resemble aspects of a photographic negative of the selected layer.
Difference: Similar to the Subtract blend mode (in the Darkening category), except that areas of the image that would be severely darkened by the Subtract blend mode are colorized differently. The order of two layers affected by the Difference blend mode does not matter.
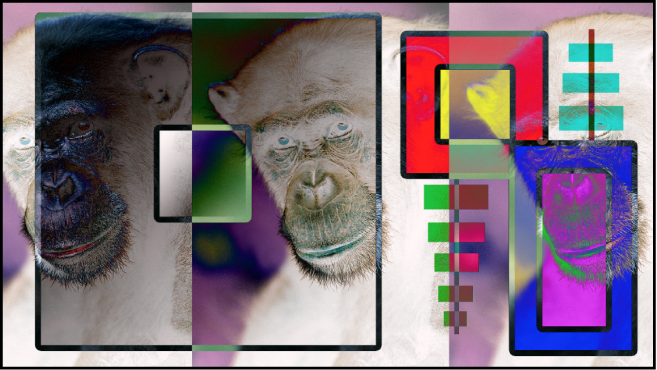
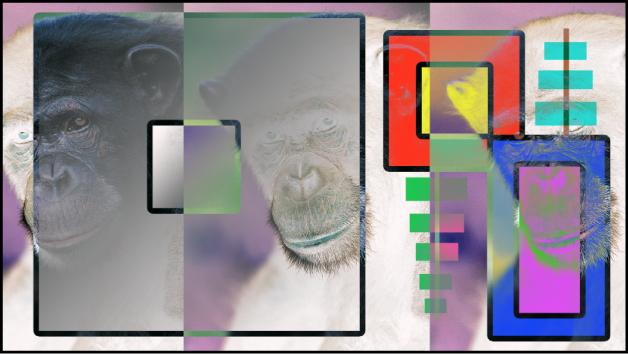
Exclusion: Similar to the Difference blend mode, except that the resulting image is lighter overall. Overlapping areas with lighter color values are lightened, while darker overlapping color values become transparent. The order of two layers affected by the Exclusion blend mode does not matter.
Download this guide: PDF