Logic Pro User Guide for iPad
-
- What is Logic Pro?
- Working areas
- Work with function buttons
- Work with numeric values
-
- Intro to tracks
- Create tracks
- Create tracks using drag and drop
- Choose the default region type for a software instrument track
- Select tracks
- Duplicate tracks
- Reorder tracks
- Rename tracks
- Change track icons
- Change track colors
- Use the tuner on an audio track
- Show the output track in the Tracks area
- Delete tracks
- Edit track parameters
- Start a Logic Pro subscription
- How to get help
-
- Intro to recording
-
- Before recording software instruments
- Record software instruments
- Record additional software instrument takes
- Record to multiple software instrument tracks
- Record multiple MIDI devices to multiple tracks
- Record software instruments and audio simultaneously
- Merge software instrument recordings
- Spot erase software instrument recordings
- Replace software instrument recordings
- Capture your most recent MIDI performance
- Use the metronome
- Use the count-in
-
- Intro to arranging
-
- Intro to regions
- Select regions
- Cut, copy, and paste regions
- Move regions
- Remove gaps between regions
- Delay region playback
- Trim regions
- Loop regions
- Repeat regions
- Mute regions
- Split and join regions
- Stretch regions
- Separate a MIDI region by note pitch
- Bounce regions in place
- Change the gain of audio regions
- Create regions in the Tracks area
- Convert a MIDI region to a Drummer region or a pattern region
- Rename regions
- Change the color of regions
- Delete regions
- Create fades on audio regions
- Access mixing functions using the Fader
-
- Intro to Step Sequencer
- Use Step Sequencer with Drum Machine Designer
- Record Step Sequencer patterns live
- Step record Step Sequencer patterns
- Load and save patterns
- Modify pattern playback
- Edit steps
- Edit rows
- Edit Step Sequencer pattern, row, and step settings in the inspector
- Customize Step Sequencer
-
- Effect plug-ins overview
-
- Instrument plug-ins overview
-
- ES2 overview
- Interface overview
-
- Modulation overview
-
- Vector Envelope overview
- Use Vector Envelope points
- Use Vector Envelope solo and sustain points
- Set Vector Envelope segment times
- Vector Envelope XY pad controls
- Vector Envelope Actions menu
- Vector Envelope loop controls
- Vector Envelope release phase behavior
- Vector Envelope point transition shapes
- Use Vector Envelope time scaling
- Use the Mod Pad
- Modulation source reference
- Via modulation source reference
-
- Sample Alchemy overview
- Interface overview
- Add source material
- Save a preset
- Edit mode
- Play modes
- Source overview
- Synthesis modes
- Granular controls
- Additive effects
- Additive effect controls
- Spectral effect
- Spectral effect controls
- Filter module
- Low and Highpass filter
- Comb PM filter
- Downsampler filter
- FM filter
- Envelope generators
- Mod Matrix
- Modulation routing
- Motion mode
- Trim mode
- More menu
- Sampler
- Copyright
Sculpture delay effect in Logic Pro for iPad
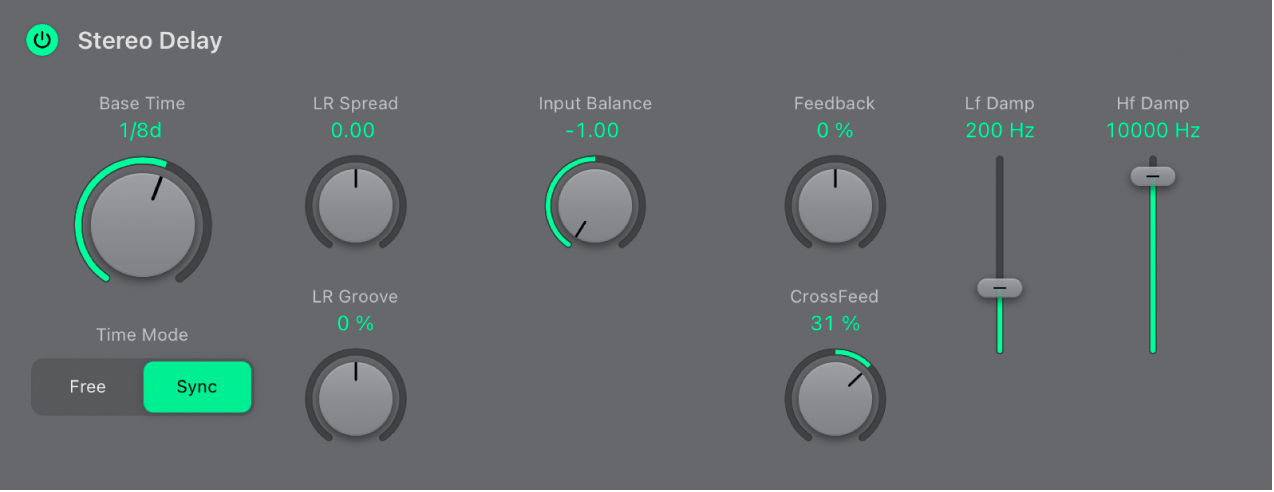
This is a stereo delay that can be synchronized with the project tempo. It can also run freely (unsynchronized).

Sculpture Delay effect parameters
Delay On/Off button: Turn the Delay effect on or off.
Base Time knob: Set the delay time. This can be in either musical note values—1/4, 1/4t (1/4 triplet), and so on (when Time Mode Sync button is on)—or in milliseconds (when Time Mode Free button is on).
Time Mode buttons: Set either free-running (Free) or tempo-synced (Sync) delay modes.
LR Spread knob: Adjust for wide stereo delay effects. Values above the default, centered position increase the delay time of the right delay line or decrease the delay time of the left delay line—in effect, smearing the delay times of the left and right channels. Negative values invert this effect.
LR Groove knob: Distribute delay taps to the left/right channels rather than smearing them across channels, like the Spread parameter. Value adjustments reduce the delay time of one delay line by a given percentage, while keeping the other delay line constant.
For example, a value of +50% reduces the right delay time by half. If a value of 1/4 was used as the Base Time, the right delay would equal 1/8th of a note and the left delay would remain at 1/4th of a note. Needless to say, this parameter is perfect for the creation of interesting rhythmic delays—in stereo.
Input Balance knob: Move the stereo center of the Delay input to the left or right, without the loss of any signal components. This makes it ideal for ping-pong delays.
Feedback knob: Set the amount of delay signal that is routed back from the delay unit output channels to the delay unit input channels. Negative values result in phase-inverted feedback.
CrossFeed knob: Set the amount of delay signal that is fed from the delay unit left output channel to the right input channel, and vice versa. Negative values result in phase-inverted feedback of the crossfed signal.
Lf Damp slider: Determine the cutoff frequency of the highpass filter at the delay line output/feedback loop.
Hf Damp slider: Determine the cutoff frequency of the lowpass filter at the delay line output/feedback loop.
Output Width knob: Change the stereo base of the wet signal. A value of 0.0 results in mono output. A value of 1.0 results in full stereo output—the left delay line output channel is panned hard left, and the right delay line output channel is panned hard right, but the stereo center is unaffected.
Note: This parameter is aimed primarily at achieving pure delay grooves in both channels, without hard left/right ping-pong panning.
Wet Level knob: Set the Delay output level.
Download this guide: PDF