Logic Pro User Guide for iPad
- What’s new in Logic Pro 1.1
-
- What is Logic Pro?
- Working areas
- Work with function buttons
- Work with numeric values
-
- Intro to tracks
- Create tracks
- Create tracks using drag and drop
- Choose the default region type for a software instrument track
- Select tracks
- Duplicate tracks
- Reorder tracks
- Rename tracks
- Change track icons
- Change track colors
- Use the tuner on an audio track
- Show the output track in the Tracks area
- Delete tracks
- Edit track parameters
- Start a Logic Pro subscription
- How to get help
-
- Intro to recording
-
- Before recording software instruments
- Record software instruments
- Record additional software instrument takes
- Record to multiple software instrument tracks
- Record multiple MIDI devices to multiple tracks
- Record software instruments and audio simultaneously
- Merge software instrument recordings
- Spot erase software instrument recordings
- Replace software instrument recordings
- Capture your most recent MIDI performance
- Use the metronome
- Use the count-in
-
- Intro to arranging
-
- Intro to regions
- Select regions
- Cut, copy, and paste regions
- Move regions
- Remove gaps between regions
- Delay region playback
- Trim regions
- Loop regions
- Repeat regions
- Mute regions
- Split and join regions
- Stretch regions
- Separate a MIDI region by note pitch
- Bounce regions in place
- Change the gain of audio regions
- Create regions in the Tracks area
- Convert a MIDI region to a Drummer region or a pattern region
- Rename regions
- Change the color of regions
- Delete regions
- Create fades on audio regions
- Access mixing functions using the Fader
-
- Intro to Step Sequencer
- Use Step Sequencer with Drum Machine Designer
- Record Step Sequencer patterns live
- Step record Step Sequencer patterns
- Load and save patterns
- Modify pattern playback
- Edit steps
- Edit rows
- Edit Step Sequencer pattern, row, and step settings in the inspector
- Customize Step Sequencer
-
- Effect plug-ins overview
-
- Instrument plug-ins overview
-
- ES2 overview
- Interface overview
-
- Modulation overview
-
- Vector Envelope overview
- Use Vector Envelope points
- Use Vector Envelope solo and sustain points
- Set Vector Envelope segment times
- Vector Envelope XY pad controls
- Vector Envelope Actions menu
- Vector Envelope loop controls
- Vector Envelope release phase behavior
- Vector Envelope point transition shapes
- Use Vector Envelope time scaling
- Use the Mod Pad
- Modulation source reference
- Via modulation source reference
-
- Sample Alchemy overview
- Interface overview
- Add source material
- Save a preset
- Edit mode
- Play modes
- Source overview
- Synthesis modes
- Granular controls
- Additive effects
- Additive effect controls
- Spectral effect
- Spectral effect controls
- Filter module
- Low and highpass filter
- Comb PM filter
- Downsampler filter
- FM filter
- Envelope generators
- Mod Matrix
- Modulation routing
- Motion mode
- Trim mode
- More menu
- Sampler
- Copyright
Sculpture amplitude envelope in Logic Pro for iPad
The parameters discussed in this section apply on a per-voice basis. This is a straightforward ADSR envelope that scales the pickup signals before passing them on to the Waveshaper and filter.
The positioning of the amplitude envelope at this point in the signal path produces more natural-sounding results because you can control signal levels before sending them to the Waveshaper (if used). The Waveshaper can have a significant impact on the spectral content of the sound, which can lead to synthetic-sounding results.

Amplitude envelope parameters
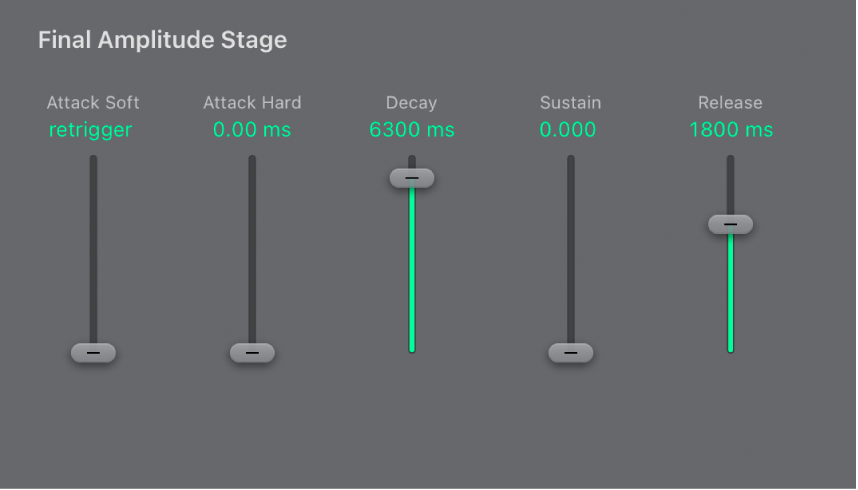
Attack Soft/Hard sliders: Set the attack time for a note played at maximum velocity with the lower slider (Soft). Set the attack time for a note played at minimum velocity with the top slider (Hard). You can adjust both slider halves simultaneously by dragging in the space between them.
Important: The attack time parameters of the amplitude envelope have a major impact on the way a single note is retriggered. When both Attack Soft and Hard are set to a value of 0, the vibrating string is retriggered. If either of these parameters is set to a value above 0, a new note is triggered. Sonically, the retriggering of a vibrating string results in different harmonics being heard during the attack phase.
Decay slider: Set the time it takes for the signal to fall to the sustain level, following the initial strike/attack time.
Sustain slider: Set the sustain level. The sustain level is held until the key is released.
Release slider: Set the time it takes for the signal to fall from the sustain level to a level of 0. Short Release values help to reduce CPU load, because the voice is no longer processed after the release phase has completed.
Note: Even with long decay and release times, the sound may decay quickly. This can be caused by high Inner or Media Loss values in the string material section or by objects (2 or 3) that are used to damp the string.
Download this guide: PDF