Logic Pro User Guide for iPad
-
- What is Logic Pro?
- Working areas
- Work with function buttons
- Work with numeric values
-
- Intro to tracks
- Create tracks
- Create tracks using drag and drop
- Choose the default region type for a software instrument track
- Select tracks
- Duplicate tracks
- Reorder tracks
- Rename tracks
- Change track icons
- Change track colors
- Use the tuner on an audio track
- Show the output track in the Tracks area
- Delete tracks
- Edit track parameters
- Start a Logic Pro subscription
- How to get help
-
- Intro to recording
-
- Before recording software instruments
- Record software instruments
- Record additional software instrument takes
- Record to multiple software instrument tracks
- Record multiple MIDI devices to multiple tracks
- Record software instruments and audio simultaneously
- Merge software instrument recordings
- Spot erase software instrument recordings
- Replace software instrument recordings
- Capture your most recent MIDI performance
- Route MIDI internally to software instrument tracks
- Record with Low Latency Monitoring mode
- Use the metronome
- Use the count-in
-
- Intro to arranging
-
- Intro to regions
- Select regions
- Cut, copy, and paste regions
- Move regions
- Remove gaps between regions
- Delay region playback
- Trim regions
- Loop regions
- Repeat regions
- Mute regions
- Split and join regions
- Stretch regions
- Separate a MIDI region by note pitch
- Bounce regions in place
- Change the gain of audio regions
- Create regions in the Tracks area
- Convert a MIDI region to a Session Player region or a pattern region
- Rename regions
- Change the color of regions
- Delete regions
-
- Intro to chords
- Add and delete chords
- Select chords
- Cut, copy, and paste chords
- Move and resize chords
- Loop chords on the Chord track
- Edit chords
- Work with chord groups
- Use chord progressions
- Change the chord rhythm
- Choose which chords a Session Player region follows
- Analyze the key signature of a range of chords
- Create fades on audio regions
- Extract vocal and instrumental stems with Stem Splitter
- Access mixing functions using the Fader
-
- Intro to Step Sequencer
- Use Step Sequencer with Drum Machine Designer
- Record Step Sequencer patterns live
- Step record Step Sequencer patterns
- Load and save patterns
- Modify pattern playback
- Edit steps
- Edit rows
- Edit Step Sequencer pattern, row, and step settings in the inspector
- Customize Step Sequencer
-
- Effect plug-ins overview
-
- Instrument plug-ins overview
-
- ES2 overview
- Interface overview
-
- Modulation overview
- Use the Mod Pad
-
- Vector Envelope overview
- Use Vector Envelope points
- Use Vector Envelope solo and sustain points
- Set Vector Envelope segment times
- Vector Envelope XY pad controls
- Vector Envelope Actions menu
- Vector Envelope loop controls
- Vector Envelope point transition shapes
- Vector Envelope release phase behavior
- Use Vector Envelope time scaling
- Modulation source reference
- Via modulation source reference
-
- Sample Alchemy overview
- Interface overview
- Add source material
- Save a preset
- Edit mode
- Play modes
- Source overview
- Synthesis modes
- Granular controls
- Additive effects
- Additive effect controls
- Spectral effect
- Spectral effect controls
- Filter module
- Low, bandpass, and highpass filters
- Comb PM filter
- Downsampler filter
- FM filter
- Envelope generators
- Mod Matrix
- Modulation routing
- Motion mode
- Trim mode
- More menu
- Sampler
- Studio Piano
- Copyright
Mastering Assistant parameters Logic Pro for iPad
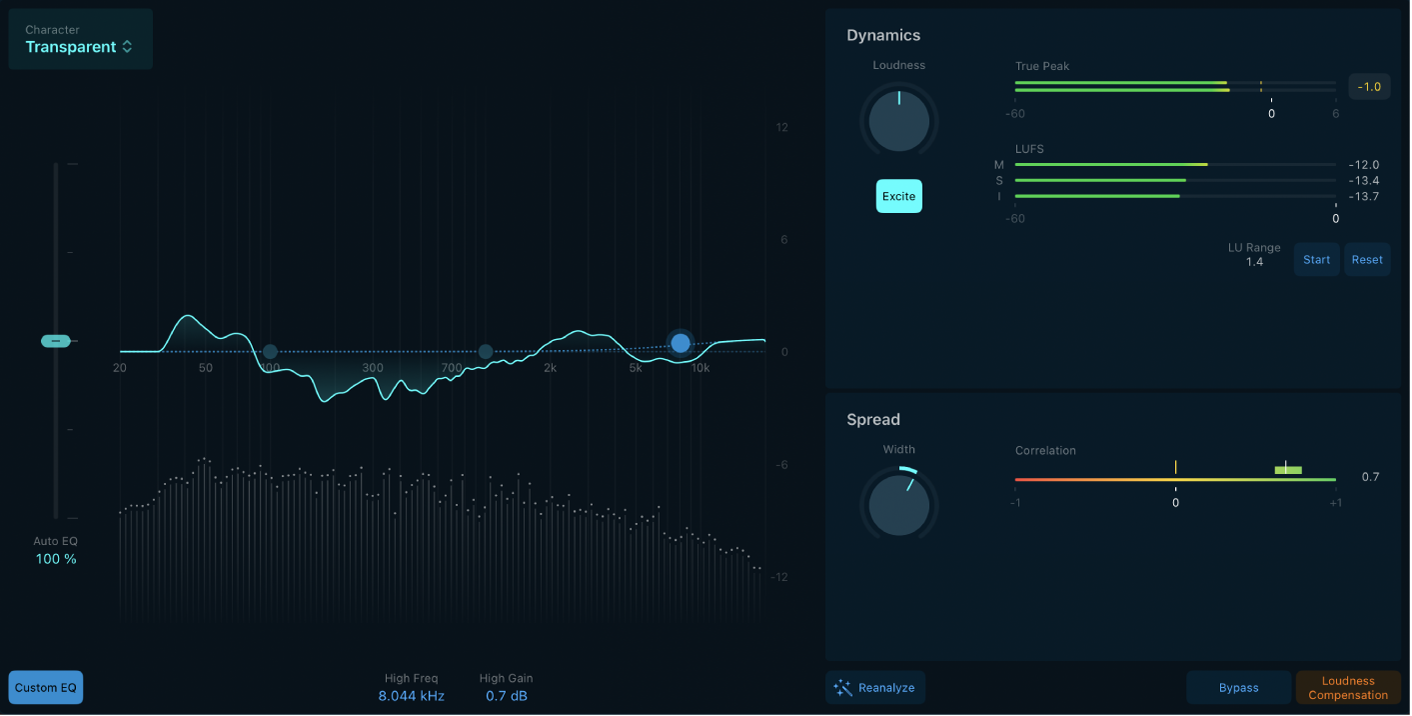
Mastering Assistant provides the following controls:

Character menu: Mastering Assistant allows you to choose the character of the processing applied to your project. The character presets change the sonic qualities of Mastering Assistant, inspired by hardware mastering chains used by professional recording engineers:
Clean: An algorithm that offers a transparent yet punchy result. This style is good for EDM, acoustic music, and anything that needs a clean yet punchy sound.
Valve: An algorithm that simulates a processing chain utilizing tubes to deliver a deep low end and refined high end, making it a great option for both acoustic music and the hip-hop genre.
Punch: An algorithm that embodies an aggressive sound with a subtle emphasis on the mid-range frequencies, ideally suited for rock music.
Transparent: An algorithm inspired by a modern and tight-sounding compressor, suitable for most genres of music.
Auto EQ slider: Control the amount of the correction EQ estimated by Mastering Assistant. After analyzing your project, Mastering Assistant shows the frequency curve that it applies to improve the sound of your project, with the Auto EQ slider set at 100%. You can adjust the amount of auto EQ by dragging the slider up or down.
Reanalyze button: Trigger a new analysis of your project if it has undergone changes. The button name changes to Reanalyze Section when a cycle area is set or to Analyze after you add content to an empty project.
Bypass button: Switch to the unprocessed audio. This allows you to directly compare the audio with or without processing, providing a clear evaluation of the effects applied. Use in combination with the Loudness Compensation button to avoid any sudden jumps in loudness. Remember to turn off bypass before bouncing your project.
Loudness Compensation button: Match the volume of the processed audio with that of the original, ensuring a balanced and unbiased basis for comparison. By doing so, you can accurately assess any changes or improvements made during the processing stage without being influenced by differences in loudness. Remember to turn off loudness compensation before bouncing your project.
Dynamics section
Loudness knob: Change the loudness of the processed audio. When you adjust the loudness knob to its center position, the output typically registers at around –14 LUFS-I. This typically is the target loudness for many streaming platforms. However, in the mastering process, adhering strictly to this value isn’t always the best approach. Instead, mastering engineers aim for a loudness level that best complements the specific mix. The optimal loudness can vary considerably based on the genre and the unique characteristics of the project.
Excite button: Introduce saturation to frequencies within the upper-mid range of the signal. This produces more overtones and adds richness and crispness to your mix. The enriched signal produces results similar to vintage transformer-based console designs of the ’60s, ’70s, and ’80s.
True Peak meter: Displays the signal level on a dBTP (dB measured as true peak) scale, and the dBTP max level. Tap to clear the numeric scale and max level.
True Peak represents the absolute highest level a signal is reaching, which is very important for observing where it is in relation to the ceiling, or the highest level a digital audio signal can reach before distorting or clipping. The signal level is represented by a green bar that turns yellow above –3 dB and red when it exceeds 0 dB. The numeric display follows the same color code. When the level exceeds 0 dB, the portion of the bar above the 0 dB point turns red. However, Mastering Assistant limits the processed signal to –1 dBFS True Peak, meeting the requirement for streaming platforms.
LUFS meter: The M, S, and I fields and meters indicate the current momentary, short-term, and integrated loudness measurement of your processed mix. The loudness for each measurement (M, S, I) is represented by a green bar. A meter turns yellow when the measured loudness exceeds the target loudness.
LU Range field: Indicates the loudness range during measurement (using the Start/Pause button).
Start/Pause button: Activate the loudness meter, initiating the measurement of the audio signal’s loudness. While the meter is running, it actively monitors and displays the loudness of any incoming audio signal. Pause halts the measurement process. The loudness reading ceases to update and typically holds at the last measured value. This is useful if you want to pause the measurement or if you’ve finished analyzing a particular section of audio.
Reset button: Clear any current readings or measurements on the loudness meter. Ideal for when you want to start a fresh measurement, perhaps for a new piece of audio or after making adjustments to the audio.
Spread section
Width knob: Increase or decrease the width of your mix. This knob will be set to a position other than the center if Mastering Assistant’s analysis finds that the stereo width of your project is too narrow or wide. Turn this knob all the way to the left to create a mono mix that you can use to check mono compatibility.
Correlation meter: Displays the phase relationship of a stereo signal. Your project should be above 0; the further it is, the better the mono compatibility.
A correlation of +1 (the far right position) means that the left and right channels correlate 100%—they are completely in phase.
A correlation of 0 (the center position) indicates the widest permissible left/right divergence, often audible as an extremely wide stereo effect.
Correlation values lower than 0 indicate that out-of-phase material is present, which can lead to phase cancellations if the stereo signal is combined into a monaural signal.
Spectrum analyzer and EQ section
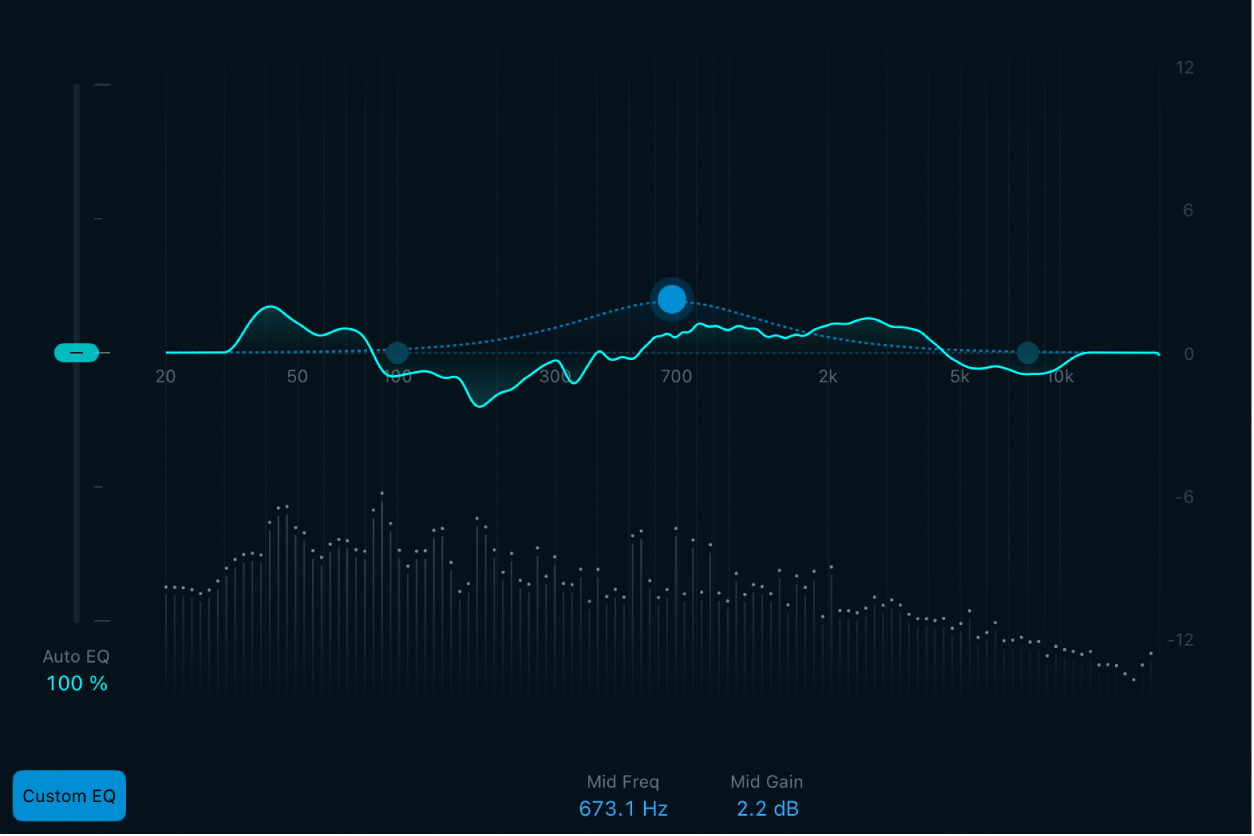
The EQ module includes a spectrum analyzer and a composite EQ curve.

Spectrum analyzer: Displays the real-time magnitude (expressed in decibels) of a signal across the frequency spectrum.
Composite curve: The collective filter response curve of the analyzed signal, depicted as a solid line spanning the spectrum. Each individual band contributes to the overall contour of this curve.
Custom EQ button: Turn the custom EQ on or off. When turned on, a dashed line illustrates the custom EQ curve, accompanied by three control points (blue dots) that you can drag to make very broad-stroke EQ adjustments.
Low frequency control point: Adjust the low frequency by dragging the control point left and right. Adjust the low frequency gain by dragging up and down.
Low Freq field: Enter a low shelving filter frequency from 20 Hz to 200 Hz.
Low Gain field: Enter a low shelving filter level. The gain range is ±6 dB.
Mid frequency control point: Adjust the mid frequency by dragging the control point left and right. Adjust the mid frequency gain by dragging up and down.
Mid Freq field: Enter a mid-range filter frequency from 200 Hz to 8.000 kHz.
Mid Gain field: Enter a mid-range filter level. The gain range is ±6 dB.
High frequency control point: Adjust the high frequency by dragging the control point left and right. Adjust the high frequency gain by dragging up and down.
High Freq field: Enter a high-range filter frequency from 8.000 kHz to 20.00 kHz.
High Gain field: Enter a high shelving filter level. The gain range is ±6 dB.
Download this guide: PDF