Logic Pro User Guide for iPad
-
- What is Logic Pro?
- Working areas
- Work with function buttons
- Work with numeric values
-
- Intro to tracks
- Create tracks
- Create tracks using drag and drop
- Choose the default region type for a software instrument track
- Select tracks
- Duplicate tracks
- Reorder tracks
- Rename tracks
- Change track icons
- Change track colors
- Use the tuner on an audio track
- Show the output track in the Tracks area
- Delete tracks
- Edit track parameters
- Start a Logic Pro subscription
- How to get help
-
- Intro to recording
-
- Before recording software instruments
- Record software instruments
- Record additional software instrument takes
- Record to multiple software instrument tracks
- Record multiple MIDI devices to multiple tracks
- Record software instruments and audio simultaneously
- Merge software instrument recordings
- Spot erase software instrument recordings
- Replace software instrument recordings
- Capture your most recent MIDI performance
- Use the metronome
- Use the count-in
-
- Intro to arranging
-
- Intro to regions
- Select regions
- Cut, copy, and paste regions
- Move regions
- Remove gaps between regions
- Delay region playback
- Trim regions
- Loop regions
- Repeat regions
- Mute regions
- Split and join regions
- Stretch regions
- Separate a MIDI region by note pitch
- Bounce regions in place
- Change the gain of audio regions
- Create regions in the Tracks area
- Convert a MIDI region to a Drummer region or a pattern region
- Rename regions
- Change the color of regions
- Delete regions
- Create fades on audio regions
- Access mixing functions using the Fader
-
- Intro to Step Sequencer
- Use Step Sequencer with Drum Machine Designer
- Record Step Sequencer patterns live
- Step record Step Sequencer patterns
- Load and save patterns
- Modify pattern playback
- Edit steps
- Edit rows
- Edit Step Sequencer pattern, row, and step settings in the inspector
- Customize Step Sequencer
-
- Effect plug-ins overview
-
- Instrument plug-ins overview
-
- ES2 overview
- Interface overview
-
- Modulation overview
-
- Vector Envelope overview
- Use Vector Envelope points
- Use Vector Envelope solo and sustain points
- Set Vector Envelope segment times
- Vector Envelope XY pad controls
- Vector Envelope Actions menu
- Vector Envelope loop controls
- Vector Envelope release phase behavior
- Vector Envelope point transition shapes
- Use Vector Envelope time scaling
- Use the Mod Pad
- Modulation source reference
- Via modulation source reference
-
- Sample Alchemy overview
- Interface overview
- Add source material
- Save a preset
- Edit mode
- Play modes
- Source overview
- Synthesis modes
- Granular controls
- Additive effects
- Additive effect controls
- Spectral effect
- Spectral effect controls
- Filter module
- Low and Highpass filter
- Comb PM filter
- Downsampler filter
- FM filter
- Envelope generators
- Mod Matrix
- Modulation routing
- Motion mode
- Trim mode
- More menu
- Sampler
- Copyright
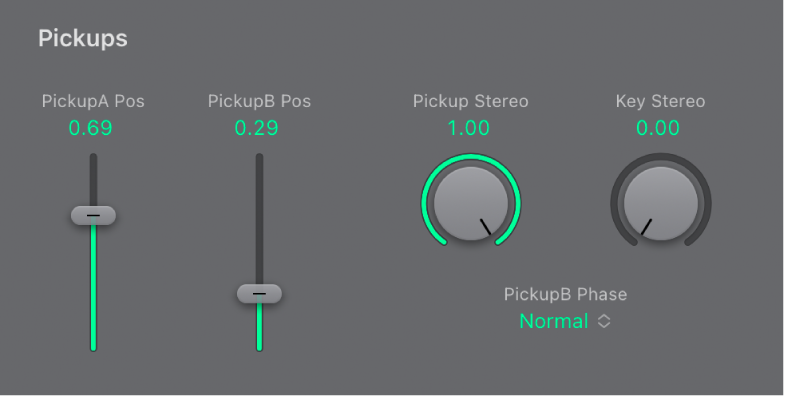
Sculpture pickup parameters in Logic Pro for iPad
The pickup parameters discussed in this section apply on a per-voice basis. A number of parameters can be morphed between up to five morph points. These are indicated in the parameter descriptions. See Sculpture morph overview.
The pickups are the first element beyond the sound-generating portion of Sculpture—consisting of the string and objects—and act as the input to the virtual signal processing chain. You can view the pickups as being like those of an electric guitar or clavinet. Obviously, changing their positions alters the tone of your instrument, just like the pickups in Sculpture.
The volume level of the pickup signals is controlled with the amplitude envelope.

Pickup parameters
PickupA Pos slider: Set the position of Pickup A along the string. Values of 0.0 and 1.0 determine the left and right ends of the string, respectively. This parameter can be morphed.
PickupB Pos slider: Set the position of Pickup B along the string. This parameter can be morphed.
Pickup Stereo knob: Use to spread the two pickups across the stereo base.
Key Stereo knob: Set the amount of panning (pan position) by MIDI note number. Depending on settings, the farther up or down the keyboard you play, the more the voice is panned left or right.
Tip: You can create animated width and chorus effects by modulating the Stereo parameters with an LFO or other modulator.
PickupB Phase pop-up menu: Invert the phase of Pickup B. Options are: normal or inverted.
Note: If the phase of Pickup B is inverted, the sound can become thinner due to portions of the Pickup A and Pickup B signals canceling each other out. Depending on the position of the pickups, however, the reverse may happen, with the sound actually becoming richer.
Download this guide: PDF