Logic Pro User Guide for iPad
-
- What is Logic Pro?
- Working areas
- Work with function buttons
- Work with numeric values
-
- Intro to tracks
- Create tracks
- Create tracks using drag and drop
- Choose the default region type for a software instrument track
- Select tracks
- Duplicate tracks
- Reorder tracks
- Rename tracks
- Change track icons
- Change track colors
- Use the tuner on an audio track
- Show the output track in the Tracks area
- Delete tracks
- Edit track parameters
- Start a Logic Pro subscription
- How to get help
-
- Intro to recording
-
- Before recording software instruments
- Record software instruments
- Record additional software instrument takes
- Record to multiple software instrument tracks
- Record multiple MIDI devices to multiple tracks
- Record software instruments and audio simultaneously
- Merge software instrument recordings
- Spot erase software instrument recordings
- Replace software instrument recordings
- Capture your most recent MIDI performance
- Route MIDI internally to software instrument tracks
- Record with Low Latency Monitoring mode
- Use the metronome
- Use the count-in
-
- Intro to arranging
-
- Intro to regions
- Select regions
- Cut, copy, and paste regions
- Move regions
- Remove gaps between regions
- Delay region playback
- Trim regions
- Loop regions
- Repeat regions
- Mute regions
- Split and join regions
- Stretch regions
- Separate a MIDI region by note pitch
- Bounce regions in place
- Change the gain of audio regions
- Create regions in the Tracks area
- Convert a MIDI region to a Session Player region or a pattern region
- Rename regions
- Change the color of regions
- Delete regions
-
- Intro to chords
- Add and delete chords
- Select chords
- Cut, copy, and paste chords
- Move and resize chords
- Loop chords on the Chord track
- Edit chords
- Work with chord groups
- Use chord progressions
- Change the chord rhythm
- Choose which chords a Session Player region follows
- Analyze the key signature of a range of chords
- Create fades on audio regions
- Extract vocal and instrumental stems with Stem Splitter
- Access mixing functions using the Fader
-
- Intro to Step Sequencer
- Use Step Sequencer with Drum Machine Designer
- Record Step Sequencer patterns live
- Step record Step Sequencer patterns
- Load and save patterns
- Modify pattern playback
- Edit steps
- Edit rows
- Edit Step Sequencer pattern, row, and step settings in the inspector
- Customize Step Sequencer
-
- Effect plug-ins overview
-
- Instrument plug-ins overview
-
- ES2 overview
- Interface overview
-
- Modulation overview
- Use the Mod Pad
-
- Vector Envelope overview
- Use Vector Envelope points
- Use Vector Envelope solo and sustain points
- Set Vector Envelope segment times
- Vector Envelope XY pad controls
- Vector Envelope Actions menu
- Vector Envelope loop controls
- Vector Envelope point transition shapes
- Vector Envelope release phase behavior
- Use Vector Envelope time scaling
- Modulation source reference
- Via modulation source reference
-
- Sample Alchemy overview
- Interface overview
- Add source material
- Save a preset
- Edit mode
- Play modes
- Source overview
- Synthesis modes
- Granular controls
- Additive effects
- Additive effect controls
- Spectral effect
- Spectral effect controls
- Filter module
- Low, bandpass, and highpass filters
- Comb PM filter
- Downsampler filter
- FM filter
- Envelope generators
- Mod Matrix
- Modulation routing
- Motion mode
- Trim mode
- More menu
- Sampler
- Studio Piano
- Copyright
Vintage B3 global effect controls in Logic Pro for iPad
Vintage B3 features a reverb effect, a three-band EQ, a pedal-controllable wah effect, and a distortion effect that simulates the sound of an overdriven tube amplifier. In addition, the signal can be routed through the Leslie rotor speaker emulation.
The default effect signal flow is as follows: the organ signal runs through the Equalizer, Wah, and Distortion effects. This treated signal is then fed into the Reverb and finally passed to the Leslie Rotor Cabinet.

Effects global parameters
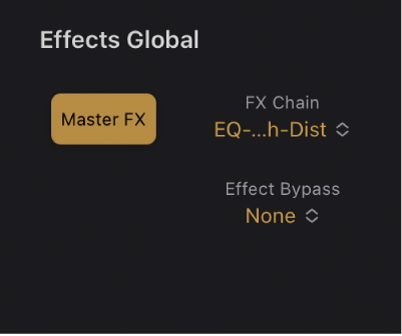
Master FX button: Enable or disable the entire Vintage B3 effects section.
Tip: You can also use the On/Off buttons to independently enable or disable the Reverb, EQ, Wah, and Distortion effects.
FX Chain pop-up menu: Choose the signal flow you require in the Vintage B3 effects section.
EQ-Wah-Dist: This routing is perfect for a classic B3 patch—an equalized organ, plugged into a wah pedal, amplified by an overdriven Leslie.
EQ-Dist-Wah: The sound of the overdrive changes if the input signal is being filtered, either by the EQ or the Wah. Placing the EQ before the Distortion provides further sonic flexibility. Although the output signal of the Distortion effect always contains high frequency content, this content can be suppressed by positioning the Wah as the final effect in the chain.
Wah-Dist-EQ: If you want to create a screaming sound (achieved by distorting the Wah effect output), you can minimize any harshness by choosing this routing.
Dist-EQ-Wah: Choose this routing to suppress the harsh overtones of extreme distortions with two filters.
Dist-Wah-EQ: Choose this routing to control extreme distortions with two filters.
Bypass: Choose to bypass effects.
Effect Bypass pop-up menu: Choose Pedal to bypass effects for the pedal register. If you choose None, the entire output of the organ is processed.
Bypassing the Distortion, Wah, and EQ effects separately for the pedal register avoids suppression of the bass portion of your organ sound by the Wah effect. It also avoids intermodulation artifacts when the Distortion effect is used.
Download this guide: PDF