Logic Pro User Guide for Mac
- Welcome
-
- What’s new in Logic Pro for Mac 11
- What’s new in Logic Pro for Mac 10.8
- What’s new in Logic Pro for Mac 10.7.8
- What’s new in Logic Pro for Mac 10.7.5
- What’s new in Logic Pro 10.7.3
- What’s new in Logic Pro 10.7
- What’s new in Logic Pro 10.6
- What’s new in Logic Pro 10.5
- What’s new in Logic Pro 10.4
- What’s new in Logic Pro 10.3
- What’s new in Logic Pro 10.2
- What’s new in Logic Pro 10.0
-
- What is Logic Pro for Mac?
- Logic Pro project basics
- Use menu commands and key commands
- Use the complete set of Logic Pro features
- Undo and redo edits
- Manage Logic Pro content
- How to get help
-
- Projects overview
- Create projects
- Open projects
- Save projects
- Delete projects
-
- Play a project
- Set the playhead position
- Control playback with the transport buttons
- Use transport shortcut menus
- Use transport key commands
- Customize the control bar
- Change the LCD display mode in Logic Pro for Mac
- Monitor and reset MIDI events
- Use the cycle area
- Use the Chase Events function
- Use Apple Remote to control Logic Pro
- Use Logic Remote to control Logic Pro projects
- Preview projects in the Finder
- Close projects
- View project information
-
- Tracks overview
-
- Create tracks
- Create tracks using drag and drop
- Create tracks using existing channel strips
- Assign tracks to different channel strips
- Choose the default region type for software instrument tracks
- Select tracks
- Duplicate tracks
- Rename tracks
- Change track icons
- Change track colors
- Reorder tracks
- Zoom tracks
- Replace or double drum sounds
- Control timing with the groove track
- Use selection-based processing
- Edit track parameters
-
- Overview
-
- Before recording software instruments
- Play software instruments
- Record software instruments
- Record additional software instrument takes
- Overdub software instrument recordings
- Spot erase software instrument recordings
- Use Note Repeat
- Replace software instrument recordings
- Record to multiple software instrument tracks
- Record multiple MIDI devices to multiple tracks
- Record software instruments and audio simultaneously
- Use step input recording techniques
- Record MIDI messages from another music app
- Route MIDI internally to software instrument tracks
- Use the metronome
-
- Arranging overview
-
- Regions overview
- Select regions
- Select parts of regions
- Cut, copy, and paste regions
- Move regions
- Add or remove gaps
- Delay region playback
- Loop regions
- Repeat regions
- Resize regions
- Mute and solo regions
- Time stretch regions
- Reverse audio regions
- Split regions
- Demix MIDI regions
- Join regions
- Create regions in the Tracks area
- Change the gain of audio regions in the Tracks area
- Normalize audio regions in the Tracks area
- Create aliases of MIDI regions
- Convert repeated MIDI regions to loops
- Change the color of regions
- Convert audio regions to samples for a sampler instrument
- Rename regions
- Delete regions
-
- Chords overview
- Add and delete chords
- Select chords
- Cut, copy, and paste chords
- Move and resize chords
- Loop chords on the Chord track
- Transpose chords
- Edit chords
- Work with chord groups
- Use chord progressions
- Change the chord rhythm
- Choose which chords a Session Player region follows
- Analyze the key signature of a range of chords
- Extract vocal and instrumental stems with Stem Splitter
- Create groove templates
-
- Overview
-
- Add notes
- Select notes
- Snap items to the grid
- Move notes
- Copy notes
- Change the pitch of notes
- Resize notes
- Edit note velocity
- Quantize the timing of notes
- Quantize the pitch of notes
- Change note articulations
- Lock the position of events
- Mute notes
- Change note color
- View note labels
- Delete notes
- Time stretch notes
- View multiple MIDI regions
- Split chords
- Automation/MIDI area in the Piano Roll Editor
- Open other editors
-
- Logic Pro for Mac advanced editors overview
-
- Audio File Editor overview
- Play audio files in the Audio File Editor
- Navigate audio files in the Audio File Editor
-
- Audio File Editor edit commands
- Edit audio files with transient markers
- Use the Audio File Editor Pencil tool
- Trim or silence audio files
- Remove DC offset
- Set audio file levels
- Normalize audio files
- Fade audio files
- Reverse audio and invert phase
- Audio File Editor Loop commands
- Undo Audio File Editor edits
- Backup audio files
- Use an external sample editor
-
- Mixing overview
- Set channel strip input formats
- Set channel strip pan or balance positions
- Mute and solo channel strips
-
- Plug-ins overview
- Add, remove, move, and copy plug-ins
- Insert a plug-in on a track using drag and drop
- Activate plug-ins on inactive channels
- Use the Channel EQ
- Work in the plug-in window
- Work with plug-in settings
- Work with plug-in latencies
- Work with Audio Units in Logic Pro for Mac
- Support for ARA 2 compatible plug-ins
- Use MPE with software instruments
- Use the Plug-in Manager
- Work with channel strip settings
- Surround panning
- Use the I/O Labels window
- Undo and redo Mixer and plug-in adjustments
-
- Smart Controls overview
- Show Smart Controls for master effects
- Choose a Smart Control layout
- Automatic MIDI controller assignment
- Map screen controls automatically
- Map screen controls
- Edit mapping parameters
- Use parameter mapping graphs
- Open the plug-in window for a screen control
- Rename a screen control
- Use articulation IDs to change articulations
- Assign hardware controls to screen controls
- Compare Smart Control edits with saved settings
- Use the Arpeggiator
- Automate screen control movements
-
- Live Loops overview
- Start and stop cells
- Work with Live Loops cells
- Change loop settings for cells
- How the Live Loops grid and Tracks area interact
- Edit cells
- Edit scenes
- Work in the Cell Editor
- Bounce cells
- Record a Live Loops performance
- Change Live Loops grid settings
- Control Live Loops with other devices
-
- Global changes overview
- Control transposition with the Pitch Source parameter
-
- Tempo overview
-
- Smart Tempo overview
- Use free tempo recording
- Choose the Project Tempo mode
- Choose the Flex & Follow setting
- Use Smart Tempo with multitrack audio
- Work in the Smart Tempo Editor
- Improve the tempo analysis using hints
- Correct tempo analysis results using beat markers
- Protect Smart Tempo edits by locking a range
- Match audio recordings to the project tempo
- Match the tempo to an audio region
- Use audio file tempo information
- Record tempo changes
- Use the Tempo Interpreter
- Use the tempo fader
- Control project volume
-
- Overview
- Add notes
-
- Part box overview
- View score symbols
- Select score symbols
- Add notes and rests
- Add notes and symbols to multiple regions
- Add key and time signature changes
- Change the clef sign
- Add dynamic marks, slurs, and crescendi
- Change note heads
- Add symbols to notes
- Add trills, ornaments, and tremolo symbols
- Add sustain pedal markings
- Add chord symbols
- Add chord grids and tablature symbols
- Add bar lines, repeats, and coda signs
- Add page and line break symbols
-
- Select notes
- Move and copy notes
- Change note pitch, duration, and velocity
- Change note articulations
- Quantize the timing of notes
- Restrict note input to the current key
- Control how ties are displayed
- Add and edit tuplets
- Override display quantization using tuplets
- Add grace notes and independent notes
- Delete notes
- Use automation in the Score Editor
-
- Staff styles overview
- Assign staff styles to tracks
- Staff Style window
- Create and duplicate staff styles
- Edit staff styles
- Edit staff, voice, and assign parameters
- Add and delete staffs or voices in the Staff Style window in Logic Pro for Mac
- Copy staffs or voices in the Staff Style window in Logic Pro for Mac
- Copy staff styles between projects
- Delete staff styles
- Assign notes to voices and staffs
- Display polyphonic parts on separate staffs
- Change the staff assignment of score symbols
- Beam notes across staffs
- Use mapped staff styles for drum notation
- Predefined staff styles
- Share a score
-
-
- Key commands overview
- Browse, import, and save key commands
- Assign key commands
- Copy and print key commands
-
- Global Commands
- Global Control Surfaces Commands
- Various Windows
- Windows Showing Audio Files
- Main Window Tracks and Various Editors
- Various Editors
- Views Showing Time Ruler
- Views Showing Automation
- Main Window Tracks
- Live Loops Grid
- Mixer
- MIDI Environment
- Piano Roll
- Score Editor
- Event Editor
- Step Editor
- Step Sequencer
- Project Audio
- Audio File Editor
- Smart Tempo Editor
- Library
- Sampler
- Drum Machine Designer
- Step Input Keyboard
- Smart Controls
- Tool Menu
- Control Surface Install Window
-
- Logic Pro projects
- Various windows
- Controller Assignments window
- Control bar
- Tracks area
- Global tracks
- Automation
- Live Loops grid
- Mixer
- MIDI Environment
- Piano Roll Editor
- Score Editor
- Event List
- Step Editor
- Step Sequencer
- Flex Time
- Audio File Editor
- Smart Tempo Editor
- Surround Panner
- Channel EQ
- Channel EQ
- Sampler
- Touch Bar shortcuts
-
-
- Working with your control surface
- Connect control surfaces
- Add a control surface to Logic Pro for Mac
- Automatic assignment for USB MIDI controllers
- Grouping control surfaces
- Control Surfaces settings overview
- Modal dialog display
- Tips for using your control surface
- Supported control surfaces
- Software and firmware for Logic Pro for Mac
-
-
- Environment overview
- Common object parameters
- Customize the Environment
-
-
- Fader objects overview
- Use fader objects
- Play back fader movements
- Work with object groups
- Fader styles
- Fader functions: MIDI events
- Fader functions: range, value as
- Fader functions: filter
- Vector fader
- Special faders overview
- Cable switchers
- Meta event faders
- SysEx faders
- Work with SysEx messages
- Special functions
- Ornament objects
- MMC record buttons
- Keyboard objects
- Monitor objects
- Channel splitter object
- Physical input objects
- Physical input objects
- MIDI click objects
-
-
- Use MIDI plug-ins
-
- Arpeggiator overview
- Arpeggiator control parameters
- Note order parameters overview
- Note order variations
- Note order inversions
- Arpeggiator pattern parameters overview
- Use Live mode
- Use Grid mode
- Arpeggiator options parameters
- Arpeggiator keyboard parameters
- Use keyboard parameters
- Assign controllers
- Modifier controls
- Note Repeater controls
- Randomizer controls
-
- Use Scripter
- Use the Script Editor
- Scripter API overview
- MIDI processing functions overview
- HandleMIDI function
- ProcessMIDI function
- GetParameter function
- SetParameter function
- ParameterChanged function
- Reset function
- JavaScript objects overview
- Use the JavaScript Event object
- Use the JavaScript TimingInfo object
- Use the Trace object
- Use the MIDI event beatPos property
- Use the JavaScript MIDI object
- Create Scripter controls
- Transposer controls
- Record MIDI to Track
-
-
- Alchemy overview
- Alchemy interface overview
- Alchemy Name bar
- Alchemy file locations
-
- Alchemy source overview
- Source master controls
- Import browser
- Source subpage controls
- Source filter controls
- Source filter use tips
- Source elements overview
- Additive element controls
- Additive element effects
- Spectral element controls
- Spectral element effects
- Pitch correction controls
- Formant filter controls
- Granular element controls
- Sampler element controls
- VA element controls
- Wide unison mode
- Source modulations
- Morph controls
- Alchemy master voice section
- Alchemy Extended parameters
-
- ES2 overview
- ES2 interface overview
- ES2 integrated effects processor controls
- Use ES2 in Surround mode
- Extended parameters
-
-
- Sample Alchemy overview
- Interface overview
- Add source material
- Edit mode
- Play modes
- Source overview
- Synthesis modes
- Granular controls
- Additive effects
- Additive effect controls
- Spectral effect
- Spectral effect controls
- Filter module
- Lowpass, bandpass, and highpass filters
- Comb PM filter
- Downsampler filter
- FM filter
- Envelope generators
- Mod Matrix
- Modulation routing
- Motion mode
- Trim mode
- More menu
-
- Sculpture overview
- Sculpture interface
- Global parameters
- Amplitude envelope parameters
- Use the Waveshaper
- Filter parameters
- Output parameters
- Use surround range and diversity
- Define MIDI controllers
- Extended parameters
-
- Studio Piano
-
- Ultrabeat overview
- Ultrabeat interface
- Synthesizer section overview
- Filter section controls
- Distortion circuit controls
- Glossary
- Copyright

Program a basic bass sound in Sculpture in Logic Pro for Mac
This section covers programming of a basic bass sound which serves as the foundation for a number of different bass sound examples. See Program a picked bass sound in Sculpture, Program a slap bass sound in Sculpture, and Program a fretless bass sound in Sculpture.
Sequentially follow the tasks in this section and Refine the basic Sculpture bass sound to learn how different components can be modeled and to gain a fuller understanding of how Sculpture parameters interact.
Create the proper working environment for design of your own bass sound in Sculpture
In Logic Pro, make sure the range from C 0 to C 3 is available on your keyboard by either transposing your master keyboard, or by using the Transpose function in the Region parameters of your host application.
Note: You can, of course, transpose sounds within Sculpture, but this isn’t the best solution in this case, for the following reason: Sounds would not be compatible with MIDI regions in which note number 60 as middle C is considered to be the measure of all things.
Choose the #default setting from the Settings pop-up menu in Sculpture.
Recreate the sound characteristics of a typical bass instrument in Sculpture
In Logic Pro, set the Attack value of the amplitude envelope to its minimum value (0.00 ms). The A(ttack) slider is just to the right of the Material Pad.
Shorten the Release time of the amplitude envelope to a value between 4 and 5 ms.
Play a key on your keyboard. The note should stop abruptly when you release the key and should be free of artifacts (a digital crackle or snap). If you encounter any artifacts, carefully increase the Release time.
Play some sustained notes in the range above E 0. These die away too quickly. Correct this quick die-out with the Media Loss parameter by dragging the slider to the left of the Material Pad almost all the way down to the bottom. Note that the low E string on a high-quality bass can sound for over a minute.
Your basic bass should simulate a fingered articulation, which means that the sound is created by striking the strings with fingers.
Choose Pick from the Type pop-up menu of Object 1.
Don’t be confused by the name of the object type; despite the name pick, this model is appropriate for simulating the playing of strings with your fingers.
Play some notes in the lower range. You’ll hear that the sound is very muffled, hollow, and distorted. Before you adjust further parameters in Object 1, you need to set the position of the pickup.
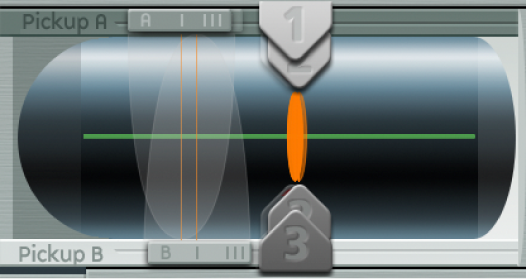
This is accomplished in the Pickup display to the left of the Material Pad. You’ll find three arrow-shaped sliders, representing Objects 1 to 3. The two transparent bell-shaped curves help you to visualize the position and width of Pickup A and Pickup B.
On electric basses the pickups are found quite a way off to the side and near the bridge. This particular bass has only a single pickup.
The behavior of a single pickup is simulated by placing both pickups at exactly the same position.
Drag Pickup B to the exact position of Pickup A while keeping an eye on the help tag. The two thin orange lines should overlap perfectly. As a suitable value for the example, set both pickups to 0.10.

Note: Make sure the Invert switch to the lower left of the Pickup display isn’t turned on, because this would cause the pickups to completely cancel each other out.
It’s now time to determine the playing position.
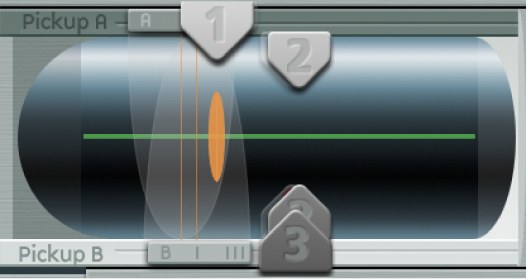
Drag the Object 1 slider in the Pickup display in a horizontal direction. Play the keyboard while doing so, to hear the changes it makes.
You’ll quickly realize that you can achieve a precise, crisp sound only when you drag the slider relatively far away from the middle of the string. Move Object 1 closer to the pickup (position 0.15 in the figure below).

The low notes are still distorted. You can remedy this by adjusting the Level knob to the right of the amplitude envelope. Set a value of −10 dB.
Recreate the material properties of a set of round wound strings in Sculpture
Although you can already recognize the sound of an electric bass, it doesn’t sound wiry enough yet. Now it’s time to focus on the bass strings themselves.
In Logic Pro, drag the ball in the Material Pad up and down at the left edge. Pay attention to how the overtones react.
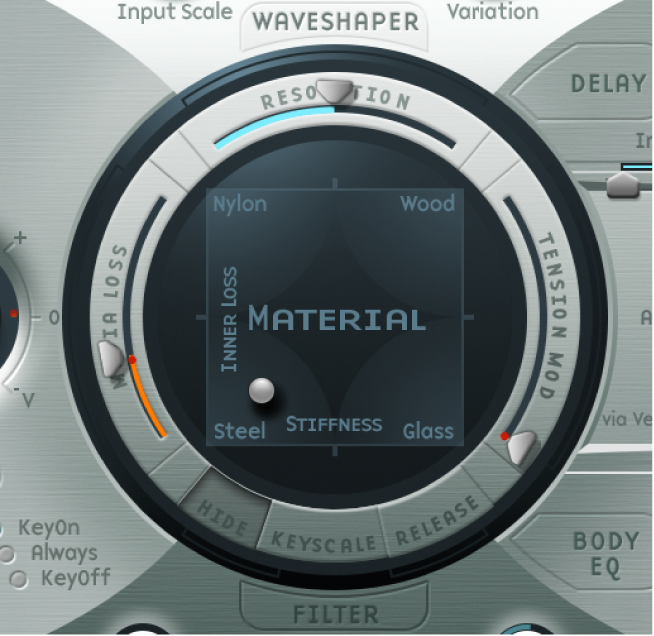
Drag the ball to the lower-left corner. The sound should vaguely remind you of the sound of a low piano string. Because the overtones sustain too long, the tone sounds somewhat unnatural.
Drag the ball upward until you hear an acceptable sound. Try the position shown in the figure:

Note: In general, a splaying of the overtones in low wound strings is typical. You can recognize it by the slightly impure, metallic sound. This occurs because the partials (overtones) are not exact whole number multiples of the fundamental frequency but rather are shifted somewhat higher. An example of this effect in the real world of electro-acoustic instruments is the low strings on a Yamaha CP70. This is overkill, but your bass model may benefit from a small amount of this effect.
Splay overtones in Sculpture
In Logic Pro, drag the ball in the Material Pad gradually to the right.
The sound takes on a more pure, bell-like character.
To realistically simulate the splaying of overtones, try the following example setting:

Emulate string and fret vibrations with Object 2 in Sculpture
The vibration of a bass string does not occur in a vacuum. The antinode of the string frequently encounters the natural, physical limitations of the instrument. This is heard as the typical buzzing and rattling that occurs when the strings touch the frets.
In Logic Pro, activate Object 2, and choose Bouncing from the Type pop-up menu.
The sound should now vaguely remind you of a mandolin tremolo. This is far too strong an effect for this kind of sound.
Move Object 2 all the way to the right (a value of 1.00).
Experiment with Object 2 parameters. A discrete and realistic result can be achieved with the following parameter values: Strength 0.33, Timbre −1.00, and Variation −0.69.
Play some low notes, and you’ll find that once again the overtones sustain a little too long—somewhat like the lowest notes or strings on a piano. this can be corrected by dampening the string.
Use Object 3 to dampen overtones in Sculpture
In Logic Pro, activate Object 3 and choose Damp from the Type pop-up menu.
Move Object 3 all the way to the right (value 1.00).
Set the Strength parameter to 0.18.
Note: Experiment with how the Strength parameter of Object 3 interacts with the Inner Loss Material Pad parameter. The higher the Inner Loss value, the smaller the Strength value can be, and vice versa.
Set the range for the basic bass sound in Sculpture
To more realistically replicate the different tonal ranges of the bass, use the scaling function.
When turned on, the key-scaling function is used to adjust the timbre of the sound, independent of pitch. Before using the blue sliders to do this, try the Resolution parameter.
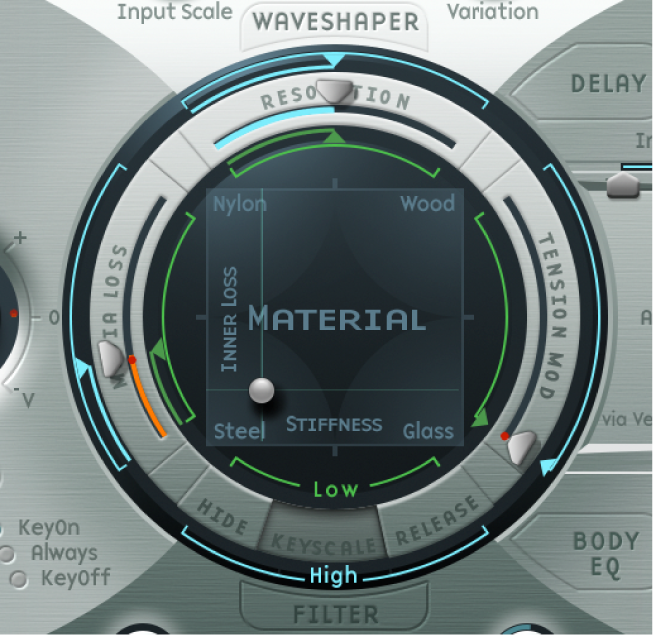
In Logic Pro, click the Keyscale button at the bottom of the Material Pad. The key scale below C3 is displayed in green, the range above in light blue. The Material Pad with its Keyscale parameters activated is shown here:

Note: The most relevant performance range for basses is found exclusively below C3. For this reason, you should make use of the green sliders to set the actual timbre of the sound. The primary sliders found around the ring determine the timbre of the sound above C3. For the moment, ignore the blue sliders (which control high key scaling) and simply set them to the same positions as the main sliders.