MainStage User Guide
- Welcome
-
- Overview of Edit mode
-
- Select patches and sets in the Patch List
- Copy, paste, and delete patches
- Reorder and move patches in the Patch List
- Add and rename patches
- Create a patch from several patches
-
- Overview of the Patch Settings Inspector
- Select patch settings in the Patch Library
- Set the time signature for patches
- Change the tempo when you select a patch
- Set program change and bank numbers
- Defer patch changes
- Instantly silence the previous patch
- Change patch icons
- Transpose the pitch of incoming notes for a patch
- Change the tuning for a patch
- Add text notes to a patch
-
- Overview of channel strips
- Add a channel strip
- Change a channel strip setting
- Configure channel strip components
- Show signal flow channel strips
- Hide the metronome channel strip
- Create an alias of a channel strip
- Add a patch bus
- Set channel strip pan or balance positions
- Set channel strip volume levels
- Mute and solo channel strips
- Use multiple instrument outputs
- Use external MIDI instruments
- Reorganize channel strips
- Delete channel strips
-
- Overview of the Channel Strip Inspector
- Choose channel strip settings
- Rename channel strips
- Change channel strip colors
- Change channel strip icons
- Use feedback protection with channel strips
- Set keyboard input for a software instrument channel strip
- Transpose individual software instruments
- Filter MIDI messages
- Scale channel strip velocity
- Set channel strips to ignore Hermode tuning
- Override concert- and set-level key ranges
- Add text notes to a channel strip in the Channel Strip Inspector
- Route audio via send effects
-
- Screen Control Inspector overview
- Replace parameter labels
- Choose custom colors for screen controls
- Change background or grouped screen control appearance
- Set screen controls to show the hardware value
- Set parameter change behavior for screen controls
- Set hardware matching behavior for screen controls
- Reset and compare changes to a patch
- Override concert- and set-level mappings
-
- Overview of mapping screen controls
- Map to channel strip and plug-in parameters
- Map screen controls to actions
- Map a screen control to multiple parameters
- Use screen controls to display PDF document pages
- Edit the saved value for a mapped parameter
- Set drum pads or buttons to use note velocity
- Map screen controls to all channel strips in a patch
- Undo screen control parameter mappings
- Remove screen control mappings
- Work with graphs
- Create controller transforms
- Share patches and sets between concerts
- Record the audio output of a concert
-
- Overview of concerts
- Create a concert
- Open and close concerts
- Save concerts
- How saving affects parameter values
- Clean up concerts
- Consolidate assets in a concert
- Rename the current concert
-
- Overview of the Concert Settings Inspector
- Set MIDI Routing to channel strips
- Transpose incoming note pitch for a concert
- Define the program change message source
- Send unused program changes to channel strips
- Set the time signature for a concert
- Change the tuning for a concert
- Set the pan law for a concert
- Add text notes to a concert
- Control the metronome
- Silence MIDI notes
- Mute audio output
-
- Layout mode overview
-
- Screen control parameter editing overview
- Lift and stamp screen control parameters
- Reset screen control parameters
- Common screen control parameters
- Keyboard screen control parameters
- MIDI activity screen control parameters
- Drum pad screen control parameters
- Waveform screen control parameters
- Selector screen control parameters
- Text screen control parameters
- Background screen control parameters
- How MainStage passes through MIDI messages
- Export and import layouts
- Change the aspect ratio of a layout
-
- Before performing live
- Use Perform mode
- Screen controls in performance
- Tempo changes during performance
- Tips for performing with keyboard controllers
- Tips for performing with guitars and other instruments
- Tune guitars and other instruments with the Tuner
- The Playback plug-in in performance
- Record your performances
- After the performance
- Tips for complex hardware setups
-
- Overview of keyboard shortcuts and command sets
-
- Concerts and layouts keyboard shortcuts
- Patches and sets (Edit mode) keyboard shortcuts
- Editing keyboard shortcuts
- Actions keyboard shortcuts
- Parameter mapping (Edit mode) keyboard shortcuts
- Channel strips (Edit mode) keyboard shortcuts
- Screen controls (Layout mode) keyboard shortcuts
- Perform in Full Screen keyboard shortcuts
- Window and view keyboard shortcuts
- Help and support keyboard shortcuts
-
-
- Use MIDI plug-ins
-
- Arpeggiator overview
- Arpeggiator control parameters
- Note order parameters overview
- Note order variations
- Note order inversions
- Arpeggiator pattern parameters overview
- Use Live mode
- Use Grid mode
- Arpeggiator options parameters
- Arpeggiator keyboard parameters
- Use keyboard parameters
- Assign controllers
- Modifier controls
- Note Repeater controls
- Randomizer controls
-
- Use Scripter
- Use the Script Editor
- Scripter API overview
- MIDI processing functions overview
- HandleMIDI function
- ProcessMIDI function
- GetParameter function
- SetParameter function
- ParameterChanged function
- Reset function
- JavaScript objects overview
- Use the JavaScript Event object
- Use the JavaScript TimingInfo object
- Use the Trace object
- Use the MIDI event beatPos property
- Use the JavaScript MIDI object
- Create Scripter controls
- Transposer controls
-
-
- Alchemy overview
- Alchemy interface overview
- Alchemy Name bar
- Alchemy file locations
-
- Alchemy source overview
- Source master controls
- Import browser
- Source subpage controls
- Source filter controls
- Source filter use tips
- Source elements overview
- Additive element controls
- Additive element effects
- Spectral element controls
- Spectral element effects
- Pitch correction controls
- Formant filter controls
- Granular element controls
- Sampler element controls
- VA element controls
- Wide unison mode
- Source modulations
- Morph controls
- Alchemy master voice section
- Alchemy Extended parameters
-
- Playback plug-in overview
- Add a Playback plug-in
- Playback interface
- Use the Playback waveform display
- Playback transport and function buttons
- Playback information display
- Playback Sync, Snap To, and Play From parameters
- Use the Playback group functions
- Use the Playback Action menu and File field
- Use markers with the Playback plug-in
-
- Sample Alchemy overview
- Interface overview
- Add source material
- Edit mode
- Play modes
- Source overview
- Synthesis modes
- Granular controls
- Additive effects
- Additive effect controls
- Spectral effect
- Spectral effect controls
- Filter module
- Lowpass, bandpass, and highpass filters
- Comb PM filter
- Downsampler filter
- FM filter
- Envelope generators
- Mod Matrix
- Modulation routing
- Motion mode
- Trim mode
- More menu
-
- Sculpture overview
- Sculpture interface
- Global parameters
- Amplitude envelope parameters
- Use the Waveshaper
- Filter parameters
- Output parameters
- Define MIDI controllers
- Extended parameters
-
- Studio Piano
- Copyright

Create Ultrabeat kick drums in MainStage
Electronically produced kick drum sounds are based primarily on the sound of a deeply tuned sine wave. Follow the tutorials sequentially to get the most from these examples.
Program a basic kick drum in Ultrabeat
In MainStage, choose Settings > Tutorial Settings > Tutorial Kit, and select Standard Tut from the Assignment section.
Note that oscillator 1 is in Phase Oscillator mode.
Find a suitably tuned pitch in the lower octaves by soloing the bass drum along with other important tonal elements of the song (a bass or pad sound, for example). Drag the Osc 1 Pitch slider to adjust the pitch until appropriate.
Use Env 4 to shape the volume of the bass drum.
For slower beats you may want a longer decay phase, whereas at faster tempos a shorter decay time is more appropriate. The attack time of Env 4 should be very short (zero, in most cases) or the sound loses its percussiveness and its ability to be clearly heard in the mix.
Give your drum more kick by controlling the pitch with an envelope
The kick drum still sounds very soft and is somewhat reminiscent of the famous TR-808 bass drum. It’s still missing a clearly defined attack.
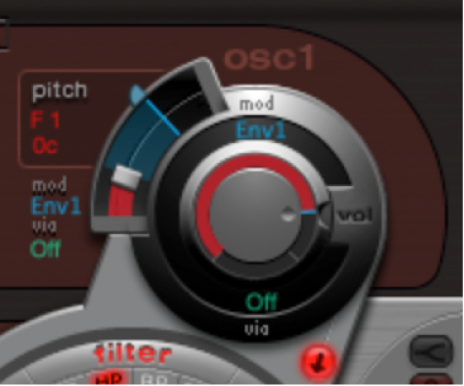
In MainStage, make sure that Env 1 is chosen from the mod pop-up menu of the oscillator 1 Pitch parameter.
Set the degree of modulation by dragging the blue Mod slider approximately 3 to 4 octaves above the original pitch.

Set the attack time in Env 1 to 0 by dragging the leftmost of the two junction points on the x-axis all the way to the left.

Experiment with the decay time by dragging the rightmost of the two junction points on the x-axis. You’ll discover that higher decay values (shifting the Bezier handle to the right) result in sounds similar to synth toms, whereas shorter decay values (shifting to the left) provide the kick character.
Change the Mod amount (the blue slider) of Osc 1 Pitch again (see step 2).
The interaction of this parameter with the envelope decay time provides numerous possibilities for shaping the kick or punch of the bass drum sound.
Note: This simple bass drum sound is listed as Kick 1 in the Tutorial Kit, at a pitch of C1.
Reduce kick drum tonality using the 2 Band EQ
One advantage of bass drums based on sine waves is that their sound can be precisely tuned to match the song. The disadvantage is that a recognizable pitch is not always desirable. Ultrabeat offers several methods to reduce the tonality of the sound. A very effective tool is the 2 Band EQ.
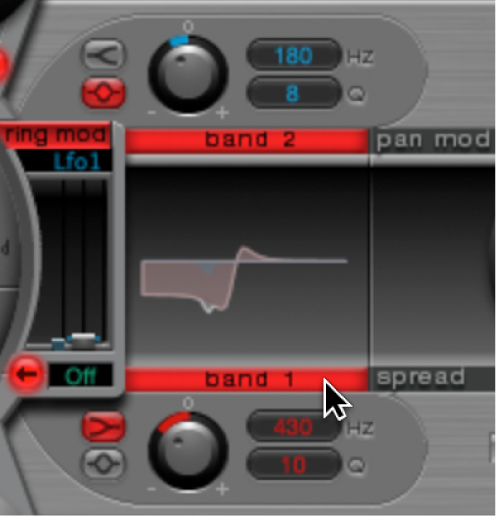
In MainStage, for band 1, select the Shelving mode at a frequency of about 80 Hz, a high Q value, and a negative Gain value.
For band 2, select the Peak mode at a frequency of around 180 Hz, a medium Q value, and also a negative Gain value.
On the EQ graph, notice how the frequencies around 80 Hz are boosted, while the surrounding frequencies are reduced.

Vary the frequency of band 2 (easily recognizable in the blue part of the EQ graph) to influence the extent of bass drum tonality.
Reduce kick drum tonality with a lowpass filter
A further method for reducing the tonality of a drum sound that is rich with overtones is to use a lowpass filter. In this example, you will control the cutoff frequency of the filter with an envelope.
In MainStage, reload the Standard Tutorial sound, choose A#0 as the basic pitch in oscillator 1, and modulate it with Env 1.
Increase the Saturation parameter value to enhance the overtones of the drum sound.
Note that the output of Osc 1 is directed to the filter, because the filter bypass button (the arrow between Osc 1 and the filter) is activated.
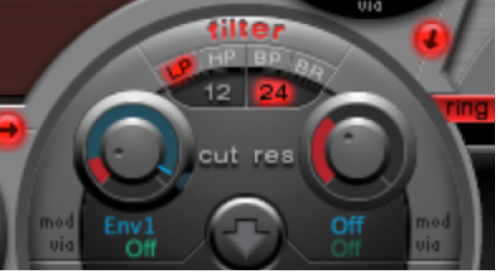
Set Filter type to LP 24.
Set Cutoff value to 0.10.
Set Mod Source for Cut to Env 3.
Set Mod Amount for Cut to 0.60.
Set Resonance to 0.30.

Set the Attack time of Env 3 to 0. Use the Decay time of Env 3 to shape the sound of the filtered bass drum.
You may also choose to control the filter resonance with an envelope. Make sure you dedicate a single envelope to this function (in this case, use Env 2 as a Mod source for Res). Choose a Mod amount for Res of about 0.80. Select a longer decay time in Env 2 than in Env 3 and listen carefully to the fatter and more atonal bass drum sound achieved through this Res modulation (due to the higher filter resonance).
Note: The bass drum described in the above example is listed as Kick 2 in the Tutorial Kit, at a pitch of C#1. It also features an interesting EQ setting, as described in “Add body and bite to your kick drum”.
Add body and bite to your kick drum
In MainStage, do any of the following:
Add some bass to your sound:
Use the Kick 2 filtered bass drum sound as a starting point, and try out the remaining parameters in the phase oscillator. You will discover that high saturation values make the sound rounder and add more bass, for example. The character of the example is beginning to head in the direction of a TR-909.
Enhance the attack transients of your sound:
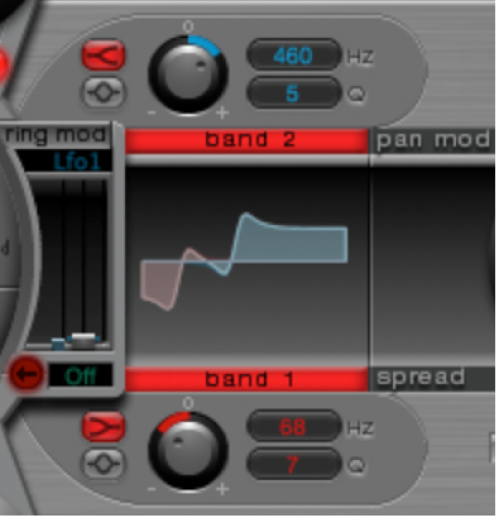
To get even closer to the TR-909, use an EQ setting as shown in the following figure. Note that the low frequency pressure point around 60 Hz (in the red area on the EQ graph) as well as the assertive punch or kick (the blue area starting at 460 Hz and up) of a 909 bass drum are strengthened. (This EQ setting is already part of the Kick 2 setting.)

Use envelopes to change the color of your sound:
In the example, all four envelope are being used. Take some time to play with the shapes of the envelopes, while maintaining the attack and decay settings. Experiment with the junction points of the decay phase in the different envelopes to familiarize yourself with the sound-shaping options available. Start with the decay phase of Env 4, which controls both the volume of oscillator 1 and filter resonance, and observe how reshaping the belly of the envelope can change the character of the sound from crisp and short to round and full.
Create an LFO-modulated “Ultrabeat” kick drum
You can create bass drum sounds that are uniquely “Ultrabeat.” Try modulating pitch with an LFO instead of an envelope, for example.
In MainStage, start with the Standard Tutorial sound at a pitch of A#0 (Osc 1 Pitch), and choose LFO 1 as the Mod source in the Osc 1 Pitch section.
Set the degree of modulation by dragging the blue Mod slider to a value of A3.
Set LFO 1 to a low number of Cycles (25 to 35), a high Rate (starting with 70 Hz and higher) and a medium value for Decay (set the Ramp knob to about −190).
Experiment with the LFO waveform and you’ll discover that you can attain different nuances in the character of the bass drum attack.
Modulate the Asym(metry) parameter with the same LFO, and also vary the Slope and Saturation values.
This method enables you to create very different bass drum sounds with a single oscillator, one LFO, and one envelope (for volume). The character of the sounds can range from soft to punchy, and the degree of tonality in the sound can be adjusted to taste.
Note: The bass drum sound described is listed as Kick 3 in the Tutorial Kit, at a pitch of D1.
Use the second oscillator (with similar settings or with a sample), or use the filter and the ring modulator—the sky’s the limit as far as your imagination is concerned, so go ahead and create that next “gotta have it” drum sound.
Note: You can find an “emulation” of the legendary 808 bass drum in Kick 4 in the Tutorial Kit, at a pitch of D#1.