Motion User Guide
- Welcome
- What’s new
-
- Intro to basic compositing
-
- Intro to transforming layers
-
- Intro to transforming layers in the canvas
- Transform layer properties in the canvas
- Transform tools
- Change layer position, scale, or rotation
- Move a layer’s anchor point
- Add a drop shadow to a layer
- Distort or shear a layer
- Crop a layer
- Modify shape or mask points
- Transform text glyphs and other object attributes
- Align layers in the canvas
- Transform layers in the HUD
- Transform 2D layers in 3D space
-
- Intro to behaviors
- Behaviors versus keyframes
-
- Intro to behavior types
-
- Intro to Parameter behaviors
- Audio behavior
- Average behavior
- Clamp behavior
- Custom behavior
- Add a Custom behavior
- Exponential behavior
- Link behavior
- Logarithmic behavior
- MIDI behavior
- Add a MIDI behavior
- Negate behavior
- Oscillate behavior
- Create a decaying oscillation
- Overshoot behavior
- Quantize behavior
- Ramp behavior
- Randomize behavior
- Rate behavior
- Reverse behavior
- Stop behavior
- Track behavior
- Wriggle behavior
-
- Intro to Simulation behaviors
- Align to Motion behavior
- Attracted To behavior
- Attractor behavior
- Drag behavior
- Drift Attracted To behavior
- Drift Attractor behavior
- Edge Collision behavior
- Gravity behavior
- Orbit Around behavior
- Random Motion behavior
- Repel behavior
- Repel From behavior
- Rotational Drag behavior
- Spring behavior
- Vortex behavior
- Wind behavior
- Additional behaviors
-
- Intro to using generators
- Add a generator
-
- Intro to image generators
- Caustics generator
- Cellular generator
- Checkerboard generator
- Clouds generator
- Color Solid generator
- Concentric Polka Dots generator
- Concentric Shapes generator
- Gradient generator
- Grid generator
- Japanese Pattern generator
- Lens Flare generator
- Manga Lines generator
- Membrane generator
- Noise generator
- One Color Ray generator
- Op Art 1 generator
- Op Art 2 generator
- Op Art 3 generator
- Overlapping Circles generator
- Radial Bars generator
- Soft Gradient generator
- Spirals generator
- Spiral Drawing generator
- Use Spiral Drawing onscreen controls
- Star generator
- Stripes generator
- Sunburst generator
- Truchet Tiles generator
- Two Color Ray generator
- Save a modified generator
-
- Intro to filters
- Browse and preview filters
- Apply or remove filters
-
- Intro to filter types
-
- Intro to Color filters
- Brightness filter
- Channel Mixer filter
- Color Adjustments filter
- Color Balance filter
- Example: Color-balance two layers
- Color Curves filter
- Use the Color Curves filter
- Color Reduce filter
- Color Wheels filter
- Use the Color Wheels filter
- Colorize filter
- Contrast filter
- Custom LUT filter
- Use the Custom LUT filter
- Gamma filter
- Gradient Colorize filter
- HDR Tools filter
- Hue/Saturation filter
- Hue/Saturation Curves filter
- Use the Hue/Saturation Curves filter
- Levels filter
- Negative filter
- OpenEXR Tone Map filter
- Sepia filter
- Threshold filter
- Tint filter
-
- Intro to Distortion filters
- Black Hole filter
- Bulge filter
- Bump Map filter
- Disc Warp filter
- Droplet filter
- Earthquake filter
- Fisheye filter
- Flop filter
- Fun House filter
- Glass Block filter
- Glass Distortion
- Insect Eye filter
- Mirror filter
- Page Curl filter
- Poke filter
- Polar filter
- Refraction filter
- Ring Lens filter
- Ripple filter
- Scrape filter
- Sliced Scale filter
- Use the Sliced Scale filter
- Sphere filter
- Starburst filter
- Stripes filter
- Target filter
- Tiny Planet filter
- Twirl filter
- Underwater filter
- Wave filter
-
- Intro to Stylize filters
- Add Noise filter
- Bad Film filter
- Bad TV filter
- Circle Screen filter
- Circles filter
- Color Emboss filter
- Comic filter
- Crystallize filter
- Edges filter
- Extrude filter
- Fill filter
- Halftone filter
- Hatched Screen filter
- Highpass filter
- Indent filter
- Line Art filter
- Line Screen filter
- MinMax filter
- Noise Dissolve filter
- Pixellate filter
- Posterize filter
- Relief filter
- Slit Scan filter
- Slit Tunnel filter
- Texture Screen filter
- Vignette filter
- Wavy Screen filter
- About filters and color processing
- Publish filter controls to Final Cut Pro
- Using filters on alpha channels
- Filter performance
- Save custom filters
-
- Intro to 3D objects
- Add a 3D object
- Move and rotate a 3D object
- Reposition a 3D object’s anchor point
- Exchange a 3D object file
- 3D object intersection and layer order
- Using cameras and lights with 3D objects
- Save custom 3D objects
- Guidelines for working with 3D objects
- Working with imported 3D objects
-
- Intro to 360-degree video
- 360-degree projects
- Create 360-degree projects
- Add 360-degree video to a project
- Create a tiny planet effect
- Reorient 360-degree media
- Creating 360-degree templates for Final Cut Pro
- 360-degree-aware filters and generators
- Export and share 360-degree projects
- Guidelines for better 360-degree projects
-
- Intro to settings and shortcuts
-
- Intro to Keyboard shortcuts
- Use function keys
- General keyboard shortcuts
- Audio list keyboard shortcuts
-
- Tools keyboard shortcuts
- Transform tool keyboard shortcuts
- Select/Transform tool keyboard shortcuts
- Crop tool keyboard shortcuts
- Edit Points tool keyboard shortcuts
- Edit shape tools keyboard shortcuts
- Pan and Zoom tools keyboard shortcuts
- Shape tools keyboard shortcuts
- Bezier tool keyboard shortcuts
- B-Spline tool keyboard shortcuts
- Paint Stroke tool keyboard shortcuts
- Text tool keyboard shortcuts
- Shape mask tools keyboard shortcuts
- Bezier Mask tool keyboard shortcuts
- B-Spline Mask tool keyboard shortcuts
- Transport control keyboard shortcuts
- View option keyboard shortcuts
- HUD keyboard shortcuts
- Inspector keyboard shortcuts
- Keyframe Editor keyboard shortcuts
- Layers keyboard shortcuts
- Library keyboard shortcuts
- Media list keyboard shortcuts
- Timeline keyboard shortcuts
- Keyframing keyboard shortcuts
- Shape and Mask keyboard shortcuts
- 3D keyboard shortcuts
- Miscellaneous keyboard shortcuts
- Touch Bar shortcuts
- Move assets to another computer
- Work with GPUs
- Glossary
- Copyright

Mask controls in the Inspector in Motion
A selected mask’s parameters appear in the Mask Inspector. These controls allow you to adjust how the mask is drawn, how each mask operates upon an object, and how masks are combined with one another. The Mask Inspector also lets you fine-tune mask control point positions.
The Mask Inspector contains the following adjustable controls:
Mask Controls
Roundness: A slider (available when a simple rectangle mask, Bezier mask, or B-Spline mask is selected) that adjusts the roundness of mask corners. Use this control to create rounded rectangles or to smooth the edges of a mask.
Preserve Scale: A checkbox (available when a simple rectangle mask, Bezier mask, or B-Spline mask is selected) that controls whether the Roundness setting is absolute or relative to the overall mask size. When the checkbox is selected, the roundness remains at the same approximate percentage of curvature as the object is scaled. When the checkbox is deselected, the curvature varies as the overall mask changes size.
Curvature: A slider (available when a simple circle mask is selected) that adjusts the degree of curvature of the circle. When set to 100 percent, the mask is elliptical. When set to 0 percent, the mask is a rectangular.
Radius: A slider (available when a simple circle mask is selected) that controls the width (X) and height (Y) of the mask. Click the disclosure triangle to reveal individual X and Y sliders.
Size: A slider (available when a simple rectangle mask is selected) that controls the size of the mask. Click the disclosure triangle to reveal individual Width and Height sliders.
Shape Type: A pop-up menu (available only for complex shapes) that sets the type of control points used to define the mask. For example, if you originally created a Bezier mask, you can choose B-Spline from this menu to change how the mask is drawn. Changing the shape type might dramatically change the mask’s form even though its control points remain fixed at their original coordinates. There are three options:
Linear: All of a mask’s control points are joined by hard angles, and the resulting mask is a polygon. The control points of a Linear mask lie directly on its edge.
Bezier: Control points can be a mix of Bezier curves and hard angles, creating any sort of mask. The control points of a Bezier mask lie directly on its edge.
B-Spline: Control points are all B-Spline points, with different degrees of curvature. B-Spline control points lie outside the surface of the mask, but are connected by the B-Spline frame.
Note: You can hide the B-Spline frame by deselecting the Lines menu item in the View pop-up menu above the canvas.
Mask Blend Mode: A pop-up menu that determines how a mask interacts with the alpha channel of the layer to which it’s applied. When a layer has multiple masks, each mask can have a different Mask Blend Mode. When this happens, each mask adds to, or subtracts from, the layer’s alpha channel according to the selected mode. The final alpha channel is the combined result of all masks applied. There are four menu options:
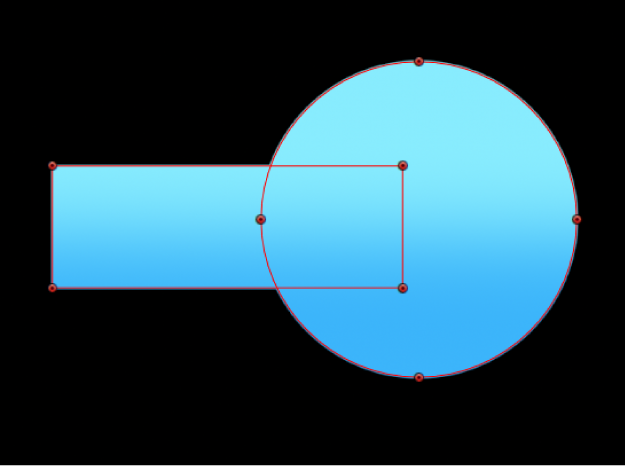
Add: Removes all pixels from areas outside the mask shape. Each new mask adds more transparency, letting more of the underlying image show through. The Add blend mode (the default for new masks) is useful for adding back regions of an image that other masks are cutting out or when masking multiple areas that do not intersect in a single image. In the following example, both the rectangle and circle masks remove areas outside of the mask shapes, revealing the underlying black canvas.
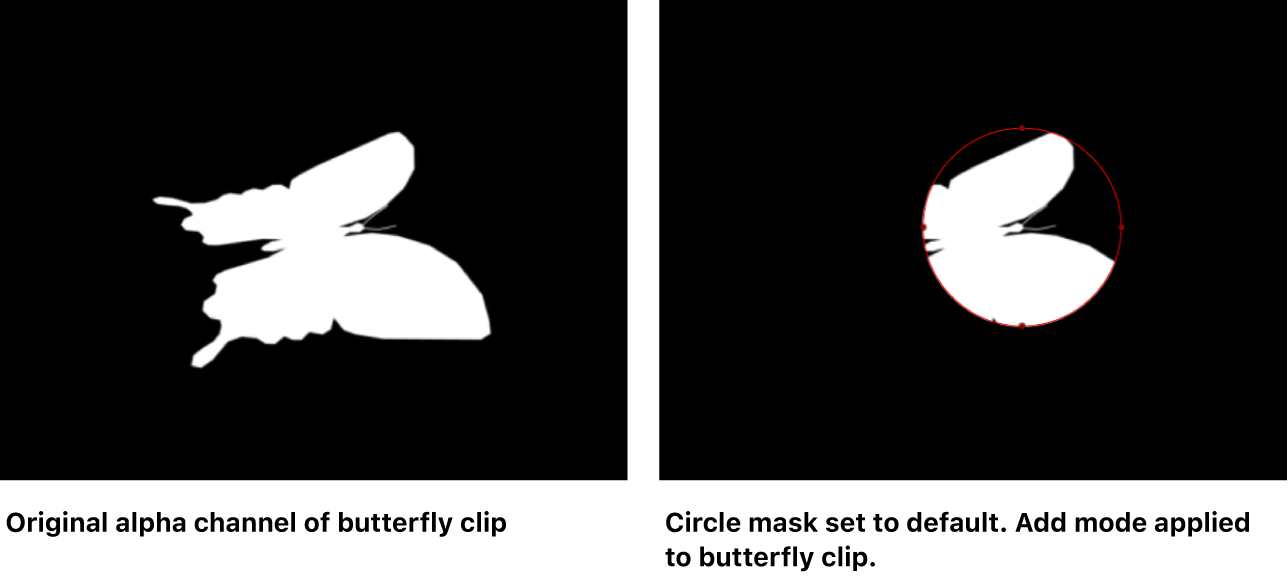
If the layer contains an alpha channel, a mask set to Add mode reveals only the masked section of the original alpha channel.
Note: To display the rest of a masked layer so you can trace it to create a second mask, turn off the first mask in the Layers list or Timeline. The outline of the first mask remains visible, even though it’s no longer affecting the layer’s transparency.
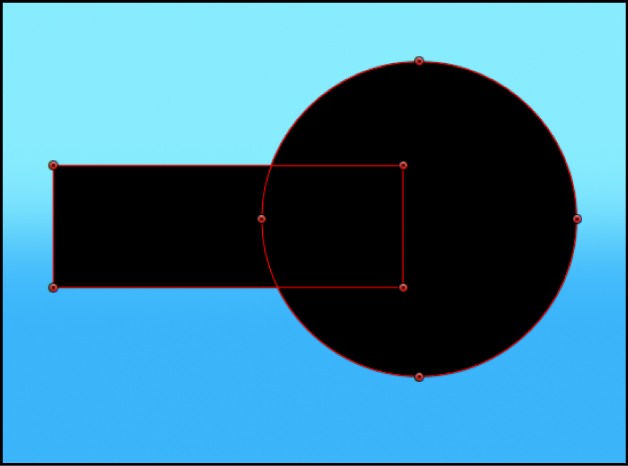
Subtract: Removes all pixels from the area inside the mask shape, effectively punching a hole in the image. In the following example, the rectangle and circle masks punch a hole through the blue gradient object, revealing the underlying black canvas.
Replace: Completely replaces the image object’s alpha channel as well as any other masks that appear beneath the mask in the Layers list. In the following example, the circle mask overrides the rectangle mask, because the circle mask (set to Replace) appears above the rectangle mask in the Layers list. See Combining multiple masks.
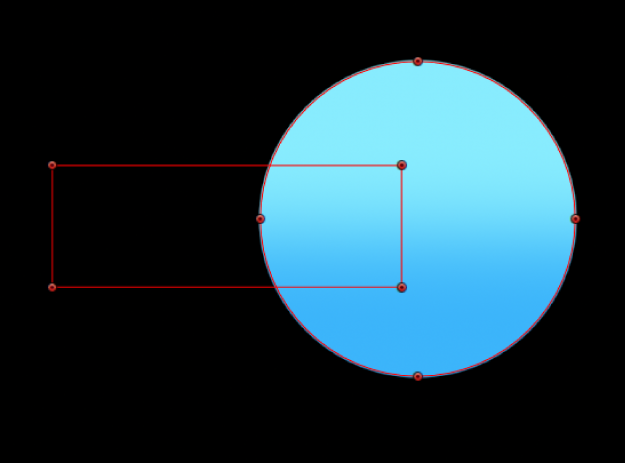
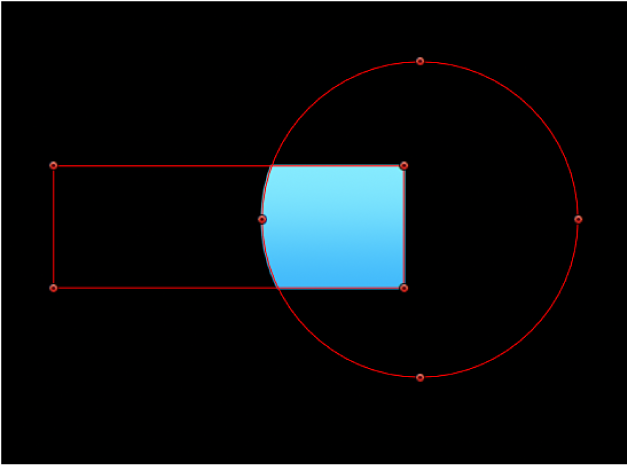
Intersect: Shows pixels only in regions where masks overlap. In the following example, only the overlapping areas of the rectangle and circle masks are visible.
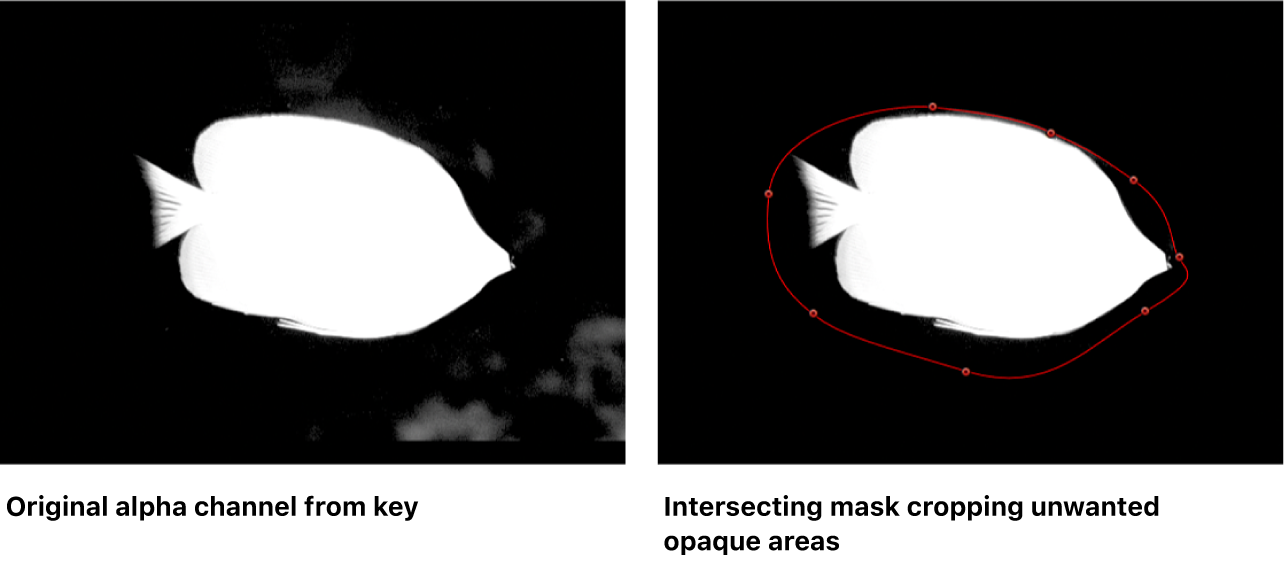
In another example, if you import a TIFF file with an alpha channel and you want to cut out part of it without losing alpha information, you must use the Intersect blend mode. This is also true for layers with keying filters applied.
Invert Mask: A checkbox that, when selected, reverses the mask—swapping its solid and transparent areas. This is useful if you need to switch the solid and transparent areas of an existing mask.
Tip: You can apply different filters and effects to the foreground and background of an image by first masking the foreground subject, duplicating the layer and its mask, then inverting the duplicate layer’s mask. Effects applied to the background can then be completely isolated from the foreground, or vice versa. You can adjust the opacity of a mask in the Properties Inspector.
Feather: A slider that softens the edges of a mask. Positive feathering values soften the edge of the mask from its edge outward. Negative feathering values soften the edge of a mask inward from the edge. Feathering the edge of a mask can soften a harsh rotoscoping job, making the masked object blend more easily with the background.
Falloff: A slider that controls how “steep” the feathering is. Higher values result in feathering that’s pushed farther inward, so the edge of the feathering effect is more transparent. Lower values result in the “core” of the feathering effect being pushed farther outward, so the edge of the feathering effect is less transparent.
Fixed Feather: A checkbox that controls feathering when a mask is scaled using the Scale parameter in the Properties Inspector (or using the 2D or 3D Transform tools in the canvas).
Set the feather to ignore scaling: Turn the checkbox on. Feathering is applied after the mask is scaled, so scaling only affects the mask (not the feathered edge). If you adjust the scale disproportionately, the feathering remains constant.
Set the feather to scale with the mask: Turn the checkbox off. Feathering is applied before the mask is scaled, so scaling affects both the mask and the feathered edge. If you adjust the scale disproportionately, feathering variations are introduced.
Note: When you scale a mask using the Size or Radius parameters in the Mask Inspector, the Fixed Feather checkbox has no effect.
Mask Color: A pop-up menu that controls the color of the mask as displayed in the canvas when it’s selected. This setting has no effect on the final output. Setting masks to different colors may aid you in identifying which mask is which.
Convert to Points: A button (available when a simple mask is selected) that, when clicked, converts a simple mask to a complex mask with editable control points. See Convert a shape or mask to control points.
Control Points controls
When a complex mask with control points is selected, this list becomes available, displaying the X and Y position parameters for the mask’s control points. The Control Points list also contains a single Animation menu (the down arrow that appears when you move the pointer over the right side of the Control Points heading row) that affects all the control points, letting you add keyframes, reset the shape’s animation, display the animation curve in the Keyframe Editor, and so on. For more information on using the Animation menu, see Animation menu controls.
To show or hide the Control Point lists, double-click the Control Points name in the Inspector.
Download this guide: PDF