MainStage User Guide
- Welcome
-
- Overview of Edit mode
-
- Select patches and sets in the Patch List
- Copy, paste, and delete patches
- Reorder and move patches in the Patch List
- Add and rename patches
- Create a patch from several patches
-
- Overview of the Patch Settings Inspector
- Select patch settings in the Patch Library
- Set the time signature for patches
- Change the tempo when you select a patch
- Set program change and bank numbers
- Defer patch changes
- Instantly silence the previous patch
- Change patch icons
- Transpose the pitch of incoming notes for a patch
- Change the tuning for a patch
- Add text notes to a patch
-
- Overview of channel strips
- Add a channel strip
- Change a channel strip setting
- Configure channel strip components
- Show signal flow channel strips
- Hide the metronome channel strip
- Create an alias of a channel strip
- Add a patch bus
- Set channel strip pan or balance positions
- Set channel strip volume levels
- Mute and solo channel strips
- Use multiple instrument outputs
- Use external MIDI instruments
- Reorganize channel strips
- Delete channel strips
-
- Overview of the Channel Strip Inspector
- Choose channel strip settings
- Rename channel strips
- Change channel strip colors
- Change channel strip icons
- Use feedback protection with channel strips
- Set keyboard input for a software instrument channel strip
- Transpose individual software instruments
- Filter MIDI messages
- Scale channel strip velocity
- Set channel strips to ignore Hermode tuning
- Override concert- and set-level key ranges
- Add text notes to a channel strip in the Channel Strip Inspector
- Route audio via send effects
-
- Screen Control Inspector overview
- Replace parameter labels
- Choose custom colors for screen controls
- Change background or grouped screen control appearance
- Set screen controls to show the hardware value
- Set parameter change behavior for screen controls
- Set hardware matching behavior for screen controls
- Reset and compare changes to a patch
- Override concert- and set-level mappings
-
- Overview of mapping screen controls
- Map to channel strip and plug-in parameters
- Map screen controls to actions
- Map a screen control to multiple parameters
- Use screen controls to display PDF document pages
- Edit the saved value for a mapped parameter
- Set drum pads or buttons to use note velocity
- Map screen controls to all channel strips in a patch
- Undo screen control parameter mappings
- Remove screen control mappings
- Work with graphs
- Create controller transforms
- Share patches and sets between concerts
- Record the audio output of a concert
-
- Overview of concerts
- Create a concert
- Open and close concerts
- Save concerts
- How saving affects parameter values
- Clean up concerts
- Consolidate assets in a concert
- Rename the current concert
-
- Overview of the Concert Settings Inspector
- Set MIDI Routing to channel strips
- Transpose incoming note pitch for a concert
- Define the program change message source
- Send unused program changes to channel strips
- Set the time signature for a concert
- Change the tuning for a concert
- Set the pan law for a concert
- Add text notes to a concert
- Control the metronome
- Silence MIDI notes
- Mute audio output
-
- Layout mode overview
-
- Screen control parameter editing overview
- Lift and stamp screen control parameters
- Reset screen control parameters
- Common screen control parameters
- Keyboard screen control parameters
- MIDI activity screen control parameters
- Drum pad screen control parameters
- Waveform screen control parameters
- Selector screen control parameters
- Text screen control parameters
- Background screen control parameters
- How MainStage passes through MIDI messages
- Export and import layouts
- Change the aspect ratio of a layout
-
- Before performing live
- Use Perform mode
- Screen controls in performance
- Tempo changes during performance
- Tips for performing with keyboard controllers
- Tips for performing with guitars and other instruments
- Tune guitars and other instruments with the Tuner
- The Playback plug-in in performance
- Record your performances
- After the performance
- Tips for complex hardware setups
-
- Overview of keyboard shortcuts and command sets
-
- Concerts and layouts keyboard shortcuts
- Patches and sets (Edit mode) keyboard shortcuts
- Editing keyboard shortcuts
- Actions keyboard shortcuts
- Parameter mapping (Edit mode) keyboard shortcuts
- Channel strips (Edit mode) keyboard shortcuts
- Screen controls (Layout mode) keyboard shortcuts
- Perform in Full Screen keyboard shortcuts
- Window and view keyboard shortcuts
- Help and support keyboard shortcuts
-
-
- Use MIDI plug-ins
-
- Arpeggiator overview
- Arpeggiator control parameters
- Note order parameters overview
- Note order variations
- Note order inversions
- Arpeggiator pattern parameters overview
- Use Live mode
- Use Grid mode
- Arpeggiator options parameters
- Arpeggiator keyboard parameters
- Use keyboard parameters
- Assign controllers
- Modifier controls
- Note Repeater controls
- Randomizer controls
-
- Use Scripter
- Use the Script Editor
- Scripter API overview
- MIDI processing functions overview
- HandleMIDI function
- ProcessMIDI function
- GetParameter function
- SetParameter function
- ParameterChanged function
- Reset function
- JavaScript objects overview
- Use the JavaScript Event object
- Use the JavaScript TimingInfo object
- Use the Trace object
- Use the MIDI event beatPos property
- Use the JavaScript MIDI object
- Create Scripter controls
- Transposer controls
-
-
- Alchemy overview
- Alchemy interface overview
- Alchemy Name bar
- Alchemy file locations
-
- Alchemy source overview
- Source master controls
- Import browser
- Source subpage controls
- Source filter controls
- Source filter use tips
- Source elements overview
- Additive element controls
- Additive element effects
- Spectral element controls
- Spectral element effects
- Pitch correction controls
- Formant filter controls
- Granular element controls
- Sampler element controls
- VA element controls
- Wide unison mode
- Source modulations
- Morph controls
- Alchemy master voice section
- Alchemy Extended parameters
-
- Playback plug-in overview
- Add a Playback plug-in
- Playback interface
- Use the Playback waveform display
- Playback transport and function buttons
- Playback information display
- Playback Sync, Snap To, and Play From parameters
- Use the Playback group functions
- Use the Playback Action menu and File field
- Use markers with the Playback plug-in
-
- Sample Alchemy overview
- Interface overview
- Add source material
- Edit mode
- Play modes
- Source overview
- Synthesis modes
- Granular controls
- Additive effects
- Additive effect controls
- Spectral effect
- Spectral effect controls
- Filter module
- Lowpass, bandpass, and highpass filters
- Comb PM filter
- Downsampler filter
- FM filter
- Envelope generators
- Mod Matrix
- Modulation routing
- Motion mode
- Trim mode
- More menu
-
- Sculpture overview
- Sculpture interface
- Global parameters
- Amplitude envelope parameters
- Use the Waveshaper
- Filter parameters
- Output parameters
- Define MIDI controllers
- Extended parameters
-
- Studio Piano
- Copyright

Morph drum beats in Alchemy in MainStage
This tutorial guides you through the process of importing two drum beats and then morphing between them. You will initially morph all elements collectively, then each individually.
Note: Images shown in tutorials are not specific to presets used in tasks. They are included as a guide to help you find areas and parameters in the Alchemy interface.
Import and morph multiple drum loops in Alchemy
The loops used for this example are from the Electro House and Tech House loop libraries. If you can’t find the loops, you need to download these additional content packages. To do so, choose Sound Library > Open Sound Library Manager from the Logic Pro menu, then download the missing content.
In Alchemy in MainStage, click the File button in the Name bar and choose Initialize Preset from the pop-up menu to reset all Alchemy parameters to default settings.
Important: Use of Initialize Preset automatically turns on wide unison mode. See Alchemy wide unison mode.
Click the source select field for source A and choose Import Audio.
The Import window opens.
Open the Apple Loops browser, and type “Lockstep” in the search field. Drag the Lockstep Beat 02 loop to the Dropzone area of the Import window.
Click the Spectral and Formant analysis mode buttons at the lower left, then click the Import button.
This determines the synthesis engine used for resynthesis of the audio sample. Spectral + Formant is a good general purpose option that works well for drum loops. It’s also the default setting in a new instance of Alchemy. When analysis is complete, you can trigger the loop at its native pitch by playing C3 on your keyboard.
Drag the Insider Groove Beat loop to the controls area of source B.
This alternative import method triggers the Import process automatically, using the previously selected analysis mode.
Play C3 to trigger both loops at once. The loops are 8 beats long and have a native tempo of 120, so playback is nicely synchronized. Although there are techniques for tempo matching imported loops, it is simpler to use matched samples and improves the potential for getting good results with minimal effort. If the loops have a very different groove, click the Edit button to open the main edit window, where you can do any of the following:
In the waveform display, create warp markers to divide the loop into equal length segments. The number of markers required depends on the length and complexity of the loop. Aim to have a segment for each significant beat in the loop.
Slide each warp marker forward or back as necessary to align it with the nearest drum hit transient. Hold a warp marker in the waveform display to zoom horizontally for more accurate adjustments.
Switch to the other drum loop source with the A/B/C/D buttons at the top left of the main edit window.
Slide each warp marker forward or back as before to align each with the nearest drum transient.
Click the A button (under Global), then choose Continuous from the source A Loop Mode pop-up menu. Repeat this step for the source B loop.
This sets both beats to loop continuously while you hold down a note.
Turn off the Velocity On button in the modulation rack.
When triggering loops, it can be helpful to disable velocity control of the playback level so the loops trigger with the same loudness regardless of how hard you play. If the modulation area doesn’t show this parameter, click the Global button, then click the center of the Master Volume knob shown at the upper right.

Click the Morph button at the left to show the morphing section at the upper right, then drag the handle in the middle of the morph control area from left to right to hear the level of each source crossfade.
The default view shows XY set to crossfade, not morph, between the sources.
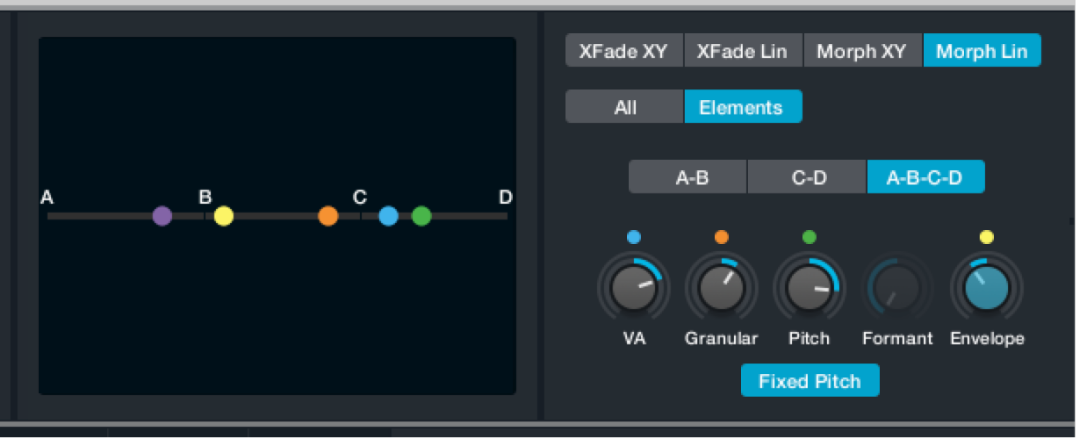
Select one of the two morph buttons in the morphing section to access the elemental morphing controls. Because there are only two sources, click the Morph Linear button, then click the A-B button to limit morphing to these two sources.

Drag the handle between the two sources while holding a note to create a fundamentally different effect than the crossfade between them.
What you can hear is a true morphing between discrete components of each sound. The transition is not simply between the overall level of each sound, but between the levels of multiple narrow frequency bands and the formant characteristics of each sound.
Drag the handle to the far left, then listen as you move slowly to the right to hear a phantom shaker-like rhythm that doesn’t exist in either loop. Once you have finished exploring, move the handle back to the far left before looking at the next task.
Morph elements independently in Alchemy
In Alchemy in MainStage, click the Elements button in the morph section to access controls that allow independent morphing between different sound elements, as opposed to morphing all sonic aspects simultaneously.
Play C3 on your keyboard, then move the Spectral control handle (orange dot) from left to right. You can also rotate the Spectral knob.
You can hear the spectral components of the first loop transition to those of the second loop. The change is similar to that heard in step 10 of the previous task, but the phantom shaker rhythm is clearer, and the kick sound from the Lockstep Beat remains intact longer. In fact, this combination causes the kick to change tone and become more pronounced at beat 1 of each bar. When the Spectral control is full right, the original kicks are replaced by a pronounced “thump” at the head of each bar.
Morph pitch and formants in Alchemy
In Alchemy in MainStage, move the Pitch handle (green dot) from left to right. You can also rotate the Pitch knob.
Drum beats don’t generally contain much pitched information, so use of the Pitch control may have little impact when working with loops. In this case, however, setting Pitch to the far right position results in the prominent high tom of the Insider Groove Beat becoming louder near beat 2. Only the tail of the pitch pushes through however, creating an eighth note rhythm that starts near beat 3.

Set Formant (purple dot) to 75%-100% to make the onset of the tom pitch more clearly audible. You can also rotate the Formant knob to set this value.
Set the Spectral knob to zero.
You can hear the arc of the tom hit, but without tonal characteristics because there’s little spectral material at this point in the Lockstep loop. This demonstrates the important role that resonances play in human perception of pitch information.
Assign performance controls to morphed drum loop elements in Alchemy
In Alchemy in MainStage, Control-click the Position knob for source A, then choose Add Modulation > LFO > LFO1 from the shortcut menu.
In the modulation section, click the Shape pop-up menu for LFO1 and choose Basic > RampUp.

Switch off Bipolar mode for the LFO, and set Rate to the same number of beats as the loop. For example, set the Rate knob to 4 beats for a one-bar loop, or to 8 beats for a two-bar loop, and so on.
Control-click the Position knob for source A, and choose Copy Modulation from the shortcut menu.
Click the source B button to view source B parameters.
Control-click the Position knob for source B, and choose Paste Modulation from the shortcut menu.
The playback position of both loops is now controlled by LFO1, and they play back in sync with the project tempo.
Click the Morph button to view morphing parameters, then click the Morph Lin button.
Click the A-B button to use the X knob to morph between the two time-aligned drum loops.
As an optional step, you can click the Elements button to use or assign element controls.

Control-click the Spect/Gran knob (orange dot), and choose Add Modulation > Perform > XYPad1X from the shortcut menu.
Control-click the Pitch knob (green dot), and choose Add Modulation > Perform > XYPad1Y from the shortcut menu.
You can now use the left X/Y pad in the Perform section to morph the spectral data by moving the pointer horizontally. You can morph pitch data by moving the pointer vertically.
Control-click the Formant knob (purple dot), and choose Add Modulation > Perform > XYPad2X from the shortcut menu.
Control-click the Envelope knob (yellow dot), and choose Add Modulation > Perform > XYPad2Y from the shortcut menu.
You can now use the right X/Y pad in the Perform section to morph the formant filters by moving the pointer horizontally. You can morph the envelope shape by moving the pointer vertically.