
Rediger iCloud-kontooplysninger
Dit Apple-id er den konto, du bruger til alle Apples tjenester, inklusive iCloud, iTunes og App Store. Du kan skifte dit Apple-id, dit fotografi og dine kontakt-, sikkerheds- og betalingsoplysninger direkte fra iClouds indstillinger.
Du finder oplysninger om, hvordan du ændrer dine kontooplysninger på iCloud.com, i Oversigt over Indstillinger i Hjælp til iCloud.
Du finder oplysninger om, hvordan du ændrer indstillinger til iCloud-kontoen ved hjælp af en iOS-enhed, i afsnittet om iCloud i brugerhåndbogen til iPhone, iPad eller iPod touch.
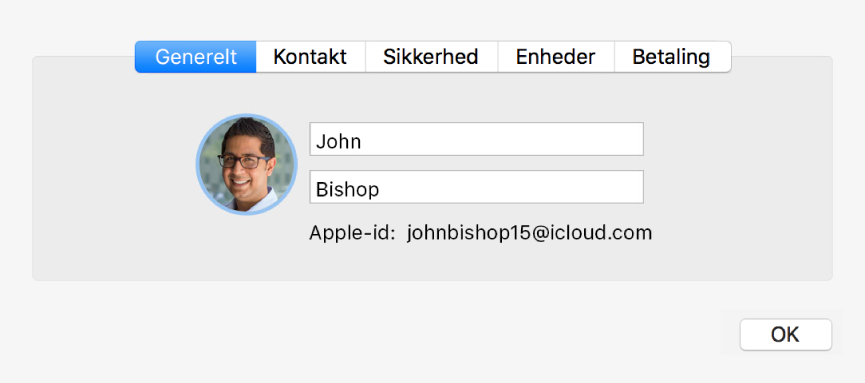
Rediger generelle oplysninger
Vælg Apple > Systemindstillinger, klik på iCloud og klik derefter på Kontooplysninger.
Klik på Generelt, og se eller rediger følgende:
For- og efternavn: Skriv navnet, der er tilknyttet dit Apple-id. Navnet vises ind imellem til andre brugere, når funktionerne til iCloud-deling bruges.
Apple-id: Identificerer denne Apple-id-konto.
Billede: Klik på dit billede, eller træk et billedarkiv fra Finder ind på billedet, og gør derefter et af følgende:
Brug et billede, der følger med macOS: Klik på Standardbilleder, og vælg derefter et billede.
Tag et billede vha. din Mac: Klik på Kamera. Klik derefter på Tag fotografi, når du er klar.
Brug et billede fra programmet Fotos: Klik på Fotos. Du kan få vist bestemte fotografier fra et bestemt tidspunkt, sted eller album ved at klikke på en infotrekant under fotografierne og derefter vælge en gruppe fotografier. Vælg et billede, og klik derefter på Næste.
Zoom ind eller ud: Træk mærket til venstre eller højre.
Flyt billedet: Træk billedet rundt i cirklen.
Rediger kontaktoplysninger
Vælg Apple > Systemindstillinger, klik på iCloud og klik derefter på Kontooplysninger.
Klik på Kontakt, og se eller rediger følgende:
E-mailadresser: Tilføj og fjern e-mailadresser og telefonnumre, der er forbundet med dit Apple-id. Venner og familie bruger dem til at dele noter og dokumenter med dig og til at komme i kontakt med dig via iMessage, FaceTime m.m.
Primær adresse: Rediger postadressen til dit Apple-id.
Fødselsdag: Ret din fødselsdag, hvis den er angivet forkert. Den bruges til bekræftelse af din identitet, hvis du glemmer din adgangskode eller har brug for at nulstille den.
Bemærk: Du kan ændre din fødselsdag én gang, og du har 24 timer efter at have redigeret den til at rette eventuelle fejl.
Et barn under 13 år (alder afhænger af land eller område) kan ikke ændre fødselsdagsoplysninger.
E-mailindstillinger: Vælg, hvilke typer oplysninger Apple skal sende til dine e-mailadresser.
Rediger sikkerhedsoplysninger
Vælg Apple > Systemindstillinger, klik på iCloud og klik derefter på Kontooplysninger.
Klik på Sikkerhed, og se eller rediger følgende:
Adgangskode til Apple-id: Du kan ændre din adgangskode til beskyttelse af dine oplysninger i iCloud og muligheden for at finde og slette din Mac eksternt vha. Find min Mac. Du kan få flere oplysninger i Gode råd om oprettelse af sikre adgangskoder.
Når du har ændret din adgangskode til Apple-id, skal du opdatere den i alle e-mailprogrammer fra tredjeparter, som du bruger til at hente din iCloud-mail med.
Sikkerhedsspørgsmål: Hvis denne indstilling vises, kan du ændre de sikkerhedsspørgsmål og svar, som Apple bruger til bekræftelse af din identitet. Denne indstilling vises ikke, hvis tofaktorgodkendelse er slået til.
Reserve-e-mailadresse: Hvis denne indstilling vises, kan du tilføje eller ændre den e-mailadresse, som Apple kan bruge til at sende dig en henvisning til bekræftelse af din identitet og til at lade dig nulstille dine oplysninger, hvis der opstår sikkerhedsproblemer af nogen art. Denne indstilling vises ikke, hvis tofaktorgodkendelse er slået til.
E-mailadresse til meddelelser: Hvis denne indstilling vises, kan du ændre den e-mailadresse, som Apple bruger til at sende dig en kopi af alle e-mails om Apple-id, der sendes til din primære e-mailadresse (vist i dine kontaktoplysninger som beskrevet ovenfor). Du kan få oplysninger om, hvornår denne indstilling vises, i Apple-supportartiklen Sådan administreres e-mailadresser til Apple-id.
Tofaktorgodkendelse: Viser, om tofaktorgodkendelse er slået til for dit Apple-id.
Hvis tofaktorgodkendelse er slået til, og du skal bruge bekræftelseskode til at logge ind på en anden enhed eller iCloud.com, skal du klikke på Hent bekræftelseskode.
Hvis tofaktorgodkendelse er slået til, og du vil tilføje godkendte telefonnumre, skal du klikke på knappen Tilføj
 , indtaste et telefonnummer og vælge en bekræftelsesmetode, og derefter klikke på Fortsæt.
 Du skal bekræfte mindst et godkendt telefonnummer, når du tilmelder dig tofaktorgodkendelse. Du bør også overveje at bekræfte andre telefonnumre, som du kan bruge, f.eks. et privat nummer eller et nummer, der bruges af et familiemedlem eller en nær ven. Godkendte telefonnumre modtager ikke automatisk bekræftelseskoder. Hvis du ikke kan få adgang til dine egne enheder midlertidigt, skal du klikke eller trykke på “Fik du ikke en bekræftelseskode?” på den nye enhed og derefter vælge en af dine godkendte telefonnumre for at modtage bekræftelseskoden.
Hvis tofaktorgodkendelse er slået fra, og du vil slå det til, skal du klikke på Slå tofaktorgodkendelse til.
Du kan også slå tofaktorgodkendelse til eller fra og administrere dine godkendte enheder og telefonnumre ved at logge ind på din kontoside til Apple-id.
Bekræftelse i to trin: Hvis disse oplysninger vises i stedet for tofaktorgodkendelse, er bekræftelse i to trin slået til for dit Apple-id. Hvis der vises en meddelelse om, at du skal skifte til tofaktorgodkendelse, skal du læse Apple-supportartiklen Skift fra totrinsbekræftelse til tofaktorgodkendelse.
Administrer dine iCloud-enheder
Vælg Apple > Systemindstillinger, klik på iCloud og klik derefter på Kontooplysninger.
Klik på Enheder, og se eller rediger følgende:
Se oplysninger om en enhed: Vælg enheden på listen til venstre. Besvar eventuelle sikkerhedsspørgsmål, du bliver bedt om at svare på.
Fjern en enhed: Klik på enheden på listen til venstre, og klik derefter på Fjern fra konto.
Hvis du mister en Mac, en iOS-enhed eller et Apple Watch med watchOS 3, kan du muligvis finde og beskytte den i stedet for at fjerne den fra din konto. Du kan få flere oplysninger i Brug Find min Mac og Oversigt over Find min iPhone i Hjælp til iCloud.
Hvis du mister et Apple Watch med watchOS 2, og Aktiveringslås er slået til på det, kan du markere det som mistet i stedet for at fjerne det. Det bevirker, at dit Apple-id og din adgangskode skal bruges til at gøre dit Apple Watch aktivt igen og bruge det. Du kan få flere oplysninger i Administration af dine enheder i iCloud-hjælp.
Dine AirPods vises på listen over enheder i Find min iPhone, men ikke på listen over enheder på din kontoside til Apple-id eller på iCloud.com eller din iPhone, iPad, iPod touch eller Mac. Du kan fjerne dine AirPods fra din konto via Find min iPhone.
Bemærk: Hvis du fjerner en enhed, der er indstillet til at bruge Apple Pay, slås Apple Pay fra for den pågældende enhed, og dine kort fjernes fra enheden, også selvom den er offline. Du kan få flere oplysninger i Brug Wallet & Apple Pay på din Mac.
Hvis du fjerner en enhed fra din konto, og enheden opretter en ny forbindelse til internettet, mens den stadig er logget ind på iCloud, vises enheden igen på din liste over iCloud-enheder. Hvis du ikke kan logge ud fra iCloud på enheden, kan du måske slette enheden eksternt. Du kan få flere oplysninger i Oversigt over Find min iPhone i Hjælp til iCloud.
Skift betalingsmetode
Vælg Apple > Systemindstillinger, klik på iCloud og klik derefter på Kontooplysninger.
Klik på Betaling, og se eller rediger følgende:
Tilføj en betalingsmetode: Denne knap vises kun, hvis du ikke har indstillet en betalingsmetode til dit Apple-id. Klik på denne knap for at indtaste dine kreditkortoplysninger og din faktureringsadresse.
Primær betalingsmetode: Klik på Oplysninger, og rediger derefter dine kreditkortoplysninger og din leveringsadresse.
Betalingsmetode til Familiedeling: Identificerer det kreditkort til køb i iTunes Store, App Store og iBooks Store, der deles af alle familiemedlemmer. Familiens arrangør kan ændre det i vinduet iCloud eller i iTunes på sin Mac eller iOS-enhed.
Betalingsmetoden til Familiedeling vises ikke, hvis du er familiens arrangør, og det Apple-id, du bruger til at logge ind på iCloud med, er det samme som det Apple-id, du bruger til køb, du deler med din familie. I så fald deler familiemedlemmerne din primære betalingsmetode til køb i iTunes Store, App Store og iBooks Store.
Hvis du er familiens arrangør, og du ikke logger ind på iCloud med det samme Apple-id, som du bruger til deling af køb, kan du ændre betalingsmetoden til Familiedeling i iTunes. Der er flere oplysninger om brug af et andet Apple-id i Del køb med din familie.
Du kan finde flere oplysninger om brug af iTunes til at ændre betalingsmetoden i Administrer din iTunes Store-konto i iTunes-hjælp.
Du kan også ændre dine kontooplysninger ved at logge ind på din kontoside til Apple-id.