Apple Diagnostics for Self Service Repair
To help isolate the cause of an issue on a device you’re troubleshooting, you may be prompted to use Apple Diagnostics for Self Service Repair or Apple Diagnostics for Repair diagnostic test suites. A diagnostic suite consists of multiple diagnostic tests. Running these test suites can help isolate issues, investigate whether a part needs to be replaced, and verify that a repair has been successfully completed.
Diagnostic choices
Apple Diagnostics for Repair refers to running diagnostic test suites directly on the device being tested. Apple Diagnostics for Self Service Repair refers to running diagnostic test suites over the web using a secondary device. Both methods provide the same set of diagnostic test suites.
Apple Diagnostics for Repair
Running Apple Diagnostics for Repair directly on the device being tested is the easiest way to run diagnostic test suites if the device meets the requirements to do so. The device uses its built-in display as a diagnostic console to select, run, and display test suites and results.
Apple Diagnostics for Self Service Repair
If your device doesn’t meet the requirements for Apple Diagnostics for Repair, has issues that prevent you from using the display, or if you otherwise can't use Apple Diagnostics for Repair, you can access these same suites online using a secondary device using Apple Diagnostics for Self Service Repair. To access the test suites online, you'll need a separate, secondary device with a web browser and internet access. The second device serves as a diagnostic console, where you’ll enter the serial number of the device that you’re servicing.
You’ll select the recommended diagnostic test suite on the secondary device. When the diagnostic test has finished running, results will appear on the diagnostic console on the secondary device. Examine the results to help isolate the cause of the issue on the device being tested.
How to run Apple Diagnostics for Repair
Requirements
To use Apple Diagnostics for Repair, you'll need:
An iPhone 12 or later to be tested that can turn on and start up in iOS. If the iPhone doesn't turn on or start up, refer to troubleshooting for battery and charging issues.
An iPad Air (M2) or iPad Pro (M4) or later to be tested that can turn on and start up in iPadOS. If the iPad doesn't turn on or start up, refer to troubleshooting for battery and charging issues.
Important: The device you're testing must have iOS 18 or iPadOS 18 or later to run Apple Diagnostics for Repair directly from the device being tested. Beta versions of iOS and iPadOS are not supported. Refer to Update your iPhone or iPad for instructions to update the device. Ensure that the device’s software is up to date before continuing.
Note: You don't need a secondary device to run Apple Diagnostics for Repair directly from the device being tested.
A Wi-Fi connection on the device to be tested
Note: The device to be tested only supports a Wi-Fi connection when in diagnostics mode. Cellular connections aren't supported.
Prepare the device you're testing
If you're able to install the latest iOS or iPadOS, update the device's software before continuing.
Unplug all accessories from the device.
Remove any case or cover from the device.
Put the device you're testing in diagnostics mode
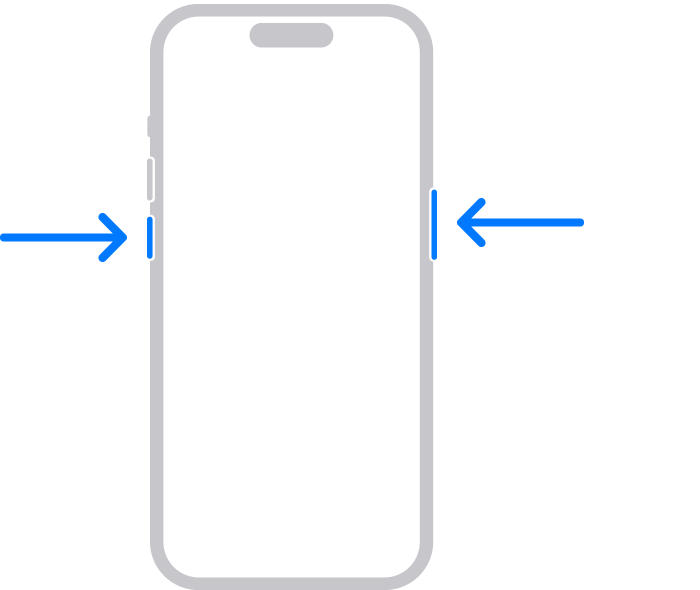
Turn off the device:
Simultaneously press and hold the side or top button and either volume button until the sliders appear, then drag the Power Off slider.
Wait 30 seconds for the device to turn off.
Press and hold both the volume up and volume down buttons.
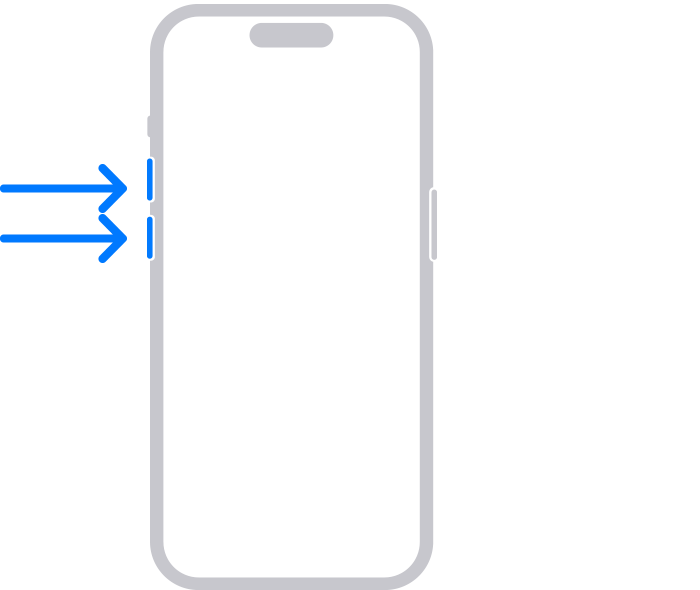
While holding down the buttons, plug the device into a 20W or higher power adapter or directly to a computer that's turned on and connected to an electrical outlet. A wireless charging connection such as MagSafe is not supported; the connection must be wired. Hubs, displays, or other indirect connections are not supported.
When the Apple logo appears, release the buttons.
When the message Diagnostics & Repair appears, the device is in Diagnostics Mode. Tap Continue to select a Wi-Fi network and agree to terms and conditions.

Select and Run Diagnostics
When a screen with the message Diagnose or Repair appears, tap Run Diagnostics on this screen to see a menu listing available diagnostic suites, where you can select and run diagnostic suites.

Important: You may see a Finish Repair button on the Diagnose or Repair screen. This means that a repair has been performed on the device and steps need to be taken to complete configuration to finish that repair. If you see this button, tap Finish Repair to complete configuration using Repair Assistant.
Note: If you encounter any issues navigating these diagnostic screens, restart the device and try again.
Follow instructions on the device’s screen to select and run diagnostic test suites, and examine diagnostic test results.

How to run Apple Diagnostics for Self Service Repair
Requirements
To use Apple Diagnostics for Self Service Repair, you'll need:
An iPhone 12 or later to be tested that can turn on and start up in iOS. If the iPhone doesn't turn on or start up, refer to troubleshooting for battery and charging issues.
Important: The device you're testing must have iOS 17 or later to run Apple Diagnostics for Self Service Repair on a web browser. Beta versions of iOS are not supported. Refer to Update your iPhone or iPad for instructions to update the device. Ensure that the device’s software is up to date before continuing.
A secondary device such as a Mac, PC, iPad, or iPhone to access the Apple Diagnostics for Self Service Repair website and diagnostic console. The diagnostic console is supported on the following secondary devices:
An iPhone running iOS 13 or later or iPad running iPadOS 13 or later with Safari
A Mac running macOS Catalina 10.15 or later with Safari
A PC with Chrome 55 or later, Firefox 59 or later, or Microsoft Edge 12 or later
A Wi-Fi connection on the device to be tested
Note: The device to be tested only supports a Wi-Fi connection when in diagnostics mode. Cellular connections aren't supported.
A Wi-Fi, cellular, or wired internet connection on the secondary device
Prepare the device you're testing
If you're able to install the latest iOS , update the device's software before continuing.
Unplug all accessories from the device.
Remove any case or cover from the device.
Write down the device’s serial number.
Follow instructions in the previous section of this article to put the device you’re testing into Diagnostics Mode. When the message Diagnostics & Repair appears, the device is in Diagnostics Mode.
Start Apple Diagnostics for Self Service Repair on the secondary device
On the secondary device, go to https://getsupport.apple.com/self-service-diagnostics.
Click or tap Continue on the Apple Diagnostics for Self Service Repair page.
Choose iPhone.
Enroll in and start a diagnostic session
On the Apple Diagnostics for Self Service Repair page on the secondary device, enter the serial number of the device you're testing.
Note: To find the serial number of the device you’re testing, tap the information icon in the lower-right corner of the diagnostics screen.
On the Apple Diagnostics for Self Service Repair page on the secondary device, click or tap Start Session.
On the device you're testing, a screen with the message Diagnostics & Repair will appear when it is in Diagnostics Mode. Tap Continue (iOS 18 and later) or Start Session (iOS 16.4 - 17.6) to select a Wi-Fi network, agree to terms and conditions, and to enroll the device in a diagnostic session.
Note: If the device doesn't enroll in a diagnostic session, click or tap Try again on the Apple Diagnostics for Self Service Repair page on the secondary device.
After you start a session on the diagnostic console (step 2) and successfully enroll the device (step 3), a list of available diagnostic test suites will appear on the diagnostic console on the secondary device.
Follow instructions to select and run diagnostic test suites and examine diagnostic test results from the diagnostic console on the secondary device.
Available diagnostic test suites
Diagnostic suite | iPhone 15 and iPhone 15 Plus | All other supported iPhones | iPad |
|---|---|---|---|
Mobile Resource Inspector (MRI) | Yes | Yes | Yes |
Display Pixel Anomalies | Yes | Yes | Yes |
Multi-Touch | Yes | Yes | No |
Camera Image Quality | Yes | Yes | No |
Face ID | Yes | Yes | Yes |
Audio for Self Service Repair | Yes | No | No |
Audio Output | No | Yes | No |
Mobile Resource Inspector (MRI)
This diagnostic suite is an initial assessment tool that checks the device's software version and validates the presence of hardware components.
Display Pixel Anomalies
This suite displays a series of colors and patterns that assist in identifying pixel anomalies and debris.
Note: When you run the Display Pixel Anomalies test suite over the web using a secondary device as the diagnostic console, the test results will display an image of the device being tested, along with the areas that were identified during the test. This information will be available on the diagnostic console. When you run this test suite from the device being tested, no image will be shown. If anomalies were identified during this test suite, a message will be displayed on the device being tested.
Multi-Touch
This suite assists in identifying areas of the display panel that have responding or non-responding touch pixels.
Note: When you run the Multi-Touch test suite over the web using a secondary device as the diagnostic console, the test results will include an image of the device being tested, along with the areas that were identified during the test. This information will be available on the diagnostic console. When you run this test suite from the device being tested, no image will be shown. If anomalies were identified during this test suite, a message will be displayed on the device being tested.
Camera Image Quality
This suite assists in identifying camera image quality issues with the front or rear cameras.
Face ID
This suite performs a check on the sensors for Face ID.
Audio for Self Service Repair
For iPhone 15 and iPhone 15 Plus
This suite plays a set of tones through the internal speakers and asks you to verify that you can hear the tones and that they weren’t distorted. Then the test asks you to record a short audio clip to confirm that each microphone can detect sound. For best results, run this test suite in a quiet environment.
![]() Caution: The Audio for Self Service Repair diagnostic suite plays loud test tones through the speakers. Be aware of your surroundings before running this test suite.
Caution: The Audio for Self Service Repair diagnostic suite plays loud test tones through the speakers. Be aware of your surroundings before running this test suite.
Audio Output
For all other supported device models
This suite plays a set of chordal tones through the internal speakers and prompts you to verify that tones played through the speakers were audible and not distorted. For best results, run this test suite in a quiet environment.
![]() Caution: The Audio Output diagnostic suite plays loud test tones through the speakers. Be aware of your surroundings before running this test suite.
Caution: The Audio Output diagnostic suite plays loud test tones through the speakers. Be aware of your surroundings before running this test suite.