This repository has been archived by the owner on Apr 20, 2020. It is now read-only.
-
Notifications
You must be signed in to change notification settings - Fork 47
/
Copy pathinstall_guide.Rmd
373 lines (275 loc) · 15.2 KB
/
install_guide.Rmd
1
2
3
4
5
6
7
8
9
10
11
12
13
14
15
16
17
18
19
20
21
22
23
24
25
26
27
28
29
30
31
32
33
34
35
36
37
38
39
40
41
42
43
44
45
46
47
48
49
50
51
52
53
54
55
56
57
58
59
60
61
62
63
64
65
66
67
68
69
70
71
72
73
74
75
76
77
78
79
80
81
82
83
84
85
86
87
88
89
90
91
92
93
94
95
96
97
98
99
100
101
102
103
104
105
106
107
108
109
110
111
112
113
114
115
116
117
118
119
120
121
122
123
124
125
126
127
128
129
130
131
132
133
134
135
136
137
138
139
140
141
142
143
144
145
146
147
148
149
150
151
152
153
154
155
156
157
158
159
160
161
162
163
164
165
166
167
168
169
170
171
172
173
174
175
176
177
178
179
180
181
182
183
184
185
186
187
188
189
190
191
192
193
194
195
196
197
198
199
200
201
202
203
204
205
206
207
208
209
210
211
212
213
214
215
216
217
218
219
220
221
222
223
224
225
226
227
228
229
230
231
232
233
234
235
236
237
238
239
240
241
242
243
244
245
246
247
248
249
250
251
252
253
254
255
256
257
258
259
260
261
262
263
264
265
266
267
268
269
270
271
272
273
274
275
276
277
278
279
280
281
282
283
284
285
286
287
288
289
290
291
292
293
294
295
296
297
298
299
300
301
302
303
304
305
306
307
308
309
310
311
312
313
314
315
316
317
318
319
320
321
322
323
324
325
326
327
328
329
330
331
332
333
334
335
336
337
338
339
340
341
342
343
344
345
346
347
348
349
350
351
352
353
354
355
356
357
358
359
360
361
362
363
364
365
366
367
368
369
370
371
372
373
---
title: "(R)QGIS installation guide for Windows, Mac & Linux"
author: "Jannes Muenchow, Patrick Schratz"
date: "`r Sys.Date()`"
output:
rmarkdown::html_vignette:
toc: true
vignette: >
%\VignetteIndexEntry{(R)QGIS installation guide for Windows, Mac & Linux"}
%\VignetteEngine{knitr::rmarkdown}
%\VignetteEncoding{UTF-8}
---
```{r, include = FALSE}
knitr::opts_chunk$set(
#fig.path = "https://raw.githubusercontent.com/jannes-m/RQGIS/master/figures/",
fig.align = "center",
collapse = TRUE,
comment = "#>"
)
```
# Vignette info
This vignette guides you through the installation process of QGIS, GRASS- and SAGA-GIS on three different platforms (Windows, Mac, Linux).
Please use the long-term release **QGIS 2.18**.
So far, **RQGIS** does not work with **QGIS 3**.
Following our instructions should ensure that RQGIS will work properly.
With the exception of SAGA, we recommend to use the latest stable version of all software packages.
Though other versions might also work with RQGIS, we did not test this.
Overall, RQGIS allows access to more than 1000 geoalgorithms.
However, please note that the number of geoalgorithms you can use from within RQGIS depends on the platform, the system architecture, the selection of installed third-party providers and software package versions.
# Windows
There are at least two options to install QGIS on Windows in such a way that RQGIS can access QGIS. The first option is the Standalone Installer from the [QGIS installer page](https://www.qgis.org/en/site/forusers/download.html).
This will install QGIS along with the third-party providers GRASS and SAGA.
However, if you would like to use even more third-party providers (e.g., GDAL, GEOS, Taudem, OTB, PostGIS, etc.), we recommend to use the OSGeo4W Network installer.
This installer is available on the [QGIS installer page](https://www.qgis.org/en/site/forusers/download.html) as well as on the [OSGeo4W-website](http://trac.osgeo.org/osgeo4w/).
To install OSGeo4W, the easiest way is to to use the Express installation:
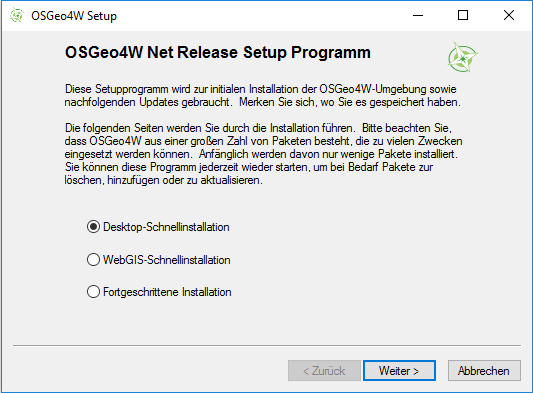
We are sorry, that our installer uses a German dialog.
Apparently, OSGeo4w automatically uses the language in accordance with the system locale. Nevertheless, it should be easy enough to follow our steps.
1. Select "Express Installation"
2. Next check "QGIS, GRASS and GDAL"
3. Start the installation.
This installation is more or less equivalent to the standalone QGIS-installation.
However, to have the full choice of available geoalgorithms provided by QGIS, we recommend to use the advanced settings of the OSGeo4W Network installer:
1. Run the OSGeo4W setup and choose the advanced installation.
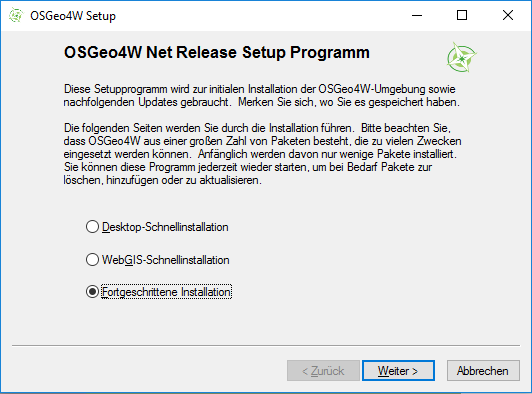
2. Subsequently, accept the default settings until you reach the “Select Packages” window.
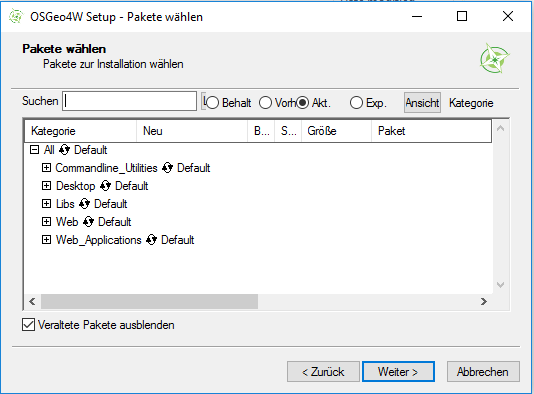
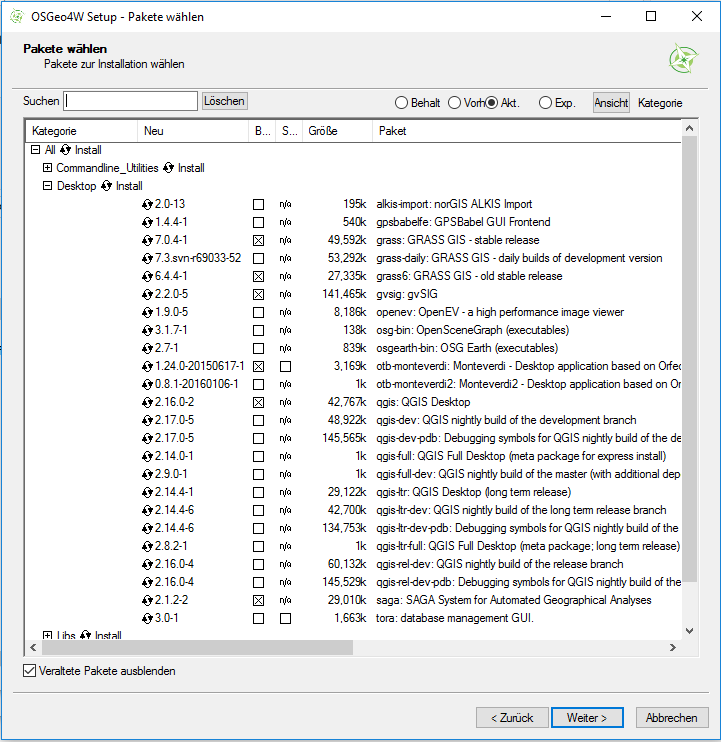
3. After expanding the command line utilities, we choose several commandline tools such as gdal and python-core (of course, you can select other components as well):
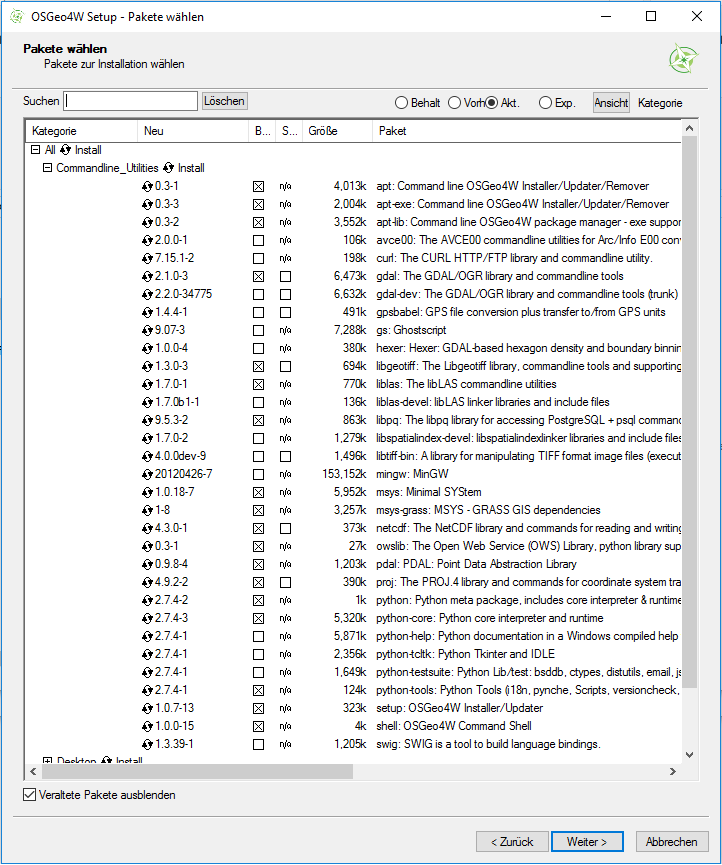
Additionally, we choose the Desktop-GIS GRASS 6 & 7, the Orfeo Toolbox, SAGA, and of course QGIS. Here, we install both the most recent QGIS version as well as the long-term release.
RQGIS will use the latter by default since this is the most stable version and everything is already set up correctly.
<!--
By contrast, using QGIS 2.16.1 would require some additional code adjustment (see above).
-->
4. We leave the rest as is, click "Next" and wait for the OSGeo4W-suggestions which we accept.
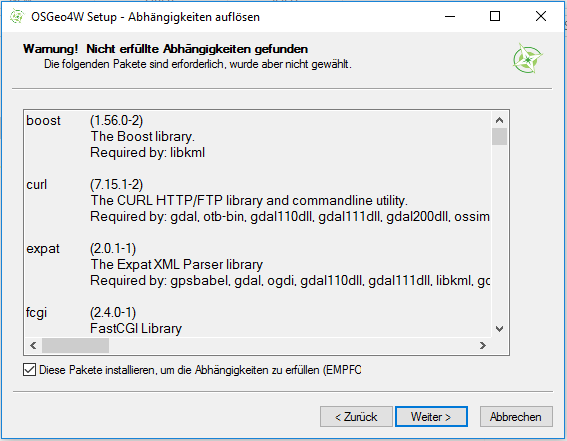
Clicking "Next" once more will start the download and installation process which might take a while.
If you wish to to modify, uninstall or update some of the installed components, you might do so later on by running `../OSGeo4W/bin/osgeo4w-setup.exe`.
Alternatively, you can download and run again the latest [OSGeo4W-executable](http://trac.osgeo.org/osgeo4w/).
If you additionally want to use the **LiDAR processing tools** (LAStools), please follow the steps found [here](https://rapidlasso.com/2013/09/29/how-to-install-lastools-toolbox-in-qgis/).
# Linux
## Ubuntu
### QGIS (and GRASS)
If you install QGIS with the built-in software managers, you will most likely get an outdated QGIS version.
To install more recent QGIS releases, we recommend to follow the installation instructions from the [QGIS installers website](https://www.qgis.org/en/site/forusers/alldownloads.html).
Here, we just describe exemplarily the QGIS installation procedure under Debian/Ubuntu following the description found [here](https://www.qgis.org/en/site/forusers/alldownloads.html#debian-ubuntu).
RQGIS should work as well with Linux derivatives other than Ubuntu. However, we did not test this.
Open a terminal window. First of all, make sure to remove QGIS and GRASS packages you may have installed before from other repositories:
<!--http://gis.stackexchange.com/questions/167472/qgis-2-8-ubuntu-14-04-installation-issues-terminal-command-attempts-to-install-->
```sh
sudo apt-get --purge remove qgis
sudo apt autoremove --purge-remove
sudo apt autoremove
sudo apt-get update
```
Next add the correct repository to `/etc/apt/sources.list`.
Here, we use the current long-term release (2.18):
**QGIS 2.18.x for Ubuntu 18.04**
The "ubuntugis" repo does not have support for `bionic`.
So we need to use the "debian" repos.
```sh
# add QGIS repository for Ubuntu 18.04 to sources.list
sudo sh -c 'echo "deb http://qgis.org/debian-ltr bionic main" >> /etc/apt/sources.list'
sudo sh -c 'echo "deb-src http://qgis.org/debian-ltr bionic main" >> /etc/apt/sources.list'
```
**QGIS 2.18.x for Ubuntu 16.04**
Since `xenial` lacks a native `gdal2` installation, we will use the "ubuntugis" repos including its "ubuntugis-unstable" repo (for `gdal2`) to install QGIS.
```sh
# add QGIS repository for Ubuntu 16.04 to sources.list
sudo sh -c 'echo "deb http://qgis.org/ubuntugis-ltr xenial main" >> /etc/apt/sources.list'
sudo sh -c 'echo "deb-src http://qgis.org/ubuntugis-ltr xenial main" >> /etc/apt/sources.list'
sudo sh -c 'echo "deb http://ppa.launchpad.net/ubuntugis/ubuntugis-unstable/ubuntu xenial main" >> /etc/apt/sources.list'
sudo add-apt-repository ppa:ubuntugis/ubuntugis-unstable
```
<!--
**QGIS nightly (3.99)**
```sh
# add QGIS repository for Ubuntu 16.04 to sources.list
sudo sh -c 'echo "deb http://qgis.org/ubuntugis-nightly xenial main" >> /etc/apt/sources.list'
sudo sh -c 'echo "deb-src http://qgis.org/ubuntugis-nightly xenial main" >> /etc/apt/sources.list'
sudo sh -c 'echo "deb http://ppa.launchpad.net/ubuntugis/ubuntugis-unstable/ubuntu xenial main" >> /etc/apt/sources.list'
sudo add-apt-repository ppa:ubuntugis/ubuntugis-unstable
```
-->
**For other Ubuntu releases, simply replace 'xenial' with the respective release name.**
Now we need to add the GPG key so that we do not face key errors:
```sh
wget -O - http://qgis.org/downloads/qgis-2017.gpg.key | gpg --import
# to verify, run:
# gpg --fingerprint CAEB3DC3BDF7FB45
gpg --export --armor CAEB3DC3BDF7FB45 | sudo apt-key add -
```
After that, we can install QGIS and GRASS as follows:
```sh
sudo apt-get update
sudo apt-get install qgis python-qgis qgis-plugin-grass
```
### SAGA
You can install the SAGA LTS 2.3.1 version from the [ubuntugis/unstable](https://launchpad.net/~ubuntugis/+archive/ubuntu/ubuntugis-unstable) repository.
If you haven't done so yet, add the repository and then simply install SAGA via `apt-get`:
```sh
sudo add-apt-repository ppa:ubuntugis/ubuntugis-unstable
sudo apt-get update
sudo apt-get install saga
```
<!---
To use SAGA functions within (R)QGIS, you naturally need to install SAGA GIS. To install the most recent SAGA version, simply execute the following lines in a terminal window:
```sh
sudo add-apt-repository ppa:johanvdw/saga-gis
sudo apt-get update
sudo apt-get install saga
```
sudo add-apt-repository --remove ppa:johanvdw/saga-gis
--->
If you would like to use another SAGA version, you need to compile it yourself (see [here](https://sourceforge.net/p/saga-gis/wiki/Compiling%20SAGA%20on%20Linux/)).
Please note, however, that QGIS currently only supports the SAGA LTR 2.3.x as far as we know.
<!--
After the installation you will find the SAGA algorithms in the processing toolbox of the QGIS GUI (this might not be true for SAGA >= 2.2.1 see further below).
Prior to the SAGA installation, we need to install various dependencies required by SAGA.
Here, we just quickly show how to install SAGA and its dependencies under Ubuntu. Please refer to this [page](https://sourceforge.net/p/saga-gis/wiki/Compiling%20SAGA%20on%20Linux/) for a more comprehensive SAGA installation guide.
Please note that we here simply reproduce in great parts a copy of this guide.
First of all, install all necessary SAGA dependencies and a few compilation and configuration tools:
```sh
sudo apt-get install libwxgtk3.0-dev libtiff5-dev libgdal-dev libproj-dev libjasper-dev libexpat1-dev wx-common libexpat1-dev libogdi3.2-dev unixodbc-dev
# compilation and configuration tools
sudo apt-get install g++ make automake libtool git
```
Next, we would like to download a specific SAGA version.
Check out the various available versions [here](https://sourceforge.net/projects/saga-gis/files/).
Here, we will download SAGA 2.3.1 into our home directory, unpack it and change the working directory to the unpacked folder:
```sh
wget -O /home/<YourUserName>/saga-git "https://sourceforge.net/projects/saga-gis/files/SAGA%20-%202.3/SAGA%202.3.1/saga_2.3.1.tar.gz"
cd /home/<YourUserName>
sudo tar -xvzf saga-git
cd saga-2.3.1
```
Having done so, we are ready to compile SAGA:
```sh
sudo autoreconf -i
sudo ./configure
sudo make
sudo make install
```
To check if SAGA was successfully compiled, run:
```
saga_cmd
saga_gui
```
Sometimes `saga_gui` produces following error message:
```sh
saga_gui: error while loading shared libraries: libsaga_gdi-2.3.1.so: cannot open shared object file: No such file or directory
```
In this case, you have to enable the SAGA GUI by specifying the path where `libsaga_gdi-2.3.1.so` is located:
```sh
export LD_LIBRARY_PATH=/usr/local/lib:$LD_LIBRARY_PATH
saga_gui
```
Using SAGA >= 2.2.1 you might encounter following message in the Processing log when opening QGIS:
`Problem with SAGA installation: installed SAGA version (2.3.1) is not supported`.
Though in this case SAGA is not available in the processing toolbox, you might still able to use it
via the QGIS Python API and therefore also with RQGIS.
Please note that SAGA 2.3.1 is the latest SAGA version supported by QGIS (2.14 and 2.18).
In case you would like to uninstall SAGA, type:
```sh
cd /home/<YourUserName>/saga-2.3.1
sudo make uninstall
```
-->
<!--
### Orfeo Toolbox (OTB)
You can download the Orfeo Toolbox from [here](https://www.orfeo-toolbox.org/download/).
We save the .run-script to the Desktop. Of course, you might select any other accesible folder.
Next, we create a folder named "Applications" to which we move the .run script. Finally, we install OTB.
Please note that so far there is only a **64-bit** OTB version available.
This version does not work on 32-bit machines!
```sh
mkdir /home/<YourUserName>/Applications/
mv /home/<YourUserName>/Desktop/<filename> /home/<YourUserName>/Applications
sh /home/<YourUserName>/Applications/<NameOfScript>
```
(R)QGIS assumes that the "OTB applications folder" is located at "/usr/lib/otb/applications" (see also [QGIS manual](https://docs.qgis.org/2.14/en/docs/user_manual/processing/3rdParty.html#orfeo-toolbox)).
Therefore, we need to move the OTB installation to the corresponding folder:
```sh
# move applications folder
sudo mv /home/<YourUserName>/Applications/<YourOTBInstallation>/lib/otb /usr/lib/
# commandline tools
cp -a /home/<YourUserName>/Applications/<YourOTBInstallation>/bin/. /usr/bin
```
OTB algorithms should be now availabe in the "Processing Toolbox" and in RQGIS (use `find_algorithms()` to check).
Finally, we clean up after ourselves by deleting the previously created Applications folder:
```sh
rmdir /home/<YourUserName>/Applications/
```
-->
## Arch Linux
You can install various QGIS, SAGA and GRASS versions from the [Arch User Repository](https://aur.archlinux.org/).
We recommend to use the [yaourt](https://wiki.archlinux.de/title/Yaourt) package manager.
## Fedora
You can install current stable QGIS, SAGA and GRASS GIS versions via the standard software package manager:
```sh
sudo dnf install qgis-python qgis qgis-grass saga grass-gui grass-libs
```
# Mac OSX
## SAGA
There is no binary install of SAGA for macOS.
We recommend to use the bottle installation from `homebrew`:
```sh
# brew tap osgeo4mac
brew install saga-gis-lts
brew link saga-gis-lts --force
```
If you do not link SAGA with force, QGIS will not be able to detect SAGA.
Alternatively, you can compile SAGA from source from the [SAGA website](https://sourceforge.net/projects/saga-gis/files/).
However, this is tedious and QGIS2 only supports the SAGA LTS version.
## GRASS
You can install GRASS6 and GRASS7 via `homebrew`:
```sh
# brew tap osgeo4mac
brew install grass6 grass7
```
The binary GRASS installation can be found [here](https://grass.osgeo.org/download/software/mac-osx/).
However, we recommend to use the `homebrew` approach.
When installing GRASS7 independently of QGIS via `homebrew`, please make sure to install it **before** you have installed QGIS.
Only this way, the path for the QGIS processing plugin will be updated.
Otherwise, the GRASS installation will work, however, `GRASS7Utils.grassPath()`, a QGIS function that links to the GRASS installation, gives back a non-existing path such as `/Applications/Grass-7.0.app/Contents/MacOS` which in turn prevents GRASS algorithms from working from within QGIS.
## QGIS
Two options exist installing QGIS on macOS
1. Using `homebrew` (**recommended**)
```
# brew tap osgeo4mac
brew install qgis2
```
Check `brew info qgis2` for more available options.
However, if you use them, QGIS will be compiled from source which may take > 30 min (depending on your system).
Otherwise, pre-built bottles (= binaries) will be used which speeds up the installation process a lot.
**Note:** Make sure to install SAGA and GRASS before QGIS so that QGIS finds the correct paths.
2. Install QGIS binary from Kyngchaos
Homebrew also supports [GUI installations](https://caskroom.github.io/).
QGIS can be installed using
```sh
brew cask install qgis
```
from the command line if homebrew is installed and configured correctly.
If you do not (want to) use `homebrew`, you can install the QGIS binary from [https://www.qgis.org/en/site/forusers/download.html](https://www.qgis.org/en/site/forusers/download.html).
This is exactly the same as calling `brew cask install qgis`.
If you choose this option, you will get the following error messages during QGIS processing
```
QSqlDatabase: QSQLITE driver not loaded
QSqlDatabase: available drivers:
QSqlQuery::prepare: database not open
[1] "ERROR: Opening of authentication db FAILED"
[2] "WARNING: Auth db query exec() FAILED"
```
These messages **DO NOT affect RQGIS usage**.