The post .NET AI Template Now Available in Preview appeared first on .NET Blog.
]]> This template is part of our ongoing effort to make AI development with .NET easier to discover and use, with scaffolding and guidance within Visual Studio, Visual Studio Code, and the .NET CLI.
Please note that this template is in preview, and future versions may change based on your feedback and the rapid advancements in AI.
Install the template now
To get started with the first Preview of the template, you install the Microsoft.Extensions.AI.Templates from your Terminal. Just run:
dotnet new install Microsoft.Extensions.AI.TemplatesOnce installed, the template is available in Visual Studio, Visual Studio Code (with the C# Dev Kit), or you can just run dotnet new aichatweb to create it in your working directory.
Getting Started with the .NET AI Chat Template
The .NET AI Chat template is designed to help you quickly build an AI-powered chat application to start chatting with custom data. This initial release focuses on a Blazor-based web app, built using the Microsoft.Extensions.AI and Microsoft.Extensions.VectorData abstractions. The template uses the Retrieval Augmented Generation (RAG) pattern commonly used for chat applications.
Key Features and Configuration Options
- Chat with Custom Data: The template allows you to create a chat-based UI that can interact with sample PDFs or your own data using the RAG pattern.
- Local and Azure Integration: The template supports both a local vector store for prototyping and Azure AI Search for more advanced configurations.
- Customizable Code: The generated code includes UI components for chat interactions, citation tracking, and follow-up suggestions. You can customize or remove these components as needed.
- Data Ingestion: The template includes code for data ingestion, caching, and processing, allowing you to handle various data sources and formats.
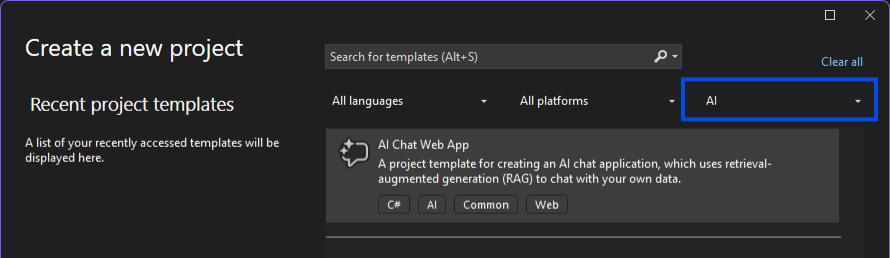
Using the template in Visual Studio
Once the template is installed from the command line, you can find the template in Visual Studio by using the File > New Project… menu. You can search for AI Chat, or choose the AI project type to find the template:
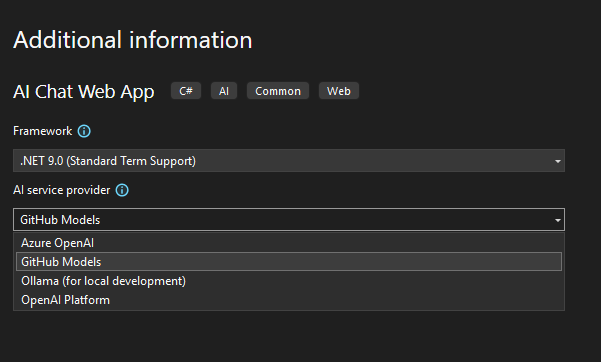
 After choosing your project name and location, you can select an AI model provider and vector store to get started. By default we’re using GitHub Models with a local vector store, which is the easiest way to get started with minimal setup.
You can learn about each of the options from the .NET AI Templates documentation.
Using Visual Studio Code and the C# Dev Kit
To use the template in Visual Studio Code, first install the C# Dev Kit extension. Then, use the .NET: New Project… command:
By default this will create a new project using the GitHub Models model provider and a local vector store. You can learn about additional options from the .NET AI Templates documentation.
Chatting with your own data
This template includes two sample PDF files and an example of data ingestion code to process the PDFs. This data ingestion code is flexible so that you swap out the sample PDFs. To chat with your own data, do the following:
- If you have your project running, stop it.
- Remove the sample PDF files from the /wwwroot/Data folder.
- Add your own PDF files to the /wwwroot/Data folder.
- Run the application again.
On startup of the app, the data ingestion code (located in /Services/Ingestion/DataIngestor.cs) will compare the contents of the Data folder; it will remove old files from the configured vector store and add new ones. Note: depending on how many files you have, and how big they are, you may run into quota and rate limits with your configured AI model provider. When you hit a limit, you may see an error message or experience long delays in the startup of the application. See the AI Template Documentation for help troubleshooting.
Extending the chatbot’s behavior
The code is built using Microsoft.Extensions.AI, which makes it very straightforward to plug in custom behaviors. You can give the chatbot access to call any C# function. This can extend its capabilities to include retrieving additional data or taking actions.
As a very simple example, you can try giving it access to “weather” data. In Pages/Chat/Chat.razor, define a C# function in the @code block:
private async Task<string> GetWeather([Description("The city, correctly capitalized")] string city)
{
    string[] weatherValues = ["Sunny", "Cloudy", "Rainy", "Snowy", "Balmy", "Bracing"];
    return city == "London" ? "Drizzle" : weatherValues[Random.Shared.Next(weatherValues.Length)];
}
Then, inside the OnInitialized method, update chatOptions.Tools to include your method:
chatOptions.Tools =
[
    AIFunctionFactory.Create(SearchAsync),
    AIFunctionFactory.Create(GetWeather)
];
Now try setting a breakpoint inside GetWeather and ask the chatbot about the weather. You’ll find it will call your method and will use the result in its answer.
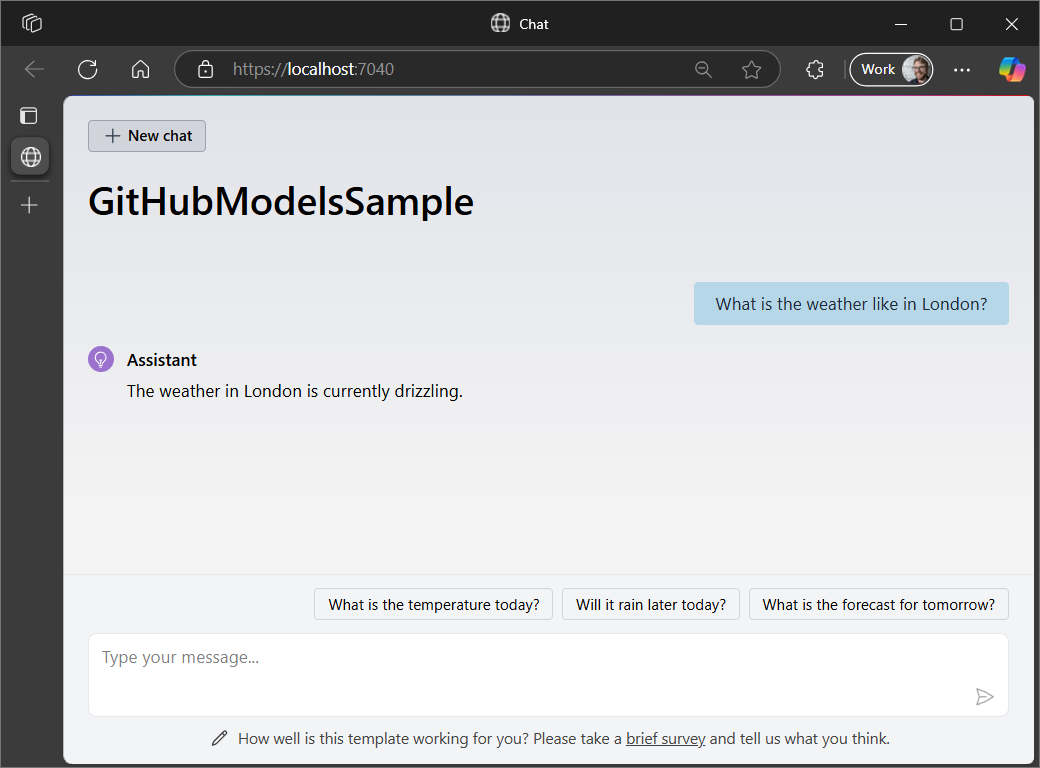
You can use this to retrieve any information from external systems, including via asynchronous calls. Bear in mind that the parameters passed in from the LLM should be treated as untrusted input.
See it in action
Check out the latest episode of the .NET AI Community Standup as Alex, Bruno, and Jordan overview the new templates!
What’s Coming Next – Share Your Thoughts
In future releases, we plan to expand the template offerings to include an AI Console template, Minimal API template, support for .NET Aspire, and including the templates by default in the .NET SDK. We’ll also be exploring support for Azure AI Foundry and working with the Semantic Kernel team to expand template options for Semantic Kernel users.
We want to learn from you and use your feedback to help us shape these templates. Please share your thoughts about the template – both what works well for you, and what you’d like to see change!
Thank you and happy coding!
The post .NET AI Template Now Available in Preview appeared first on .NET Blog.
]]>The post Unlock new possibilities for AI Evaluations for .NET appeared first on .NET Blog.
]]>In November, we announced the public preview of the library, and today, we are thrilled to announce that it is now available open source in the dotnet/Extensions repo. This repository contains a suite of libraries that provide facilities commonly needed when creating production-ready applications. By making this library available to everyone, we aim to empower developers to harness the power of AI more effectively in their projects.
New Samples for Using the Library
To help you get started with the Microsoft.Extensions.AI.Evaluations library, we have released a set of new samples. These samples showcase various use cases and demonstrate how to leverage the library’s capabilities effectively. Whether you are a seasoned developer or just beginning your AI journey, these samples will provide valuable insights and practical guidance. You can find the samples on our GitHub repository. We encourage you to explore them, experiment, and share your feedback with us. Your contributions and feedback are invaluable as we continue to enhance and expand the library’s features.
Introducing the Azure DevOps Plug-in
Looking to integrate your AI evaluations into your Azure DevOps pipeline? We are excited to announce the availability of a plug-in in the marketplace. This plug-in allows you to seamlessly integrate AI evaluations into your pipelines, enabling continuous assessment of your AI models as part of your CI/CD workflows.
With the AzDO plug-in, you can automate the evaluation process, ensuring that your applications meet the desired criteria before deployment. This integration enhances the reliability and efficiency of your AI solutions, helping you deliver high-quality applications with confidence.

Get Started Today
We invite you to explore the open-source Microsoft.Extensions.AI.Evaluations preview libraries, try out the new samples, and integrate the AzDO plug-in into your pipelines. We are excited to see how you will use these tools to innovate and create impactful AI solutions. Stay tuned for more updates and enhancements, and, as always, we welcome your feedback and contributions.
The post Unlock new possibilities for AI Evaluations for .NET appeared first on .NET Blog.
]]>The post .NET 10 Preview 1 is now available! appeared first on .NET Blog.
]]>This release contains the following improvements.
 Libraries
- Finding Certificates By Thumbprints Other Than SHA-1
- Finding PEM-encoded Data in ASCII/UTF-8
- New Method Overloads in ISOWeek for DateOnly Type
- String Normalization APIs to Work with Span of Characters
- Numeric Ordering for String Comparison
- Adding TimeSpan.FromMilliseconds Overload with a Single Parameter
- ZipArchive performance and memory improvements
- Additional
TryAddandTryGetValueoverloads forOrderedDictionary<TKey, TValue> - More Left-Handed Matrix Transformation Methods
- Full Release Notes
 Runtime
- Array Interface Method Devirtualization
- Stack Allocation of Arrays of Value Types
- AVX10.2 Support
- Full Release Notes
 SDK
SDK
C#
nameofin unbound generics- Implicit span conversions
fieldbacked properties- Modifiers on simple lambda parameters
- Experimental feature – String literals in data section
- Full Release Notes
F#
This release you will find updates across the F# language, FSharp.Core standard library, and FSharp.Compiler.Service.
Visual Basic
 ASP.NET Core & Blazor
- OpenAPI 3.1 support
- Generate OpenAPI documents in YAML format
- Response description on
ProducesResponseType - Detect if URL is local using
RedirectHttpResult.IsLocalUrl - Improvements to integration testing of apps with top-level statements
- QuickGrid
RowClassparameter - Blazor script as a static web asset
- Route syntax highlighting for Blazor
RouteAttribute - Full Release Notes
 .NET MAUI
This release focused on quality improvements for .NET MAUI. In addition to the CollectionView enhancements for iOS and Mac Catalyst are included in this release, browse through the full GitHub release notes for all of the improvements.
.NET for Android
- Android 16 (Baklava) Beta 1
- Minimum supported Android API recommendations
- Building with JDK-21 is now supported
dotnet runsupport for Androd projects- Enable marshal methods by default
- Visual Studio Design-Time Builds no longer invoke
aapt2
.NET for iOS, Mac Catalyst, macOS, tvOS
Browse the full release notes for all of this and more.
 Windows Forms
- Clipboard related serialization and deserialization changes
- Obsoleted Clipboard APIs
- New Clipboard related APIs
- Full Release Notes
Windows Presentation Foundation (WPF)
This release focused on quality improvements. A full list of changes can be found in the release notes.
 Entity Framework Core
- Support for the .NET 10 LeftJoin operator
- ExecuteUpdateAsync now accepts a regular, non-expression lambda
- Full Release Notes
 Container Images
10.0-previewtags use Ubuntu 24.04- Debian images use Debian 13 “Trixie”
- Ubuntu Chiseled images now contain the Chisel manifest
- Full Release Notes
 Get started
To get started with .NET 10, install the .NET 10 SDK.
If you’re on Windows using Visual Studio, we recommend installing the latest Visual Studio 2022 preview. You can also use Visual Studio Code and the C# Dev Kit extension with .NET 10.
Join us for .NET 10 Preview 1 Unboxed Live Stream
Join us for an unboxing video with the team to discuss what’s new in this preview release, with live demos from the dev team!
 .NET 10 Discussions
The team has been making monthly announcements alongside full release notes on the dotnet/core GitHub Discussions and has seen great engagement and feedback from the community.
 Stay up-to-date with .NET 10
You can stay up-to-date with all the features of .NET 10 with:
- What’s new in .NET 10
- What’s new in C# 14
- What’s new in .NET MAUI
- What’s new in ASP.NET Core
- What’s new in Entity Framework Core
- What’s new in Windows Forms
- What’s new in WPF
- Breaking Changes in .NET 10
- .NET 10 Releases
Additionally, be sure to subscribe to the GitHub Discussions RSS news feed for all release announcements.
We want your feedback, so head over to the .NET 10 Preview 1 GitHub Discussion to discuss features and give feedback for this release.
The post .NET 10 Preview 1 is now available! appeared first on .NET Blog.
]]>The post .NET Aspire 9.1 is here with six great new dashboard features, and more! appeared first on .NET Blog.
]]> Six great new dashboard features
The .NET Aspire dashboard has received several new features in this release. Here are the highlights:
 Resource Relationships
The dashboard now reflects the concept of a “parent” and “child” resource relationship. For example, if you create a Postgres instance with multiple databases, they will now be nested in the Resource page in the same instance.

 Localization Overrides
The dashboard defaults to the language set in your browser. This release introduces the ability to override this setting and change the dashboard language independently from the browser language. Consider the following screen capture, that demonstrates the addition of the language dropdown in the dashboard:

 Filtering
You can now filter what you see in the Resource page by Resource type, State, and Health state. Consider the following screen capture, which demonstrates the addition of the filter options in the dashboard:

 More Resource Details
When you select a resource in the dashboard, more data points are now available in the details pane, including References, Back references, and Volumes with their mount types.

 CORS Support for Custom Local Domains
You can now set the DOTNET_DASHBOARD_CORS_ALLOWED_ORIGINS environment variable to allow the dashboard to receive telemetry from other browser apps, such as if you have resources running on custom localhost domains.
For more information, see .NET Aspire app host: Dashboard configuration.
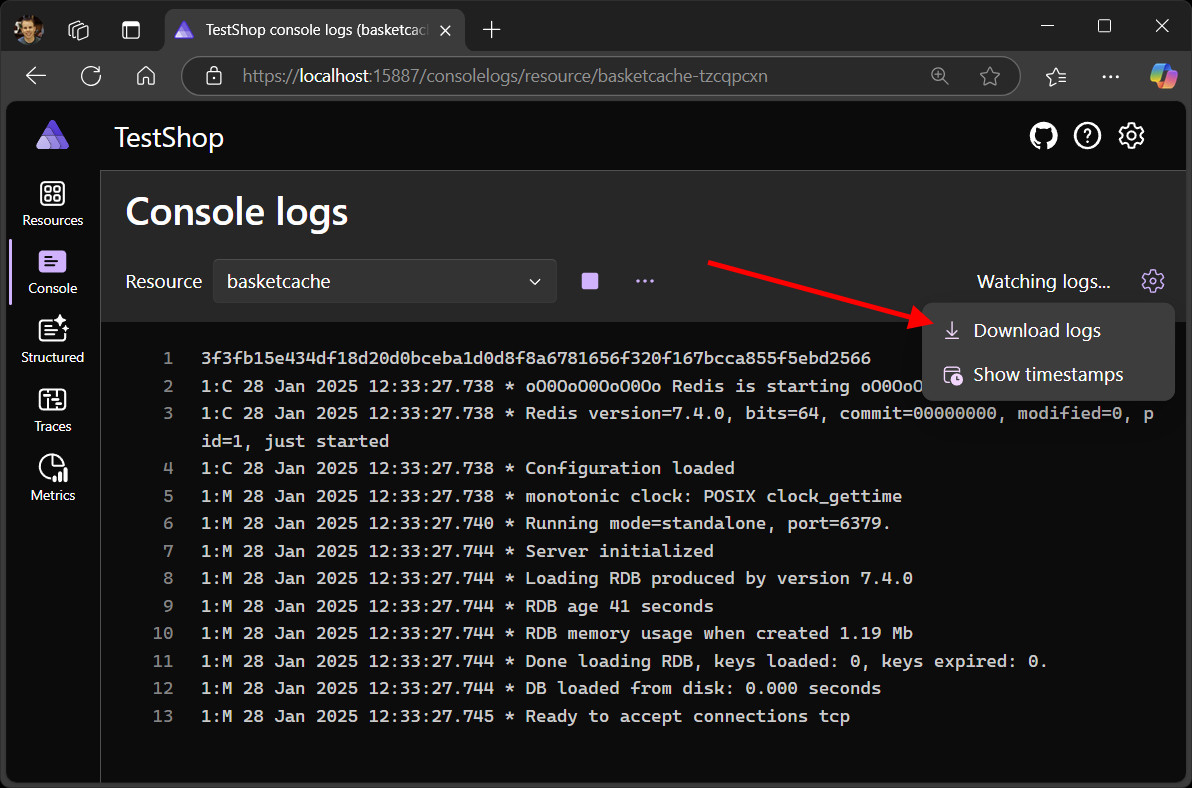
 Flexibility with Console Logs
The console log page has two new options. You’re now able to download your logs so you can view them in your own diagnostics tools. Plus, you can turn timestamps on or off to reduce visual clutter when needed.
 Various UX Improvements
Several new features in .NET Aspire 9.1 enhance and streamline popular tasks:
- Resource commands, such as Start and Stop buttons, are now available on the Console logs page.
- Single selection to open in the text visualizer.
- URLs within logs are now automatically clickable, with commas removed from endpoints.
Additionally, the scrolled position now resets when switching between different resources.
For more details on the latest dashboard enhancements, check out James Newton-King on Bluesky, where he’s been sharing new features daily.
And A Whole Lot More
In addition to the new dashboard features, .NET Aspire 9.1 includes several other cool features:
 Start Resources on Demand: You can now tell resources not to start with the rest of your app by using
 WithExplicitStart()on the resource in your app host. Then, you can start it whenever you’re ready from inside the dashboard. Better Docker Integration: The
 PublishAsDockerfile()feature was introduced for all projects and executable resources. This enhancement allows for complete customization of the Docker container and Dockerfile used during the publish process. Cleaning Up Docker Networks: In 9.1, we addressed a persistent issue where Docker networks created by .NET Aspire would remain active even after the application was stopped. This bug, tracked in issue #6504, is resolved. Now, Docker networks are properly cleaned up, ensuring a more efficient and tidy development environment.
 Improved Development Container support: In this release, we improved support for Dev Containers in both GitHub Codespaces and Visual Studio Code. See dotnet/aspire-devcontainer.
See the full list of new features in the What’s new in .NET Aspire 9.1 documentation.
 Learn More on the .NET Aspire Community Standup
Join us on the .NET Aspire Community Standup to learn more about the new features in .NET Aspire 9.1. Watch the recording below:
Learn More & Get Involved
We hope you enjoy the new features in .NET Aspire 9.1! As always, we welcome your feedback and contributions. Here are some ways to get involved:
- GitHub: Collaborate with us on GitHub or join us on Discord to chat with team members.
- Documentation: Check out the official documentation for more information on .NET Aspire.
- Community Standup: Join us on the .NET Aspire Community Standup to stay up-to-date with the latest developments.
Thank you for being a part of the .NET Aspire community!
The post .NET Aspire 9.1 is here with six great new dashboard features, and more! appeared first on .NET Blog.
]]>The post Let’s Learn .NET: GitHub Copilot Event appeared first on .NET Blog.
]]>Event Details
- Date: February 27th, 2025
- Time: 10:00 AM Pacific Time
- Location: YouTube Live Stream
Topics Covered
Introduction to GitHub Copilot
Learn about GitHub Copilot, an AI-powered code completion tool that helps you write code faster and with fewer errors. We will cover its features, benefits, and how it can improve your development workflow.
Best Practices and Tips
Discover best practices and tips for using GitHub Copilot effectively. Learn how to generate documentation, tests, and more with ease.
Building a Mini-Game with Copilot
Watch as we build a mini-game from scratch using GitHub Copilot. See how Copilot can assist in the development process and help you create a functional game quickly.
We will be taking the Microsoft Learn training challenge and earning a badge!
Using GitHub Codespaces
Throughout the workshop, we will explore GitHub Codespaces and how it can be used in conjunction with GitHub Copilot. Learn how to set up a development environment quickly and efficiently.
Get Started
To get started with GitHub Copilot and follow along with the event, use this repository: mastering-github-copilot-for-dotnet-csharp-developers.
Don’t forget to sign up for your Free GitHub Copilot account.
Join Us
Don’t miss out on this exciting event! Join us on February 27th at 10:00 AM Pacific Time on YouTube.
World Wide Events
Let’s Learn .NET is a global event and for GitHub Copilot you can join Microsoft and community members around the world present in local time zones and local languages! Here are the upcoming events:
- March 9th, 9:00 PM Pacific | March 10th, 5:00 UTC – 日本語
- March 10th, 3:00 PM Pacific | 23:00 UTC – Português
- March 10th, 11:00 PM Pacific | March 11th, 7:00 UTC – 한국어
- March 13th, 12:00 AM Pacific | 8:00 UTC Tiếng Việt
- March 13th, 9:00 AM Pacific | 17:00 UTC – Français
- March 19th, 12:00 PM Pacific | 20:00 UTC – Español
- March 20th, 5:00 AM Pacific | 13:00 UTC – Türkçe
The post Let’s Learn .NET: GitHub Copilot Event appeared first on .NET Blog.
]]>The post .NET MAUI Performance Features in .NET 9 appeared first on .NET Blog.
]]>We’ll also walk through the options available to you as a developer
for measuring the performance of your .NET MAUI applications. Both CPU
sampling and memory snapshots are available via dotnet-trace and
dotnet-gcdump respectively. These can give insights into performance
problems in your application, NuGet packages, or even something we
should look into for .NET MAUI.
Background
By default, .NET MAUI applications on iOS and Android use the following settings:
- “Self-contained”, meaning a copy of the BCL and runtime are included with the application.
Note
This makes .NET MAUI applications suitable for running on “app stores” as no prerequisites such as installing a .NET runtime are required.- Partially trimmed (
TrimMode=partial), meaning that code within your applications or NuGet packages are not trimmed by default.
Note
This is a good default, as it is the most compatible with existing code and NuGet packages in the ecosystem.Full Trimming
This is where full-trimming (TrimMode=full) can make an impact on
your application’s size. If you have a substantial amount of C# code
or NuGet packages, you may be missing out on a significant application
size reduction.
To opt into full trimming, you can add the following to your .csproj file:
<PropertyGroup>
  <TrimMode>full</TrimMode>
</PropertyGroup>
For an idea on the impact of full trimming:

Note
MyPal is a sample .NET MAUI application that is a useful comparison because of its usage of several common NuGet packages.See our trimming .NET MAUI documentation for more information on “full” trimming.
NativeAOT
Building upon full trimming, NativeAOT both relies on libraries being trim-compatible and AOT-compatible. NativeAOT is a new runtime that can improve startup time and reduce application size compared to existing runtimes.
Note
NativeAOT is not yet supported on Android, but is available on iOS, MacCatalyst, and Windows.To opt into NativeAOT:
<PropertyGroup>
  <IsAotCompatible>true</IsAotCompatible>
  <PublishAot>true</PublishAot>
</PropertyGroup>
For an idea on the impact of NativeAOT and application size:

And startup performance:

Note
macOS on the above graphs is running on MacCatalyst, the default for .NET MAUI applications running on Mac operating systems.See our NativeAOT deployment documentation for more information about this newly supported runtime.
NuGet Package Authors
As a NuGet package author, you may wish for your package to run in either fully trimmed or NativeAOT scenarios. This can be useful for developers targeting .NET MAUI, mobile, or even self-contained ASP.NET microservices.
To support NativeAOT, you will need to:
- Mark your assemblies as “trim-compatible” and “AOT-compatible”.
- Enable Roslyn analyzers for trimming and NativeAOT.
- Solve all the warnings.
Begin with modifying your .csproj file:
<PropertyGroup>
  <IsTrimmable>true</IsTrimmable>
  <IsAotCompatible>true</IsAotCompatible>
</PropertyGroup>
These properties will enable Roslyn analyzers as well as include
[assembly: AssemblyMetadata] information in the resulting .NET
assembly. Depending on your library’s usage of features like
System.Reflection, you could have either just a few warnings or
potentially many warnings.
See the documentation on preparing libraries for trimming for more information.
XAML and Trimming
Sometimes, taking advantage of NativeAOT in your app can be as easy as adding a property to your project file. However, for many .NET MAUI applications, there can be a lot of warnings to solve. The NativeAOT compiler removes unnecessary code and metadata to make the app smaller and faster. However, this requires understanding which types can be created and which methods can and cannot be called at runtime. This is often impossible to do in code which heavily uses System.Reflection. There are two areas in .NET MAUI which fall into this category: XAML and data-binding.
Compiled XAML
Loading XAML at runtime provides flexibility and enables features like XAML hot reload. XAML can instantiate any class in the whole app, the .NET MAUI SDK, and referenced NuGet packages. XAML can also set values to any property.
Conceptually, loading a XAML layout at runtime requires:
- Parsing the XML document.
- Looking up the control types based on the XML element names using
Type.GetType(xmlElementName). - Creating new instances of the controls using
Activator.CreateInstance(controlType). - Converting the raw string XML attribute values into the target type of the property.
- Setting properties based on the names of the XML attributes.
This process can not only be slow, but it presents a great challenge
for NativeAOT. For example, the trimmer does not know which types
would be looked up using the Type.GetType method. This means that
either the compiler would need to keep all the classes from the whole
.NET MAUI SDK and all the NuGet packages in the final app, or the
method might not be able to find the types declared in the XML input
and fail at runtime.
Fortunately, .NET MAUI has a solution – XAML compilation.
This turns XAML into the actual code for the InitializeComponent()
method at build time. Once the code is generated, the NativeAOT
compiler has all the information it needs to trim your app.
In .NET 9, we implemented the last remaining XAML features that the compiler could not handle in previous releases, especially compiling bindings. Lastly, if your app relies on loading XAML at runtime, NativeAOT might not be suitable for your application.
Compiled Bindings
A binding ties together a source property with a target property. When the source changes, the value is propagated to the target.
Bindings in .NET MAUI are defined using a string “path”. This path
resembles C# expressions for accessing properties and indexers. When
the binding is applied to a source object, .NET MAUI uses
System.Reflection to follow the path to access the desired source
property. This suffers from the same problems as loading XAML at
runtime, because the trimmer does not know which properties could be
accessed by reflection and so it does not know which properties it can
safely trim from the final application.
When we know the type of the source object at build time from
x:DataType attributes, we can compile the binding path into a simple
getter method (and a setter method for two-way bindings). The compiler
will also ensure that the binding listens to any property changes
along the binding path of properties that implement
INotifyPropertyChanged.
The XAML compiler could already compile most bindings in .NET 8 and earlier. In .NET 9 we made sure any binding in your XAML code can be compiled. Learn more about this feature in the compiled bindings documentation.
Compiled bindings in C#
The only supported way of defining bindings in C# code up until .NET 8
has been using a string-based path. In .NET 9, we are adding a new
API which allows us to compile the binding using a source generator:
// .NET 8 and earlier
myLabel.SetBinding(Label.TextProperty, "Text");

// .NET 9
myLabel.SetBinding(Label.TextProperty, static (Entry nameEntry) => nameEntry.Text);
The Binding.Create() method is also an option, for when you need to
save the Binding instance for later use:
var nameBinding = Binding.Create(static (Entry nameEntry) => nameEntry.Text);.NET MAUI’s source generator will compile the binding the same way the XAML compiler does. This way the binding can be fully analyzed by the NativeAOT compiler.
Even if you aren’t planning to migrate your application to NativeAOT,
compiled bindings can improve the general performance of the binding.
To illustrate the difference, let’s use BenchmarkDotNet to measure
the difference between the calls to SetBinding() on Android using the
Mono runtime:
// dotnet build -c Release -t:Run -f net9.0-android

public class SetBindingBenchmark
{
    private readonly ContactInformation _contact = new ContactInformation(new FullName("John"));
    private readonly Label _label = new();

    [GlobalSetup]
    public void Setup()
    {
        DispatcherProvider.SetCurrent(new MockDispatcherProvider());
        _label.BindingContext = _contact;
    }

    [Benchmark(Baseline = true)]
    public void Classic_SetBinding()
    {
        _label.SetBinding(Label.TextProperty, "FullName.FirstName");
    }

    [Benchmark]
    public void Compiled_SetBinding()
    {
        _label.SetBinding(Label.TextProperty, static (ContactInformation contact) => contact.FullName?.FirstName);
    }

    [IterationCleanup]
    public void Cleanup()
    {
        _label.RemoveBinding(Label.TextProperty);
    }
}
When I ran the benchmark on Samsung Galaxy S23, I got the following results:
| Method | Mean | Error | StdDev | Ratio | RatioSD |
|---|---|---|---|---|---|
| Classic_SetBinding | 67.81 us | 1.338 us | 1.787 us | 1.00 | 0.04 |
| Compiled_SetBinding | 30.61 us | 0.629 us | 1.182 us | 0.45 | 0.02 |
The classic binding needs to first parse the string-based path and
then use System.Reflection to get the current value of the source.
Each subsequent update of the source property will also be faster with
the compiled binding:
// dotnet build -c Release -t:Run -f net9.0-android

public class UpdateValueTwoLevels
{
    ContactInformation _contact = new ContactInformation(new FullName("John"));
    Label _label = new();

    [GlobalSetup]
    public void Setup()
    {
        DispatcherProvider.SetCurrent(new MockDispatcherProvider());
        _label.BindingContext = _contact;
    }

    [IterationSetup(Target = nameof(Classic_UpdateWhenSourceChanges))]
    public void SetupClassicBinding()
    {
        _label.SetBinding(Label.TextProperty, "FullName.FirstName");
    }

    [IterationSetup(Target = nameof(Compiled_UpdateWhenSourceChanges))]
    public void SetupCompiledBinding()
    {
        _label.SetBinding(Label.TextProperty, static (ContactInformation contact) => contact.FullName?.FirstName);
    }

    [Benchmark(Baseline = true)]
    public void Classic_UpdateWhenSourceChanges()
    {
        _contact.FullName.FirstName = "Jane";
    }

    [Benchmark]
    public void Compiled_UpdateWhenSourceChanges()
    {
        _contact.FullName.FirstName = "Jane";
    }

    [IterationCleanup]
    public void Reset()
    {
        _label.Text = "John";
        _contact.FullName.FirstName = "John";
        _label.RemoveBinding(Label.TextProperty);
    }
}| Method | Mean | Error | StdDev | Ratio | RatioSD |
|---|---|---|---|---|---|
| Classic_UpdateWhenSourceChanges | 46.06 us | 0.934 us | 1.369 us | 1.00 | 0.04 |
| Compiled_UpdateWhenSourceChanges | 30.85 us | 0.634 us | 1.295 us | 0.67 | 0.03 |
The differences for a single binding aren’t that dramatic but they add
up. This can be noticeable on complex pages with many bindings or when
scrolling lists like CollectionView or ListView.
The full source code of the above benchmarks is available on GitHub.
Profiling .NET MAUI Applications
Attaching dotnet-trace to a .NET MAUI application, allows you to get
profiling information in formats like .nettrace and .speedscope.
These give you CPU sampling information about the time spent in each
method in your application. This is quite useful for finding where
time is spent in the startup or general performance of your .NET
applications. Likewise, dotnet-gcdump can take memory snapshots of
your application that display every managed C# object in memory.
dotnet-dsrouter is a requirement for connecting dotnet-trace to a
remote device, and so this is not needed for desktop applications.
You can install these tools with:
$ dotnet tool install -g dotnet-trace
You can invoke the tool using the following command: dotnet-trace
Tool 'dotnet-trace' was successfully installed.
$ dotnet tool install -g dotnet-dsrouter
You can invoke the tool using the following command: dotnet-dsrouter
Tool 'dotnet-dsrouter' was successfully installed.
$ dotnet tool install -g dotnet-gcdump
You can invoke the tool using the following command: dotnet-gcdump
Tool 'dotnet-gcdump' was successfully installed.
From here, instructions differ slightly for each platform, but generally the steps are:
- Build your application in
Releasemode. For Android, toggle<AndroidEnableProfiler>true</AndroidEnableProfiler>in your.csprojfile, so the required Mono diagnostic components are included in the application. - If profiling mobile, run
dotnet-dsrouter android(ordotnet-dsrouter ios, etc.) on your development machine. - Configure environment variables, so the application can connect to
the profiler. For example, on Android:
$ adb reverse tcp:9000 tcp:9001 # no output $ adb shell setprop debug.mono.profile '127.0.0.1:9000,nosuspend,connect' # no output - Run your application.
- Attach
dotnet-trace(ordotnet-gcdump) to the application, using the PID ofdotnet-dsrouter:$ dotnet-trace ps 38604 dotnet-dsrouter ~/.dotnet/tools/dotnet-dsrouter.exe ~/.dotnet/tools/dotnet-dsrouter.exe android $ dotnet-trace collect -p 38604 --format speedscope No profile or providers specified, defaulting to trace profile 'cpu-sampling' Provider Name Keywords Level Enabled By Microsoft-DotNETCore-SampleProfiler 0x0000F00000000000 Informational(4) --profile Microsoft-Windows-DotNETRuntime 0x00000014C14FCCBD Informational(4) --profile Waiting for connection on /tmp/maui-app Start an application with the following environment variable: DOTNET_DiagnosticPorts=/tmp/maui-app
For iOS, macOS, and MacCatalyst, see the iOS profiling wiki page for more information.
Note
For Windows applications, you might just consider using Visual Studio’s built-in profiling tools, butdotnet-trace collect -- C:\path\to\an\executable.exe is also an option.Now that you’ve collected a file containing performance information, opening them to view the data is the next step:
dotnet-traceby default outputs.nettracefiles, which can be opened in PerfView or Visual Studio.dotnet-trace collect --format speedscopeoutputs.speedscopefiles, which can be opened in the Speedscope web app.dotnet-gcdumpoutputs.gcdumpfiles, which can be opened in PerfView or Visual Studio. Note that there is not currently a good option to open these files on macOS.
In the future, we hope to make profiling .NET MAUI applications easier in both future releases of the above .NET diagnostic tooling and Visual Studio.
Note
Note that the NativeAOT runtime does not have support fordotnet-trace and performance profiling. You can use the other supported runtimes for this, or use native profiling tools instead such as Xcode’s Instruments.See the profiling .NET MAUI wiki page for links to documentation on each platform or a profiling demo on YouTube for a full walkthrough.
Conclusion
.NET 9 introduces performance enhancements for .NET MAUI applications
through full trimming and NativeAOT. These features enable developers
to create more efficient and responsive applications by reducing
application size and improving startup times. By leveraging tools like
dotnet-trace and dotnet-gcdump, developers can gain insights into
their application’s performance.
For a full rundown on .NET MAUI trimming and NativeAOT, see the .NET Conf 2024 session on the topic.
The post .NET MAUI Performance Features in .NET 9 appeared first on .NET Blog.
]]>The post Building .NET AI apps with Chroma appeared first on .NET Blog.
]]>What is Chroma?
Chroma is an open-source database for your AI applications.
With support for storing embeddings, metadata filtering, vector search, full-text search, document storage, and multi-modal retrieval, you can use Chroma to power semantic search and Retrieval Augmented Generation (RAG) features in your app.
For more details, check out the Chroma website.
Get started with Chroma in your C# application
In this scenario, we’ll be using the ChromaDB.Client package to connect to a Chroma database and search for movies using vector search.
The easiest way to start is locally using the Chroma Docker image. You can also deploy an instance in Azure.
Note: the ChromaDB.Client is an open-source community-supported library.
Connect to the database
- Create a C# console application.
- Install the ChromaDB.Client NuGet package.
- Create a
ChromaClientwith configuration options.using ChromaDB.Client; var configOptions = new ChromaConfigurationOptions(uri: "http://localhost:8000/api/v1/"); using var httpClient = new HttpClient(); var client = new ChromaClient(configOptions, httpClient);
When using a hosted version of Chroma, replace the uri with your hosted endpoint.
Create a collection
Now that you have a client, create a collection to store movie data.
var collection = await client.GetOrCreateCollection("movies");To perform operations on that collection, you’ll then need to create a collection client.
var collectionClient = new ChromaCollectionClient(collection, configOptions, httpClient);Add data to your collection
Once your collection is created, it’s time to add data to it. The data we’re storing will consist of:
- Movie IDs
- Embeddings to represent the movie description.
- Metadata containing the movie title
| ID | Title | Embedding | Movie Description |
|---|---|---|---|
| 1 | The Lion King | [0.10022575, -0.23998135] | The Lion King is a classic Disney animated film that tells the story of a young lion named Simba who embarks on a journey to reclaim his throne as the king of the Pride Lands after the tragic death of his father. |
| 2 | Inception | [0.10327095, 0.2563685] | Inception is a mind-bending science fiction film directed by Christopher Nolan. It follows the story of Dom Cobb, a skilled thief who specializes in entering people’s dreams to steal their secrets. However, he is offered a final job that involves planting an idea into someone’s mind. |
| 3 | Toy Story | [0.095857024, -0.201278] | Toy Story is a groundbreaking animated film from Pixar. It follows the secret lives of toys when their owner, Andy, is not around. Woody and Buzz Lightyear are the main characters in this heartwarming tale. |
| 4 | Pulp Fiction | [0.106827796, 0.21676421] | Pulp Fiction is a crime film directed by Quentin Tarantino. It weaves together interconnected stories of mobsters, hitmen, and other colorful characters in a non-linear narrative filled with dark humor and violence. |
| 5 | Shrek | [0.09568083, -0.21177962] | Shrek is an animated comedy film that follows the adventures of Shrek, an ogre who embarks on a quest to rescue Princess Fiona from a dragon-guarded tower in order to get his swamp back. |
List<string> movieIds = ["1", "2", "3", "4", "5" ];

List<ReadOnlyMemory<float>> descriptionEmbeddings = [

    new [] { 0.10022575f, -0.23998135f },
    new [] { 0.10327095f, 0.2563685f },
    new [] { 0.095857024f, -0.201278f },
    new [] { 0.106827796f, 0.21676421f },
    new [] { 0.09568083f, -0.21177962f },
];

List<Dictionary<string,object>> metadata =
[
    new Dictionary<string, object> { ["Title"] = "The Lion King" },
    new Dictionary<string, object> { ["Title"] = "Inception"  },
    new Dictionary<string, object> { ["Title"] = "Toy Story"  },
    new Dictionary<string, object> { ["Title"] = "Pulp Fiction" },
    new Dictionary<string, object> { ["Title"] = "Shrek"  },
];

await collectionClient.Add(movieIds, descriptionEmbeddings, metadata);
Search for movies (using vector search)
Now that your data is in the database, you can query it. In this case, we’re using vector search.
| Text | Embedding |
|---|---|
| A family friendly movie | [0.12217915, -0.034832448] |
List<ReadOnlyMemory<float>> queryEmbedding = [new([0.12217915f, -0.034832448f])];

var queryResult = await collectionClient.Query(
    queryEmbeddings: queryEmbedding,
    nResults: 2,
    include: ChromaQueryInclude.Metadatas | ChromaQueryInclude.Distances);

foreach (var result in queryResult)
{
    foreach (var item in result)
    {
        Console.WriteLine($"Title: {(string)item.Metadata["Title"] ?? string.Empty} {(item.Distance)}");
    }
}
The result should look similar to the following output.
Title: Toy Story 0.028396977
Title: Shrek 0.032012463
Watch it live
Join Jiří Činčura on the .NET Data Community Standup on February 26 to learn more about how to use Chroma and the new C# SDK.
Conclusion
This latest addition enhances the growing AI ecosystem in .NET. It paves the way for a simpler implementation of the existing Semantic Kernel connector and seamless integration into your .NET apps using foundational components like Microsoft.Extensions.VectorData and Microsoft.Extensions.AI.
We’d like to thank @ssone95 for his work and contributions to the project. We’re excited to continue building partnerships and working with the community to enable .NET developers to build AI applications.
To learn how you can start building AI apps using databases like Chroma, check out the .NET AI documentation.
Try out the Chroma C# SDK today and provide feedback.
The post Building .NET AI apps with Chroma appeared first on .NET Blog.
]]>The post New Features for Enhanced Razor Productivity! appeared first on .NET Blog.
]]>Extract to Component
Extract to Component, available in Visual Studio 17.12, is a new refactoring that automates the process of creating a new Razor/Blazor component. Instead of manually creating a new file and copy/pasting the code you want to extract, selecting this feature will do that work for you by selecting the lightbulb refactoring (CTRL + .) after highlighting the code (or tag) you want to extract. This feature makes it easier to create reusable components, allowing for a cleaner and more manageable codebase.
In this first iteration of the feature, Extract to Component focuses on support for basic, mostly HTML-based extraction scenarios. However, we have plans to add additional improvements and more advanced scenarios (i.e. more consistent extractions involving variable dependencies, C#, parameters, etc.).
Roslyn C# Tokenizer
The C# tokenizer / lexer update brings significant improvements to how Razor handles C# code. Many users have expressed frustrations with not being able to use raw string literals and verbatim interpolated strings in Razor files, and the new Roslyn C# lexer fixes that! In addition to these string formats, the lexer also adds support for binary literals and improves the handling of C# preprocessor directives, ensuring they follow C# rules. Ultimately, the new lexer will also make it easier to support new C# language features going forward.


This new tokenizer is not on by default until .NET 10 but is available in both Visual Studio (17.13) and Visual Studio Code for .NET 9. To enable the C# tokenizer today, check the Use the C# tokenizer for Razor files in the IDE option under Tools > Options > Preview Features and add <Features>use-roslyn-tokenizer;$(Features)</Features> to a property group in your .csproj or directory.props file:

This new lexer does currently come with some breaking changes, particularly around preprocessor directives, so we encourage you to please share any related issues you may experience in the Razor Github repository.
Summary
These two updates, Extract to Component and the C# tokenizer, help enhance your Razor productivity. By adopting these features, you can ensure cleaner code, better language support, and an overall more efficient development process. However, there’s always room for improvement! To share your Razor feedback, submit issues in our Razor Github repo, the Developer Community, or check out this survey to share your Extract to Component feedback!
Finally, if you’d like to chat directly with the Razor team about our upcoming roadmap and how we’re addressing your issues, you can join our upcoming .NET Community Standup on February 18th!
The post New Features for Enhanced Razor Productivity! appeared first on .NET Blog.
]]>The post Announcing Generative AI for Beginners – .NET appeared first on .NET Blog.
]]> Generative AI for Beginners - .NET
Our focus in this course is code-first, to teach you what you need to know to be confident building .NET GenAI applications today.
What is this course about?
As generative AI becomes more accessible, it’s essential for developers to understand how to use it responsibly and effectively. To fill this need, we created a course that covers the basics of Generative AI for the .NET ecosystem, including how to set up your .NET environment, core techniques, practical samples, and responsible use of AI. You’ll learn how to create real-world .NET AI-based apps using a variety of libraries and tools including Microsoft Extensions for AI, GitHub Models and Codespaces, Semantic Kernel, Ollama, and more.
We’ve included several lessons and they all include:
- Short 5–10 minute videos explaining each concept.
- Fully functional .NET code samples ready to run and explore.
- Integration with GitHub Codespaces and GitHub Models for quick, convenient setup.
- Guidance on using GitHub Models and local models with Ollama for flexibility and privacy.
Lessons Overview
These lessons provide a guided roadmap, starting with core generative AI concepts for .NET developers and how to configure your environment to access AI models in the cloud or locally via Ollama. You’ll then explore techniques that go beyond text processing, such as assembling practical solutions with chatbots including adding video and real-time audio to chat. You’ll also learn about the world of AI Agents, or autonomous intelligent agents that act on the user’s behalf. Finally, you’ll learn about the importance of responsible AI use, ensuring your applications remain ethical and secure.
Here’s an example of the semantic search feature you’ll build:
And here’s what that real-time voice chat looks like:
Getting Started
All that’s required is some .NET experience and a desire to learn!
You can clone the repo and start working all locally.
Even better, we’ve done our best to reduce all of the friction from getting started! You can run everything in GitHub Codespaces and use GitHub Models to access the various LLMs we’ll use in the course – all for free.
Check out the course repository, and explore the lessons at your own pace.
Watch an overview on the .NET AI Community Standup
Check out the .NET AI Community Standup where we gave a sneak peek into the Generative AI for Beginners .NET course, showcasing how .NET developers can harness the power of Generative AI in real-world scenarios.
Contribute and Connect
Join us on GitHub, contributions are welcome! Submit issues, add new code samples, or create pull requests.
You can also join the Azure AI Community Discord to connect with other AI enthusiasts.
We look forward to seeing what you build with us! Get started right away and discover how simple it can be to bring AI into your .NET projects.
The post Announcing Generative AI for Beginners – .NET appeared first on .NET Blog.
]]>The post .NET and .NET Framework February 2025 servicing releases updates appeared first on .NET Blog.
]]>| .NET 8.0 | .NET 9.0 | |
|---|---|---|
| Release Notes | 8.0.13 | 9.0.2 |
| Installers and binaries | 8.0.13 | 9.0.2 |
| Container Images | images | images |
| Linux packages | 8.0.13 | 9.0.2 |
| Known Issues | 8.0 | 9.0 |
Release changelogs
- .NET MAUI: 9.0.40
- ASP.NET Core: 8.0.13 | 9.0.2
- Entity Framework Core: 8.0.13 | 9.0.2
- Runtime: 8.0.13 | 9.0.2
- SDK: 8.0.13 | 9.0.2
- Templating: 8.0.13 | 9.0.2
- Windows Forms: 8.0.13 | 9.0.2
- Windows Presentation Foundation (WPF): 8.0.13 | 9.0.2
Share feedback about this release in the Release feedback issue.
.NET Framework February 2025 Updates
This month, there are no new security and non-security updates. For recent .NET Framework servicing updates, be sure to browse our release notes for .NET Framework for more details.
See you next month
That’s it for this month, make sure you update to the latest service release today.
The post .NET and .NET Framework February 2025 servicing releases updates appeared first on .NET Blog.
]]>