
Gemma is a family of open models built from the same research and technology used to create the Gemini models. Gemma models are capable of performing a wide range of tasks, including text generation, code completion and generation, fine-tuning for specific tasks, and running on various devices.
Ray is an open-source framework for scaling AI and Python applications. Ray provides the infrastructure to perform distributed computing and parallel processing for your machine learning (ML) workflow.
By the end of this tutorial, you'll have a solid understanding of how to use Gemma Supervised tuning on Ray on Vertex AI to train and serve machine learning models efficiently and effectively.
You can explore the "Get started with Gemma on Ray on Vertex AI" tutorial notebook on GitHub to learn more about Gemma on Ray. All the code below is on this notebook to make your journey easier.
The following steps are required, regardless of your environment.
2. Make sure that billing is enabled for your project.
3. Enable APIs.
If you’re running this tutorial locally, you need to install the Cloud SDK.
This tutorial uses billable components of Google Cloud:
Learn about pricing, use the Pricing Calculator to generate a cost estimate based on your projected usage.
We’ll use the Extreme Summarization (XSum) dataset, which is a dataset about abstractive single-document summarization systems.
You have to create a storage bucket to store intermediate artifacts such as datasets.

Or with Google Cloud CLI
gsutil mb -l {REGION} -p {PROJECT_ID} {BUCKET_URI}

# for example: gsutil mb -l asia-northeast1 -p test-bebechien gs://test-bebechien-ray-bucket
To store the custom cluster image, create a Docker repository in the Artifact Registry.

Or with Google Cloud CLI
gcloud artifacts repositories create your-repo --repository-format=docker --location=your-region --description="Tutorial repository"
A TensorBoard instance is for tracking and monitoring your tuning jobs. You can create one from Experiments.
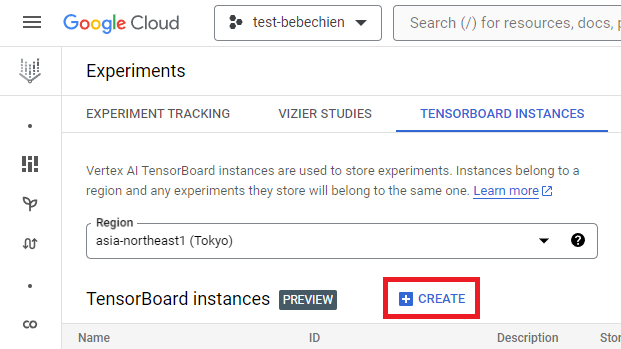
Or with Google Cloud CLI
gcloud ai tensorboards create --display-name your-tensorboard --project your-project --region your-region
To get started with Ray on Vertex AI, you can choose to either create a Dockerfile for a custom image from scratch or utilize one of the pre-built Ray base images. One such base image is available here.
First, prepare the requirements file that includes the dependencies your Ray application needs to run.
Then, create the Dockerfile for the custom image by leveraging one of the prebuilt Ray on Vertex AI base images.
Finally, build the Ray cluster custom image using Cloud Build.
gcloud builds submit --region=your-region
--tag=your-region-docker.pkg.dev/your-project/your-repo/train --machine-type=E2_HIGHCPU_32 ./dockerfile-path
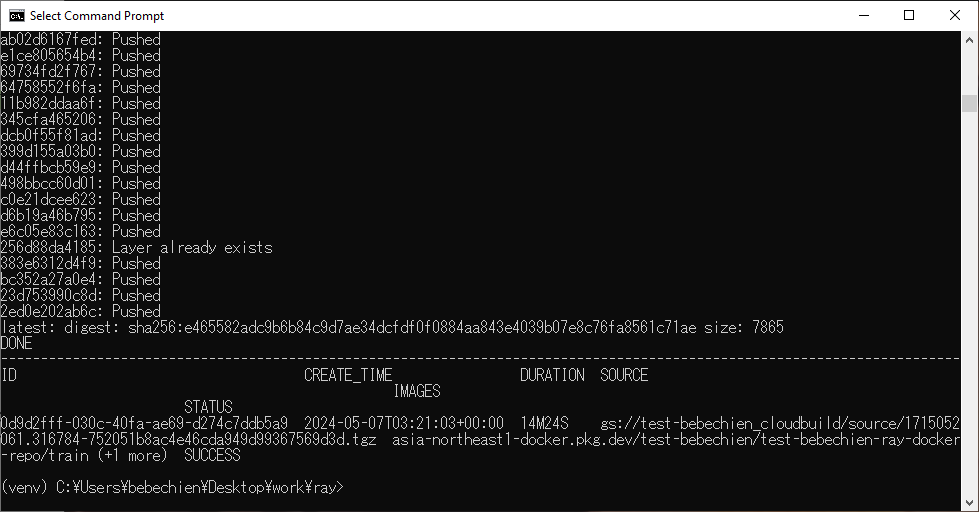
If everything goes well, you’ll see the custom image has been successfully pushed to your docker image repository.
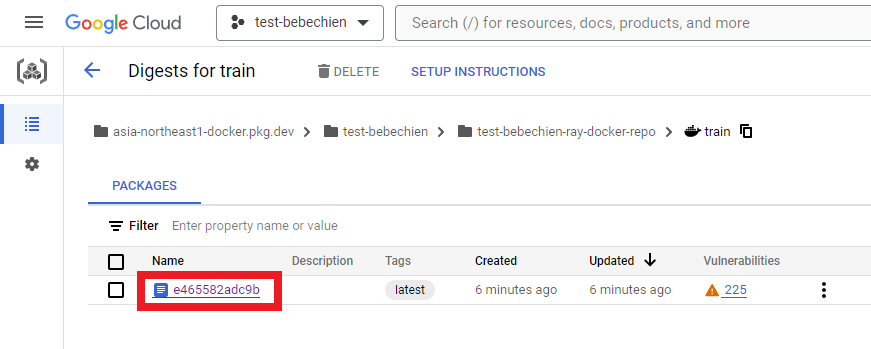
Also on your Artifact Registry
You can create the ray cluster from Ray on Vertex AI.
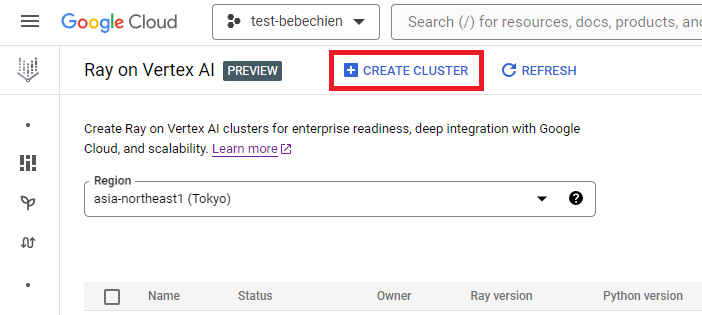
Or use the Vertex AI Python SDK to create a Ray cluster with a custom image and to customize the cluster configuration. To learn more about the cluster configuration, see the documentation.
Below is an example Python code to create the Ray cluster with the predefined custom configuration.
NOTE: Creating a cluster can take several minutes, depending on its configuration.
# Set up Ray on Vertex AI
import vertex_ray
from google.cloud import aiplatform as vertex_ai
from vertex_ray import NodeImages, Resources

# Retrieves an existing managed tensorboard given a tensorboard ID
tensorboard = vertex_ai.Tensorboard(your-tensorboard-id, project=your-project, location=your-region)

# Initialize the Vertex AI SDK for Python for your project
vertex_ai.init(project=your-project, location=your-region, staging_bucket=your-bucket-uri, experiment_tensorboard=tensorboard)


HEAD_NODE_TYPE = Resources(
    machine_type= "n1-standard-16",
    node_count=1,
)

WORKER_NODE_TYPES = [
    Resources(
        machine_type="n1-standard-16",
        node_count=1,
        accelerator_type="NVIDIA_TESLA_T4",
        accelerator_count=2,
    )
]

CUSTOM_IMAGES = NodeImages(
    head="your-region-docker.pkg.dev/your-project/your-repo/train",
    worker="your-region-docker.pkg.dev/your-project/your-repo/train",
)

ray_cluster_name = vertex_ray.create_ray_cluster(
    head_node_type=HEAD_NODE_TYPE,
    worker_node_types=WORKER_NODE_TYPES,
    custom_images=CUSTOM_IMAGES,
    cluster_name=”your-cluster-name”,
)
Now you can get the Ray cluster with get_ray_cluster(). Use list_ray_clusters() if you want to see all clusters associated with your project.
ray_clusters = vertex_ray.list_ray_clusters()
ray_cluster_resource_name = ray_clusters[-1].cluster_resource_name
ray_cluster = vertex_ray.get_ray_cluster(ray_cluster_resource_name)

print("Ray cluster on Vertex AI:", ray_cluster_resource_name)
To fine-tune Gemma with Ray on Vertex AI, you can use Ray Train for distributing HuggingFace Transformers with PyTorch training, as you can see below.
With Ray Train, you define a training function which contains your HuggingFace Transformers code for tuning Gemma that you want to distribute. Next, you define the scaling configuration to specify the desired number of workers and indicate whether the distributed training process requires GPUs. Additionally, you can define a runtime configuration to specify checkpointing and synchronization behaviors. Finally, you submit the fine-tuning by initiating a TorchTrainer and run it using its fit method.
In this tutorial, we’ll fine-tune Gemma 2B (gemma-2b-it) for summarizing newspaper articles using HuggingFace Transformer on Ray on Vertex AI. We wrote a simple Python trainer.py script and will submit it to the Ray cluster.
Let’s prepare the train script, below is an example Python script for initializing Gemma fine-tuning using HuggingFace TRL library.
Next, prepare the distributed training script. Below is an example Python script for executing the Ray distributed training job.
Now we submit the script to the Ray cluster using the Ray Jobs API via the Ray dashboard address. You can also find the dashboard address on the Cluster details page like below.

First, initiate the client to submit the job.
import ray
from ray.job_submission import JobSubmissionClient

client = JobSubmissionClient(
    address="vertex_ray://{}".format(ray_cluster.dashboard_address)
)
Let’s set some job configuration including model path, job id, prediction entrypoint, and more.
import random, string, datasets, transformers
from etils import epath
from huggingface_hub import login


# Initialize some libraries settings
login(token=”your-hf-token”)
datasets.disable_progress_bar()
transformers.set_seed(8)

train_experiment_name = “your-experiment-name”
train_submission_id = “your-submission-id”
train_entrypoint = f"python3 trainer.py --experiment-name={train_experiment_name} --logging-dir=”your-bucket-uri/logs” --num-workers=2 --use-gpu"
train_runtime_env = {
    "working_dir": "your-working-dir",
    "env_vars": {"HF_TOKEN": ”your-hf-token”, "TORCH_NCCL_ASYNC_ERROR_HANDLING": "3"},
}
Submit the job
train_job_id = client.submit_job(
    submission_id=train_submission_id,
    entrypoint=train_entrypoint,
    runtime_env=train_runtime_env,
)
Check the status of the job from the OSS dashboard.
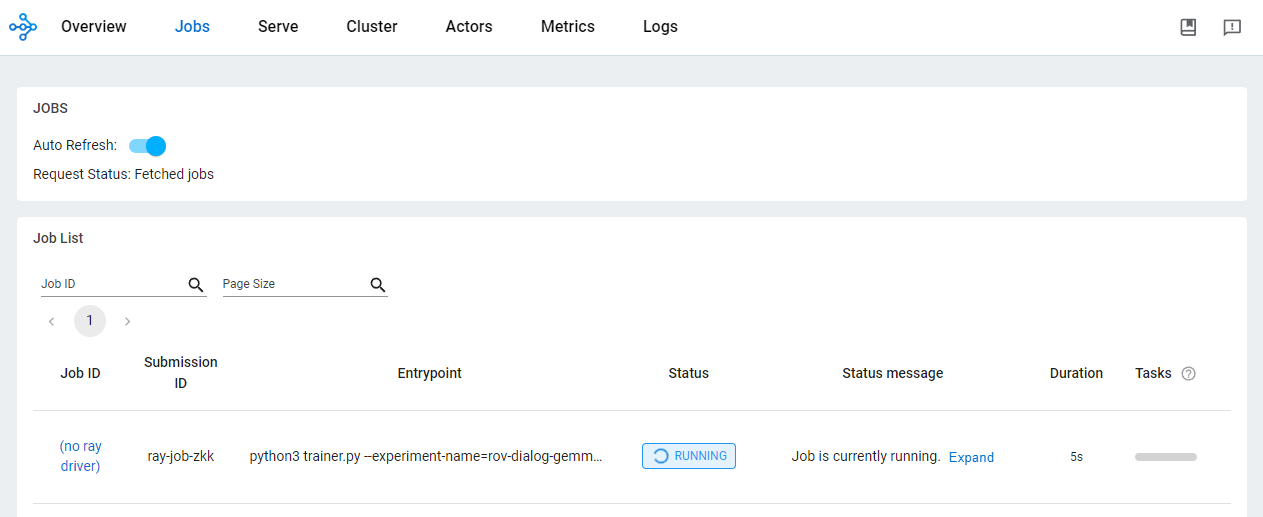
Using Ray on Vertex AI for developing AI/ML applications offers various benefits. In this scenario, you can use Cloud storage to conveniently store model checkpoints, metrics, and more. This allows you to quickly consume the model for AI/ML downstreaming tasks including monitoring the training process using Vertex AI TensorBoard or generating batch predictions using Ray Data.
While the Ray training job is running and after it has completed, you see the model artifacts in the Cloud Storage location with Google Cloud CLI.
gsutil ls -l your-bucket-uri/your-experiments/your-experiment-name
You can use Vertex AI TensorBoard for validating your training job by logging resulting metrics.
vertex_ai.upload_tb_log(
    tensorboard_id=tensorboard.name,
    tensorboard_experiment_name=train_experiment_name,
    logdir=./experiments,
)
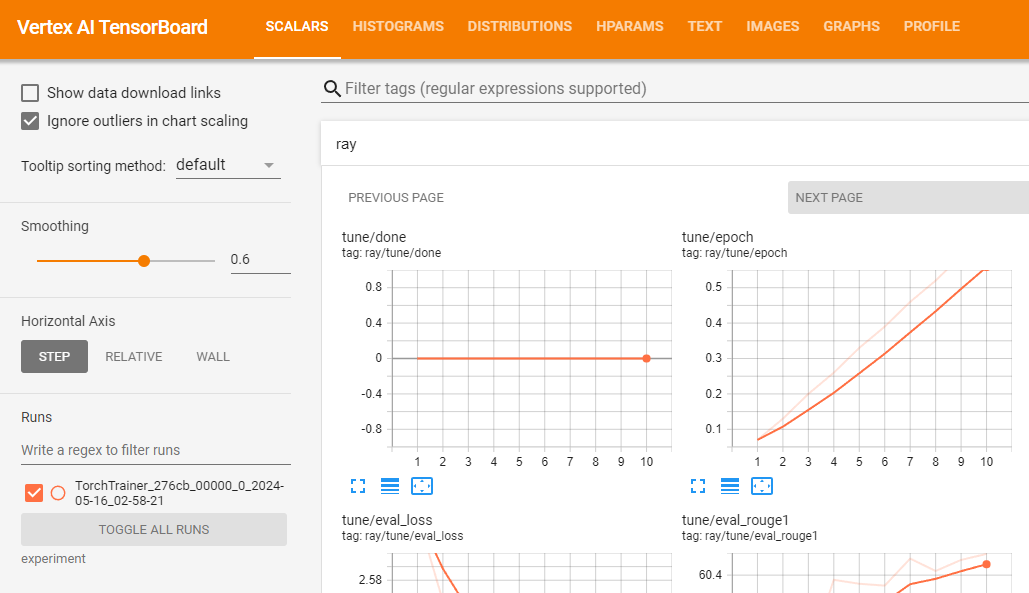
Assuming that your training runs successfully, you can generate predictions locally to validate the tuned model.
First, download all resulting checkpoints from Ray job with Google Cloud CLI.
# copy all artifacts
gsutil ls -l your-bucket-uri/your-experiments/your-experiment-name ./your-experiment-path
Use the ExperimentAnalysis method to retrieve the best checkpoint according to relevant metrics and mode.
import ray
from ray.tune import ExperimentAnalysis

experiment_analysis = ExperimentAnalysis(“./your-experiment-path”)
log_path = experiment_analysis.get_best_trial(metric="eval_rougeLsum", mode="max")
best_checkpoint = experiment_analysis.get_best_checkpoint(
    log_path, metric="eval_rougeLsum", mode="max"
)
Now you know which one is the best checkpoint. Below is an example output.

And load the fine-tuned model as described in the Hugging Face documentation.
Below is an example Python code to load the base model and merge the adapters into the base model so you can use the model like a normal transformers model. You can find the saved tuned model at tuned_model_path. For example, “tutorial/models/xsum-tuned-gemma-it”
import torch
from etils import epath
from transformers import AutoModelForCausalLM, AutoTokenizer
from peft import PeftModel

base_model_path = "google/gemma-2b-it"
peft_model_path = epath.Path(best_checkpoint.path) / "checkpoint"
tuned_model_path = models_path / "xsum-tuned-gemma-it"

tokenizer = AutoTokenizer.from_pretrained(base_model_path)
tokenizer.padding_side = "right"

base_model = AutoModelForCausalLM.from_pretrained(
    base_model_path, device_map="auto", torch_dtype=torch.float16
)
peft_model = PeftModel.from_pretrained(
    base_model,
    peft_model_path,
    device_map="auto",
    torch_dtype=torch.bfloat16,
    is_trainable=False,
)

tuned_model = peft_model.merge_and_unload()
tuned_model.save_pretrained(tuned_model_path)
Tidbit: Since you fine tuned a model, you can also publish it to the Hugging Face Hub by using this single line of code.
tuned_model.push_to_hub("my-awesome-model")
To generate summaries with the tuned model, let’s use the validation set of the tutorial dataset.
The following Python code example demonstrates how to sample one article from a dataset to summarize. It then generates the associated summary and prints both the reference summary from the dataset and the generated summary side by side.
import random, datasets
from transformers import pipeline

dataset = datasets.load_dataset(
    "xsum", split="validation", cache_dir=”./data”, trust_remote_code=True
)

sample = dataset.select([random.randint(0, len(dataset) - 1)])
document = sample["document"][0]
reference_summary = sample["summary"][0]

messages = [
    {
        "role": "user",
        "content": f"Summarize the following ARTICLE in one sentence.\n###ARTICLE: {document}",
    },
]

prompt = tokenizer.apply_chat_template(
    messages, tokenize=False, add_generation_prompt=True
)

tuned_gemma_pipeline = pipeline(
    "text-generation", model=tuned_model, tokenizer=tokenizer, max_new_tokens=50
)

generated_tuned_gemma_summary = tuned_gemma_pipeline(
    prompt, do_sample=True, temperature=0.1, add_special_tokens=True
)[0]["generated_text"][len(prompt) :]

print(f"Reference summary: {reference_summary}")
print("-" * 100)
print(f"Tuned generated summary: {generated_tuned_gemma_summary}")
Below is an example output from the tuned model. Note that the tuned result might require further refinement. To achieve optimal quality, it's necessary to iterate through the process several times, adjusting factors such as the learning rate and the number of training steps.

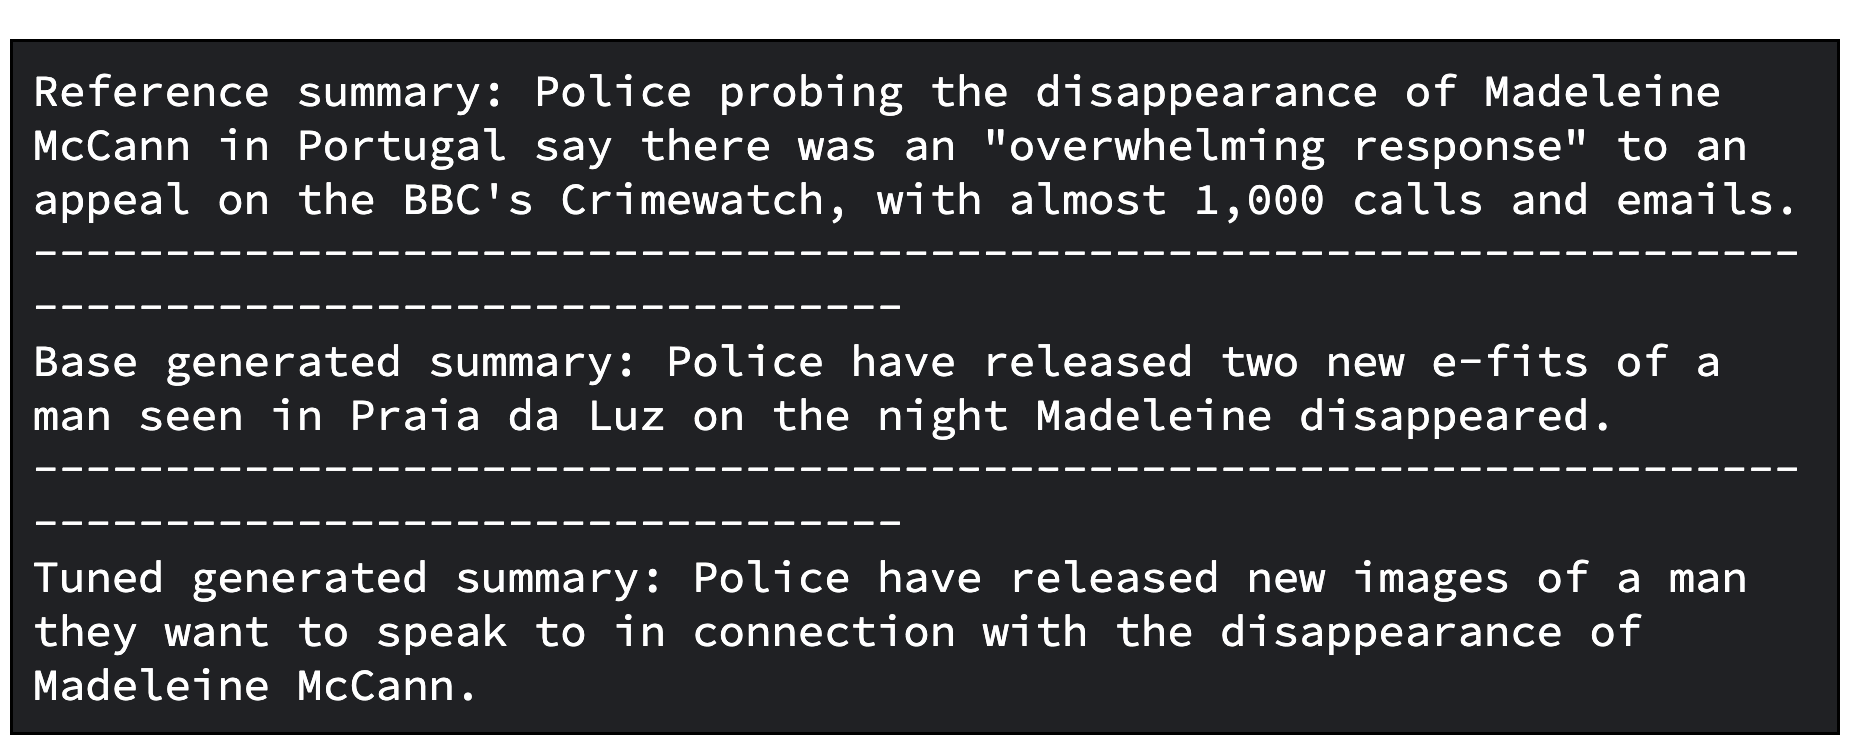
As an additional step, you can evaluate the tuned model. To evaluate the model you compare models qualitatively and quantitatively.
In one case, you compare responses generated by the base Gemma model with the ones generated by the tuned Gemma model. In the other case, you calculate ROUGE metrics and its improvements which gives you an idea of how well the tuned model is able to reproduce the reference summaries correctly with respect to the base model.
Below is a Python code to evaluate models by comparing generated summaries.
gemma_pipeline = pipeline(
    "text-generation", model=base_model, tokenizer=tokenizer, max_new_tokens=50
)

generated_gemma_summary = gemma_pipeline(
    prompt, do_sample=True, temperature=0.1, add_special_tokens=True
)[0]["generated_text"][len(prompt) :]

print(f"Reference summary: {reference_summary}")
print("-" * 100)
print(f"Base generated summary: {generated_gemma_summary}")
print("-" * 100)
print(f"Tuned generated summary: {generated_tuned_gemma_summary}")
Below is an example output from the base model and tuned model.
And below is a code to evaluate models by computing ROUGE metrics and its improvements.
import evaluate

rouge = evaluate.load("rouge")

gemma_results = rouge.compute(
    predictions=[generated_gemma_summary],
    references=[reference_summary],
    rouge_types=["rouge1", "rouge2", "rougeL", "rougeLsum"],
    use_aggregator=True,
    use_stemmer=True,
)

tuned_gemma_results = rouge.compute(
    predictions=[generated_tuned_gemma_summary],
    references=[reference_summary],
    rouge_types=["rouge1", "rouge2", "rougeL", "rougeLsum"],
    use_aggregator=True,
    use_stemmer=True,
)

improvements = {}
for rouge_metric, gemma_rouge in gemma_results.items():
    tuned_gemma_rouge = tuned_gemma_results[rouge_metric]
    if gemma_rouge != 0:
        improvement = ((tuned_gemma_rouge - gemma_rouge) / gemma_rouge) * 100
    else:
        improvement = None
    improvements[rouge_metric] = improvement

print("Base Gemma vs Tuned Gemma - ROUGE improvements")
for rouge_metric, improvement in improvements.items():
    print(f"{rouge_metric}: {improvement:.3f}%")
And the example output for the evaluation.

To generate offline predictions at scale with the tuned Gemma on Ray on Vertex AI, you can use Ray Data, a scalable data processing library for ML workloads.
Using Ray Data for generating offline predictions with Gemma, you need to define a Python class to load the tuned model in Hugging Face Pipeline. Then, depending on your data source and its format, you use Ray Data to perform distributed data reading and you use a Ray dataset method to apply the Python class for performing predictions in parallel to multiple batches of data.
To generate batch prediction with the tuned model using Ray Data on Vertex AI, you need a dataset to generate predictions and the tuned model stored in the Cloud bucket.
Then, you can leverage Ray Data which provides an easy-to-use API for offline batch inference.
First, upload the tuned model on the Cloud storage with Google Cloud CLI
gsutil -q cp -r “./models” “your-bucket-uri/models”
Prepare the batch prediction training script file for executing the Ray batch prediction job.
Again, you can initiate the client to submit the job like below with the Ray Jobs API via the Ray dashboard address.
import ray
from ray.job_submission import JobSubmissionClient

client = JobSubmissionClient(
    address="vertex_ray://{}".format(ray_cluster.dashboard_address)
)
Let’s set some job configuration including model path, job id, prediction entrypoint and more.
import random, string

batch_predict_submission_id = "your-batch-prediction-job"
tuned_model_uri_path = "/gcs/your-bucket-uri/models"
batch_predict_entrypoint = f"python3 batch_predictor.py --tuned_model_path={tuned_model_uri_path} --num_gpus=1 --output_dir=”your-bucket-uri/predictions”"
batch_predict_runtime_env = {
    "working_dir": "tutorial/src",
    "env_vars": {"HF_TOKEN": “your-hf-token”},
}
You can specify the number of GPUs to use with the "--num_gpus" argument. This should be a value that is equal to or less than the number of GPUs available in your Ray cluster.
And submit the job.
batch_predict_job_id = client.submit_job(
    submission_id=batch_predict_submission_id,
    entrypoint=batch_predict_entrypoint,
    runtime_env=batch_predict_runtime_env,
)
Let’s have a quick view of generated summaries using a Pandas DataFrame.
import io
import pandas as pd
from google.cloud import storage

def read_json_files(bucket_name, prefix=None):
    """Reads JSON files from a cloud storage bucket and returns a Pandas DataFrame"""

    # Set up storage client
    storage_client = storage.Client()
    bucket = storage_client.bucket(bucket_name)
    blobs = bucket.list_blobs(prefix=prefix)

    dfs = []

    for blob in blobs:
        if blob.name.endswith(".json"):
            file_bytes = blob.download_as_bytes()
            file_string = file_bytes.decode("utf-8")
            with io.StringIO(file_string) as json_file:
                df = pd.read_json(json_file, lines=True)
            dfs.append(df)

    return pd.concat(dfs, ignore_index=True)

predictions_df = read_json_files(prefix="predictions/", bucket_name=”your-bucket-uri”)
predictions_df = predictions_df[
    ["id", "document", "prompt", "summary", "generated_summary"]
]
predictions_df.head()
And below is an example output. The default number of articles to summarize is 20. You can specify the number with the “--sample_size” argument.

Now you have learned many things including:
We hope that this tutorial has been enlightening and provided you with valuable insights.
Consider joining the Google Developer Community Discord server. It offers an opportunity to share your projects, connect with other developers, and engage in collaborative discussions.
And don’t forget to clean up all Google Cloud resources used in this project. You can simply delete the Google Cloud project that you used for the tutorial. Otherwise, you can delete the individual resources that you created.
# Delete tensorboard
tensorboard_list = vertex_ai.Tensorboard.list()
for tensorboard in tensorboard_list:
    tensorboard.delete()

# Delete experiments
experiment_list = vertex_ai.Experiment.list()
for experiment in experiment_list:
    experiment.delete()

# Delete ray on vertex cluster
ray_cluster_list = vertex_ray.list_ray_clusters()
for ray_cluster in ray_cluster_list:
    vertex_ray.delete_ray_cluster(ray_cluster.cluster_resource_name)
# Delete artifacts repo
gcloud artifacts repositories delete “your-repo” -q

# Delete Cloud Storage objects that were created
gsutil -q -m rm -r “your-bucker-uri”
Thanks for reading!